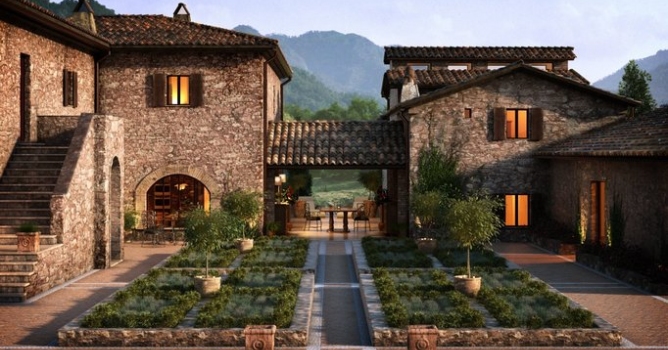
This exterior scene was made in 3ds Max and V-Ray by Evermotion. It is scene 6 from Archexteriors vol. 25. You can purchase this single scene or entire Archexteriors vol. 25 collection in Evermotion Shop. This scene is inspired by Villa in Castello di Reschio, Italy.
Click on image to enlarge 
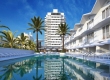
Final image after post-production. We used various stone materials. The main light source is Vray Sun / Sky. But we also placed many Vray lights and spot lights to enhance the details.
Click on image to enlarge 
Wireframe view. You can see that we used displacement maps on the walls and pavement.
Click on image to enlarge 
3ds Max viewport. View from camera.
Click on image to enlarge 
Background plane is very big compared to the model (small box above the water).
Click on image to enlarge 
Background plane material.
Click on image to enlarge 
Isometric view of the scene and Vray camera settings.
Click on image to enlarge 
Click on image to enlarge 
Click on image to enlarge 
Vray lights everywhere :) Spot lights were used to enhance details of building elements and plants. There are also lights inside the building that make it look more warm and cosy place.
Click on image to enlarge 
Spot lights in the bowls.
Click on image to enlarge 
Vray light lister with lights settings.
Click on image to enlarge 
The stone pavement is quite simple plane, bended on the right side. It was displaced with VrayDisplacement map.
Click on image to enlarge 
Pavement VrayDisplacement map settings.
Click on image to enlarge 
Pavement material. we used variations of displacement map in bump, glossiness and diffuse slots.
Click on image to enlarge 
Pavement material, Vray Dirt settings.
Click on image to enlarge 
Pavement material, second Vray Dirt settings.
Click on image to enlarge 
Pavement material, glossiness composite map settings.
Click on image to enlarge 
Click on image to enlarge 
Click on image to enlarge 
Click on image to enlarge 
Click on image to enlarge 
Sand material is quite simple. It is not visible in the scene, because it is covered by grass and plants.
Click on image to enlarge 
Stone framing - notice the imperfections - we moved some vertices to make it more believable.
Click on image to enlarge 
Click on image to enlarge 
Stone framing material, continued.
Click on image to enlarge 
Stone material, continued.
Click on image to enlarge 
Roof was made by hand from single elements. They were collapsed into editable poly.
Click on image to enlarge 
Click on image to enlarge 
Roof material, continued.
Click on image to enlarge 
Part of the wall of the building. It was displaced by VrayDisplacementMod
Click on image to enlarge 
Click on image to enlarge 
Click on image to enlarge 
Wall material, continued.
Click on image to enlarge 
Wall material, continued.
Click on image to enlarge 
We placed furniture in rooms that are visible from the camera.
Click on image to enlarge 
Table and chairs in the middle of the scene.
Click on image to enlarge 
Click on image to enlarge 
Raw render without post-production.
Click on image to enlarge 
Photoshop stack. Except subtle color balancing and vignetting there were not many changes. We put desaturated version of the scene on the second layer and mixed is in linear dodge mode, 23% opacity. Then we added Vray Lighting and Vray reflection (screen, 50%). We used two color balance layers. The lower is only for the background (more yellow, to better match the model), the second color balance layer is very subtle yellow tint for all scene elements.
Click on image to enlarge
Final image after post-production. Thanks for reading! :)


 Customer zone
 Your orders
 Edit account
 Add project
 Liked projects
 View your artist profile
COMMENTS