Evermotion: More Than an Asset Library
How Evermotion became a full-scale production partner for archviz, automotive and synthetic data.


Total: € 0

Modeling & texturing
I want to thank also to Joris Nivelle, our former colleague of Indabox Studio, who introduced me to the works of this genius architect Richard Rogers.
First, we have collected a lot of information and pictures of the interior (searching Google images). My former interns, Jonathan Stourm and Kevin Ketfi worked on the modeling. They started with Sketchup.
Click on images to see them in full resolution!

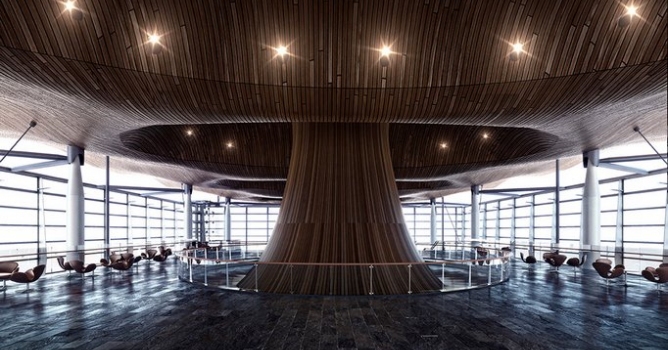
Complex parts like the roof, the funnel and the furniture were modeled in 3ds Max.


To include some a randomness to the texture we followed a method that I've learned by watching Alex Roman tutorial:

For texturing, we use always the same methods: fresnel enabled, diffuse map, bump, reflection, and blurred reflection glossiness map.
Roof shape
The roof area is 3200 square meters, it is divided into 6 modules. It was crucial to create the organic shape of the roof, because it was out of the question to model each plank and make it random without programming and an overkilling the computer.

Finally we opted for Low-Poly modelisation, few symmetries and displacement.
 The texture of the roof was the most technical part. We wanted to prepare a high quality texture with random look. Same for displacement...
To be honest we did not have any ready solutions! I found the solution by reading a tutorial of Bertrand Benoit, "Use of multitexture" by Jerry Ylilammi and FloorGenerator.
The last version of FloorGenerator includes a new randomizer by BerconTile! This option allows ultimate combination of the Multitexture with the power of the procedural BerconTile.
We import our high quality textures of wooden planks in the Multitexture map.

For a better quality rendering opt for the filter Summed Area or decrease the blur. For better results sometimes it is worthy to play with Color Adjustment.
Now we can connect our MultiTexture with BerconTile.
Multitexture is Channel 1, we assign it to color slot in Channel 1 and we put BerconTile map in Channel 2. Don't forget to assign UVWmap to channel 2 for the roof. Then we chose a tile pattern similar to real roof.
 Magic!
Procedural Gradient + procedural BerconTile with randomness and flip of 180 degrees.
Floor, metal, glass
We model the floor tiles with the great plugin FloorGenerator and texture with Multitexture.
Glass: Fresnel ior 1.5, noise in the bump and Exit Color bottle green, "reflect back side" is activated.

Multitexture randomized by ID material+FloorGenerator.
The metal has an anisotropy with a 64 subdivisions with interpolation.
Interior model.
Lighting & rendering
We prefer Vray for its' speed and optimized engine. As the project has large opening to the outside, we use Vray Sun + VraySky + few VrayLight to lite the interior.


Vray Sun+VraySky + VrayLight
Rendering: output 2800*3500px : LWF + Irr + Lc
Post-production
That's the magic part ;)


LEAVE A COMMENT


|

|

|

|

|
 Customer zone
 Your orders
 Edit account
 Add project
 Liked projects
 View your artist profile
COMMENTS