How To Make Your CGI Walls More Realistic
Realistic walls with noise modifier.
Total: € 0
Continue Shopping
In accordance with the art. 13 section 1 and 2 of the European Parliament and Council Regulation 2016/679 of the 27th April, 2016 on the protection of natural persons, with regard to the processing of personal data and on the free movement of such data, and repealing Directive 95/46/EC (General Data Protection Regulation), hereafter RODO, I hereby inform that:
1. EVERMOTION S.C., 8 Przędzalniana Str., 15-688 Białystok, Poland is the Administrator of your Personal Data (APD)
2. Data Protection Inspector can be reached through e-mail: iod@evermotion.org
3. Your personal data are to be processed on the basis of art. 6 section 1 letter a, b and f of RODO in order to:
a) prepare, conclude and execute the agreement and for other purposes approved by you,
b) to execute the legitimate interest like marketing of products and the agreement, claim assertion or defence against claims resulting from the law regulations.
4. Entities entitled to the reception of your personal data may be the authorised public bodies; mail providers; providers of the services covered by the agreement; responsible for debt recovery, keeping the archives, document utilization, legal consulting, technical services, IT services and accountancy.
5. Your personal data shall not be transferred to the third country, nor to the international bodies.
6. Your personal data shall be processed within the period of the agreement and upon your additional consent until you withdraw it. APD shall keep the data for the period of any civil law claim execution connected with the agreement.
7. You have the right to demand an access to your personal data, to correct or to delete the data if there is no other basis for the processing or any other purpose of such processing or to limit the processing of the data, to transfer the data to another administrator and to raise objections to the further data processing if there is no legal basis for further processing and to withdraw any previous consent.
8. You provide the personal data voluntarily, however they are necessary to conclude the agreement. The refusal of providing such data may result in the refusal of the agreement conclusion.
9. You have the right to lodge a complaint to the Personal Data Protection Office when in your opinion the data processing violates the regulations of General Data Protection Regulation of the 27 April, 2016 (RODO).
10. Your data will be automatically processed, including the form of profiling.
11. You are obligated to forward above mentioned information to your representative, especially if you appointed this person in the agreement as the contact person or as the representative for the agreement execution.
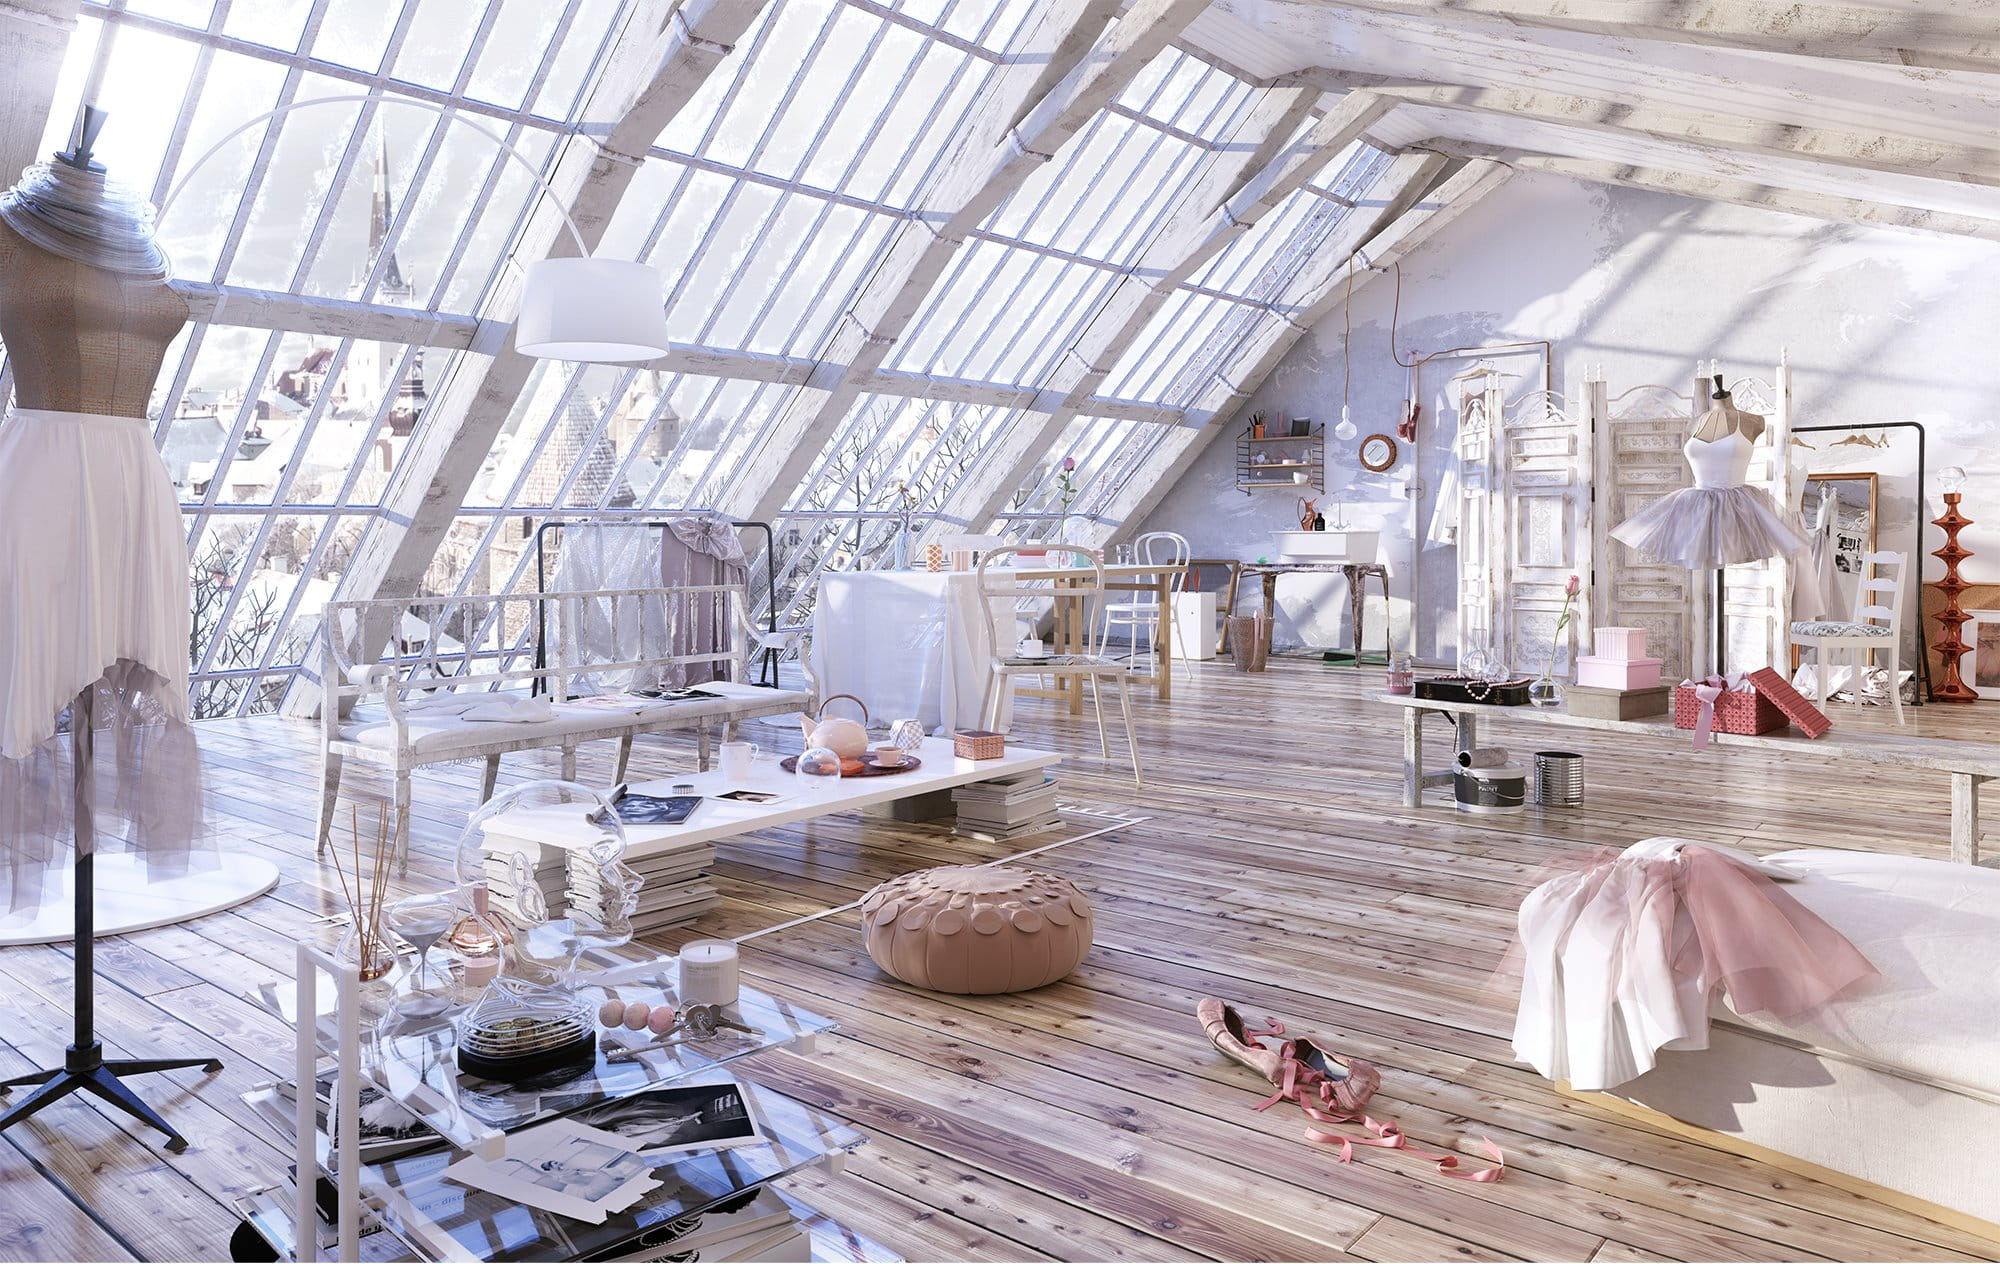

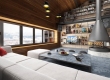
"Ballerina Loft" took second place in Evermotion Challenge 2015. That's what our jury said about this maginificent visualization:
The idea of your loft is very interesting (...) I like the feminin touch though and a huge plus is that there is no intrusive postproduction. Good light balance and models! Keep it up! Cheers! - Michał Horba.
Very solid work, good lighting, many details, great quality - Kuba Dąbrowski.
Outstanding work with innovative approach to the loft theme. Charming picture with its unique mood created by the snowy winter outside, a pleasant mild light and pastel colours of the room. Tells a lot about a person who lives in there. The author at the same time presents wide variety of technical skills: hard and organic modeling, cloths, shading and texturing with attention to details. Well done! - Barbara Witkowska.
Definitely my favorite work! This is not simply beautiful, and technically stunning. The concept is fully respected and the colors are perfectly managed. This is Magic! - Ciro Sannino.
What to say about this wonderful kind of piece of art. Clear winner for me. From the comp to the magnificient colour palette going through a absolutely peaceful sense of lighting. Simply beautiful. - Alex Roman.
Looking for references and inspiration I found an article on an interior design blog (HOW TO LIVE IN THE SKY by DECOsash) which completely captured my imagination:
Click on image to enlarge
Modeling:
Click on image to enlarge
First I modelled the structure I had seen in the picture, trying to guess the dimensions and using a biped as a helper to keep it all in scale. I exaggerated the numer of windows as my personal intervention to give it a wider feel and make it look more sophisticated.
Click on image to enlarge
Next, I detailed the objects in the scene one by one, starting with the objects closest to the camera. Meanwhile, I kept changing the HDRI and sun intensity and position looking for the best lighting and shadows that would give more 'charm' to the scene.
Click on image to enlarge
More modelling examples for different objects in the scene.
Click on image to enlarge
I modelled 2 different pairs of pumps, the ones for the close-up and the others hanging above the door in the far plane of the image.
Click on image to enlarge
Click on image to enlarge
Click on image to enlarge
Cloth simulation with Marvelous Designer:
Click on image to enlarge
I used Marvelous Designer for creating the cloth simulations and, although I have used this software many times before, making dresses and skirts was a new experience for me. It was really fun but equally challenging because in real life I'm not capable of sewing :)
Click on image to enlarge
Click on image to enlarge
Click on image to enlarge
Lighting:
Lighting was the most engaging and challenging aspect. I changed it dozens of times over the course of the project trying lots of different HDRI images, sun positions and settings until I had a result that I was satisfied with.
Click on image to enlarge
Click on image to enlarge
Lighting setup 2
For the final lighting set-up I only used the sun visible directly, the HDRI for the environment and the artificial lights for the lamps.
Click on image to enlarge
I used the image I choose for the outside view only on visibility override but the reflections and refractions came from the HDRI and direct light from the sun.
Click on image to enlarge
Materials:
Because I used Corona as my rendering engine, I needed to learn a lot about materials while experimenting with my image. I had a lot of support from the Corona comunity so I would like to thank everybody contributing to the website https://coronamaterials.com/.
Click on image to enlarge
Click on image to enlarge
Click on image to enlarge
Another example of a simple Corona material:
Click on image to enlarge
Click on image to enlarge
Click on image to enlarge
Another challenging issue for me during this project was to create the windows that looked realistic so I had many trial and error attempts to obtain the frosted window effect.
Click on image to enlarge
Rendering:
I used a V-ray camera for the scene because I was already familiar with it and I prefer it to the basic camera because it has the tilt shift option which I find very useful. However, the main rendering settings in Corona are controlled from the render dialog, so I experimented with the DOF enabled and also disabled and also played with the photographic settings.
Click on image to enlarge
Click on image to enlarge
Post production:
Post was the simplest part. Usually I save the image as .exr to have more flexibility in adjusting the exposure and balance.
Click on image to enlarge
Click on image to enlarge
Click on image to enlarge
Click on image to enlarge
At the end I added a touch of Knoll Light Factory filter just to point out how blinding the wintery light can be (top left corner).
Hope you find this useful! Thank you!
Visit Elena Nedelcu / EVNvis Studio Facebook Page.


LEAVE A COMMENT


|

|

|

|

|
 Customer zone
 Your special offers
 Your orders
 Edit account
 Add project
 Liked projects
 View your artist profile
COMMENTS