How To Make Your CGI Walls More Realistic
Realistic walls with noise modifier.
Total: € 0
Continue Shopping
In accordance with the art. 13 section 1 and 2 of the European Parliament and Council Regulation 2016/679 of the 27th April, 2016 on the protection of natural persons, with regard to the processing of personal data and on the free movement of such data, and repealing Directive 95/46/EC (General Data Protection Regulation), hereafter RODO, I hereby inform that:
1. EVERMOTION S.C., 8 Przędzalniana Str., 15-688 Białystok, Poland is the Administrator of your Personal Data (APD)
2. Data Protection Inspector can be reached through e-mail: iod@evermotion.org
3. Your personal data are to be processed on the basis of art. 6 section 1 letter a, b and f of RODO in order to:
a) prepare, conclude and execute the agreement and for other purposes approved by you,
b) to execute the legitimate interest like marketing of products and the agreement, claim assertion or defence against claims resulting from the law regulations.
4. Entities entitled to the reception of your personal data may be the authorised public bodies; mail providers; providers of the services covered by the agreement; responsible for debt recovery, keeping the archives, document utilization, legal consulting, technical services, IT services and accountancy.
5. Your personal data shall not be transferred to the third country, nor to the international bodies.
6. Your personal data shall be processed within the period of the agreement and upon your additional consent until you withdraw it. APD shall keep the data for the period of any civil law claim execution connected with the agreement.
7. You have the right to demand an access to your personal data, to correct or to delete the data if there is no other basis for the processing or any other purpose of such processing or to limit the processing of the data, to transfer the data to another administrator and to raise objections to the further data processing if there is no legal basis for further processing and to withdraw any previous consent.
8. You provide the personal data voluntarily, however they are necessary to conclude the agreement. The refusal of providing such data may result in the refusal of the agreement conclusion.
9. You have the right to lodge a complaint to the Personal Data Protection Office when in your opinion the data processing violates the regulations of General Data Protection Regulation of the 27 April, 2016 (RODO).
10. Your data will be automatically processed, including the form of profiling.
11. You are obligated to forward above mentioned information to your representative, especially if you appointed this person in the agreement as the contact person or as the representative for the agreement execution.

Hello Everyone,
Firstly, I would like to congratulate all of the participants as well as the winners! In addition, a big "thank you" to the judges and the Evermotion team for their hard work! It was really good to see those many different approaches and creative ideas, and I hope to see the same high standard next year.
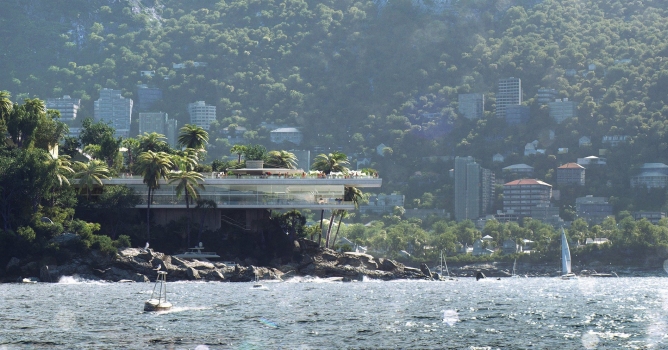
This short tutorial is going to show you the main steps in creating the image called "Caribbean Tongue".
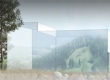
References, sketching and brainstorming:
I would like to talk about this phase a little bit more and I will try not to bore you guys. I want to share with you some thoughts that I have had in my head for a while. Maybe some of you will not agree with me...
Lots of people ask me what my "trick" is.
And most people think that the magic is in the settings or in Photoshop. That's not true! The magic is in your head...
I think everybody has it - it's just that they don't know it or simply that they do not understand it yet.
The secret is not in the shaders or in the HDRI setup, not even in the settings. For all of these things you can find tons of tutorials on the internet and you can learn easily. Honestly, I have no idea how to set-up an HDRI sky. Really! What is important is more like a right and a honest concept that portrays your project in the best way. A building of itself is nothing... It's surrounded by other buildings, people, nature and climate... if you take care of these things, people are going to believe that what they see in your image. It can produce feelings and emotions as well. Because it feels natural!
I'm quite new to the industry. I don't have 10 years experience, not even 5, so maybe I'm wrong but I have a theory. Today's arch-viz is more about making 3d scenes and not making images. People get lost in unnecessary details...
I think the key to making good images is searching, experimenting and sketching! A good composition is worth more than the rendering of a good looking grass :).
Click on image to enlarge 
Click on image to enlarge 
Click on image to enlarge 
Click on image to enlarge 
Click on image to enlarge 
Click on image to enlarge 
Click on image to enlarge 
Click on image to enlarge 
Click on image to enlarge 
Click on image to enlarge 
Click on image to enlarge 
Click on image to enlarge 
Click on image to enlarge 
Click on image to enlarge 
Click on image to enlarge 
Click on image to enlarge 
Click on image to enlarge 
Post-production breakdown:
Thanks for reading and I hope you found some useful tips in it!
Best,
Tamas


LEAVE A COMMENT


|

|

|

|

|
 Customer zone
 Your special offers
 Your orders
 Edit account
 Add project
 Liked projects
 View your artist profile
COMMENTS