How To Make Your CGI Walls More Realistic
Realistic walls with noise modifier.
Total: € 0
Continue Shopping
In accordance with the art. 13 section 1 and 2 of the European Parliament and Council Regulation 2016/679 of the 27th April, 2016 on the protection of natural persons, with regard to the processing of personal data and on the free movement of such data, and repealing Directive 95/46/EC (General Data Protection Regulation), hereafter RODO, I hereby inform that:
1. EVERMOTION S.C., 8 Przędzalniana Str., 15-688 Białystok, Poland is the Administrator of your Personal Data (APD)
2. Data Protection Inspector can be reached through e-mail: iod@evermotion.org
3. Your personal data are to be processed on the basis of art. 6 section 1 letter a, b and f of RODO in order to:
a) prepare, conclude and execute the agreement and for other purposes approved by you,
b) to execute the legitimate interest like marketing of products and the agreement, claim assertion or defence against claims resulting from the law regulations.
4. Entities entitled to the reception of your personal data may be the authorised public bodies; mail providers; providers of the services covered by the agreement; responsible for debt recovery, keeping the archives, document utilization, legal consulting, technical services, IT services and accountancy.
5. Your personal data shall not be transferred to the third country, nor to the international bodies.
6. Your personal data shall be processed within the period of the agreement and upon your additional consent until you withdraw it. APD shall keep the data for the period of any civil law claim execution connected with the agreement.
7. You have the right to demand an access to your personal data, to correct or to delete the data if there is no other basis for the processing or any other purpose of such processing or to limit the processing of the data, to transfer the data to another administrator and to raise objections to the further data processing if there is no legal basis for further processing and to withdraw any previous consent.
8. You provide the personal data voluntarily, however they are necessary to conclude the agreement. The refusal of providing such data may result in the refusal of the agreement conclusion.
9. You have the right to lodge a complaint to the Personal Data Protection Office when in your opinion the data processing violates the regulations of General Data Protection Regulation of the 27 April, 2016 (RODO).
10. Your data will be automatically processed, including the form of profiling.
11. You are obligated to forward above mentioned information to your representative, especially if you appointed this person in the agreement as the contact person or as the representative for the agreement execution.
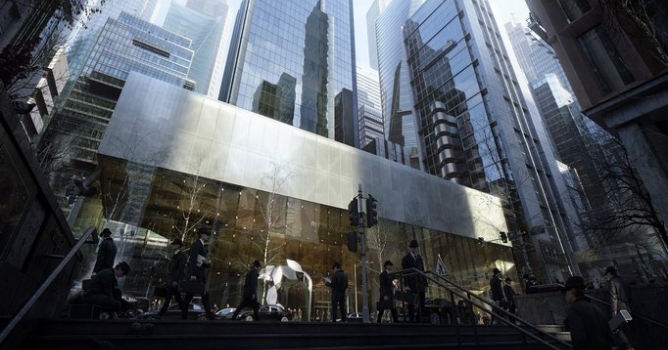

Hi Everyone! I wish to thank Evermotion again for this invitation to share a short tutorial about my latest image on the site. Named "Cloned to be different". (This work was awarded with Evermotion Editors' Choice Award - editors notice).
Click on image to enlarge 
This project was created in cooperation with one of my best friends who wanted to taste into the world of archviz during his visit at mine place. Instead of giving him a boring introduction about the program tools I managed to involve him actively in certain parts of the creation process such as brainstorming, creating graphical elements and being the clip-art model.
REFERENCES
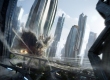
As a first phase we spent a week researching references and detailing the idea. I always put a great emphasis on this part. Visual, concept and mood references were equally important in order to begin working on our scene. The idea was to catch a special morning mood in a near future metropolis where many similar (cloned) people live their life. We wanted to picture this very unnatural state in a way which still feels real and a kind of natural. Illustrating this contradiction needed quite a bit of input.
Click on image to enlarge 
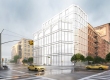
Lighting and camera setup
The modelling part can not be stated without a good setting. This is the core, the foundation of the whole image which includes the light and shadow balances, the proportions, weights and the camera angle. It is essential to draw the surrounding building boxes too. They wont be seen in our scene directly but they determine the intensity and shape of the lights, shadows and reflections for us. To achieve the desired composition and balance I had to play around with those boxes, changing their positions and dimensions consistently.
Click on image to enlarge 
Click on image to enlarge 
Modeling
I assume most of you guys already know how to model so I wouldn't waste much time on explaining that. As you can see only the basic modelling tools were used to create all skycrapers and everything else. This can be done without any special virtuosity. However to enrich this tutorial with some technical notes I show you what method I used for the skycrapers.
Click on image to enlarge 
Click on image to enlarge 
Click on image to enlarge 
Click on image to enlarge 
Click on image to enlarge 
Materials
Here are some basic materials that I used in the scene.
Click on image to enlarge 
Click on image to enlarge 
Click on image to enlarge 
Click on image to enlarge 
Click on image to enlarge 
Click on image to enlarge 
Click on image to enlarge 
Post production
The other half of the job was done in Photoshop. This means freely manipulating every bits of the image to achieve the result I imagined initially. For this process I normally use tons of adjustments such as curves, levels, colour-balance and hue-saturation. Glow, smoke, fog, mist also helps to create atmosphere. Placing the clip art into correct context gave me a hard time but playing around with these agent looking clones were definitely a fun part of the creation.
Click on image to enlarge
Click on image to enlarge 
Click on image to enlarge 
Click on image to enlarge 
I hope you find this short "making of" useful and inspiring. You can also comment "Cloned to be Different" thread on Evermotion Forum.
Best, Tomi.


LEAVE A COMMENT


|

|

|

|

|
 Customer zone
 Your special offers
 Your orders
 Edit account
 Add project
 Liked projects
 View your artist profile
COMMENTS