Removing LUTs from Textures for better results
Remove the LUT from a specific texture in order to get perfect looking textures in your render.

Total: € 0
Continue Shopping
In accordance with the art. 13 section 1 and 2 of the European Parliament and Council Regulation 2016/679 of the 27th April, 2016 on the protection of natural persons, with regard to the processing of personal data and on the free movement of such data, and repealing Directive 95/46/EC (General Data Protection Regulation), hereafter RODO, I hereby inform that:
1. EVERMOTION S.C., 8 Przędzalniana Str., 15-688 Białystok, Poland is the Administrator of your Personal Data (APD)
2. Data Protection Inspector can be reached through e-mail: iod@evermotion.org
3. Your personal data are to be processed on the basis of art. 6 section 1 letter a, b and f of RODO in order to:
a) prepare, conclude and execute the agreement and for other purposes approved by you,
b) to execute the legitimate interest like marketing of products and the agreement, claim assertion or defence against claims resulting from the law regulations.
4. Entities entitled to the reception of your personal data may be the authorised public bodies; mail providers; providers of the services covered by the agreement; responsible for debt recovery, keeping the archives, document utilization, legal consulting, technical services, IT services and accountancy.
5. Your personal data shall not be transferred to the third country, nor to the international bodies.
6. Your personal data shall be processed within the period of the agreement and upon your additional consent until you withdraw it. APD shall keep the data for the period of any civil law claim execution connected with the agreement.
7. You have the right to demand an access to your personal data, to correct or to delete the data if there is no other basis for the processing or any other purpose of such processing or to limit the processing of the data, to transfer the data to another administrator and to raise objections to the further data processing if there is no legal basis for further processing and to withdraw any previous consent.
8. You provide the personal data voluntarily, however they are necessary to conclude the agreement. The refusal of providing such data may result in the refusal of the agreement conclusion.
9. You have the right to lodge a complaint to the Personal Data Protection Office when in your opinion the data processing violates the regulations of General Data Protection Regulation of the 27 April, 2016 (RODO).
10. Your data will be automatically processed, including the form of profiling.
11. You are obligated to forward above mentioned information to your representative, especially if you appointed this person in the agreement as the contact person or as the representative for the agreement execution.


Francesco Legrenzi, the author of what would go on to be the definitive guide for V-Ray back in 2008 has spent the last 4 years dedicating himself to writing a similar guide for Corona Renderer, with the aim of making it just as definitive. More than a guide, it is a technical manual in which ALL the Corona Renderer parameters are explained. You can get "Corona - The Complete Guide" here! And below we are sharing some excerpts from the book - the chapters about Corona Shadows, Corona Sun and Corona Sky.
CORONA SHADOWS
3ds Max includes a series of light sources: Spot, Direcct, Omni, and Photometric. However, it’s advised to use Corona Light for better compatibility and speed (e.g. 3ds Max Standard lights cannot manage visibiility and occlusion). Select CoronaShadows to correctly display the shadows of the 3ds Max lights, otherwise Corona will not emit any light and the light sources will be ignored.

The modified parameters for the current render are highlighted in green. Read the online help for further information on 3ds Max Standard lights.
This image shows two problems. First, the 3ds Max light has no physical source: to solve this problem create an object with a self-illuminating material. Second, the 3ds Max light produces sharp shadows, as the Use area (soft) shadows option in the Corona Shadows rollout is not enabled yet.
Use area (soft) shadows - enable this parameter for generating soft shadows (areashadows).
Area radius - defines the softness of the shadows. Thhe higher the value, the more blurred the shadows.
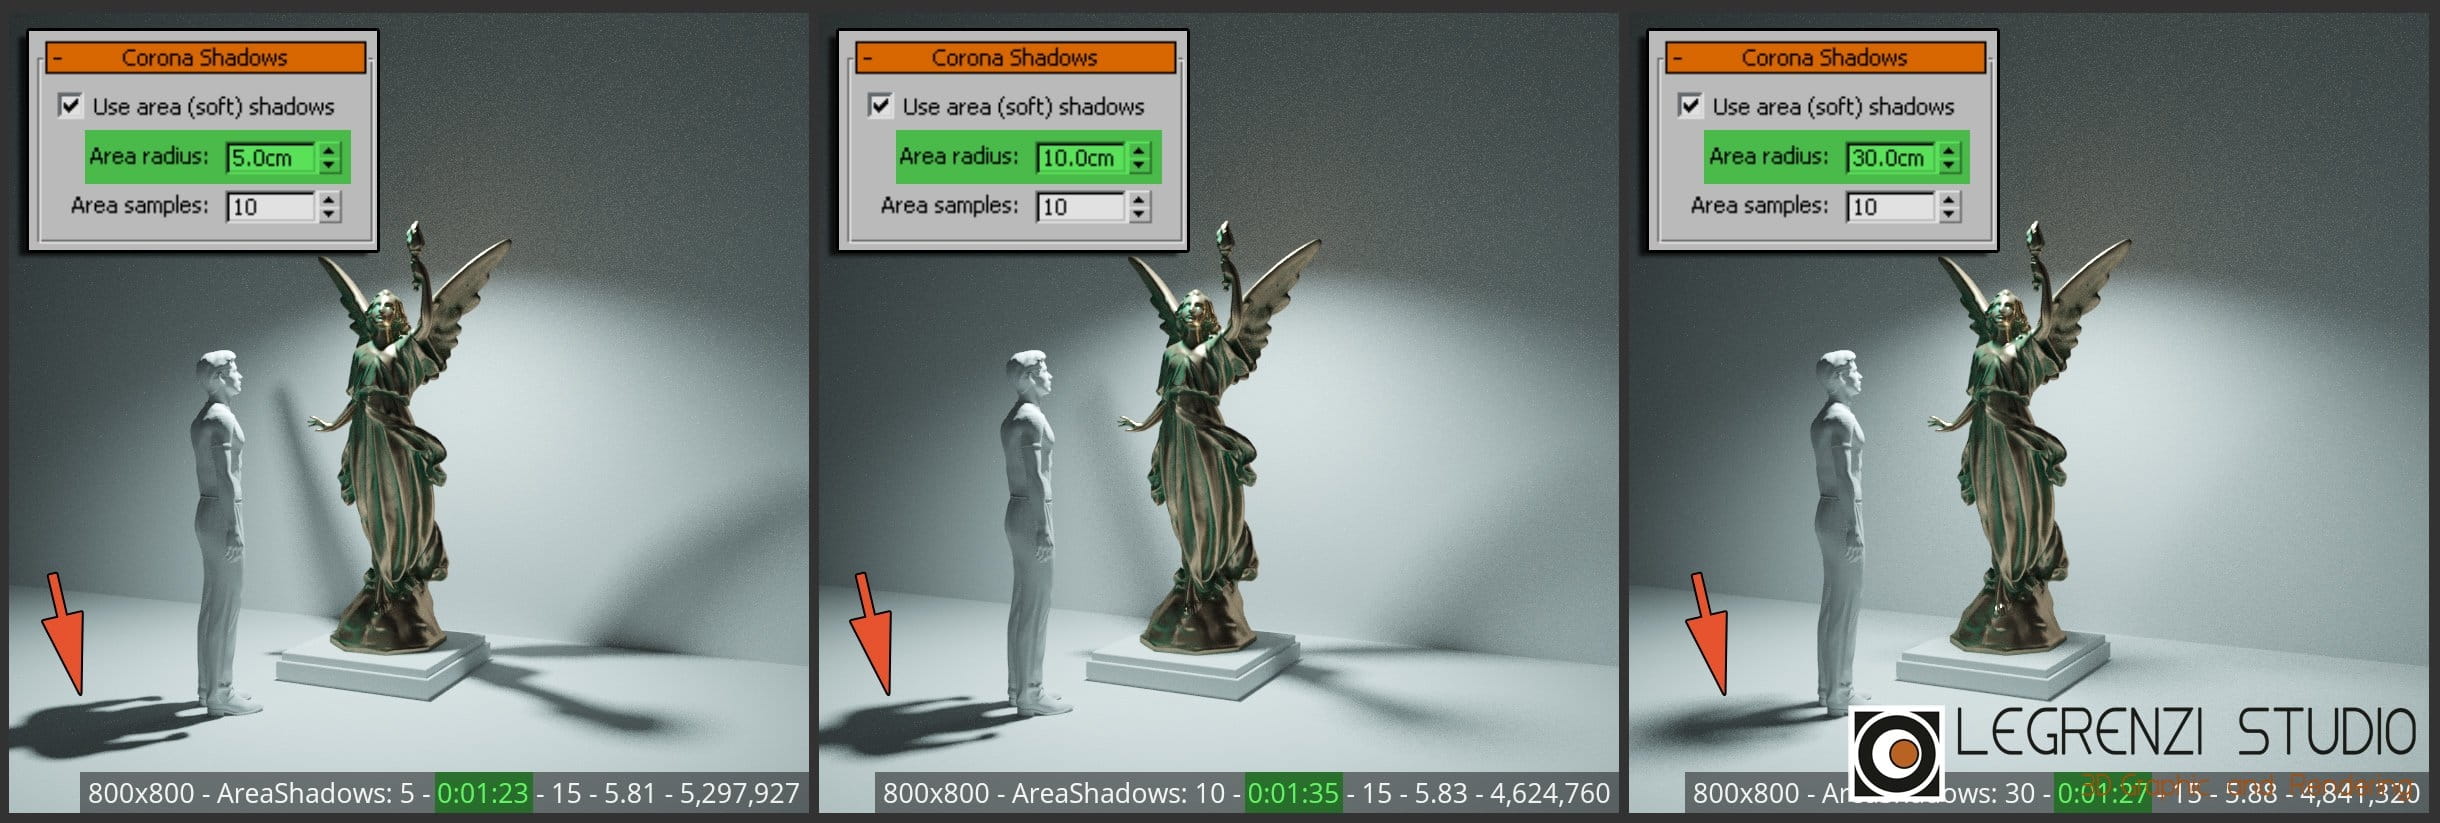
Area radius defines the softness of Corona Shadows.
Area samples - amount of noise in the Corona Shadows element. The default parameters ensure the best speed and quality.

Area samples parameter
CORONA SUN
In addition to the Corona Light source (e.g. rectangular, spherical, etc.), Corona offers a further type of light that can simulate the sun: the Corona Sun source. It is an atypical light, slightly different from both Corona Light and the classic 3ds Max lights.
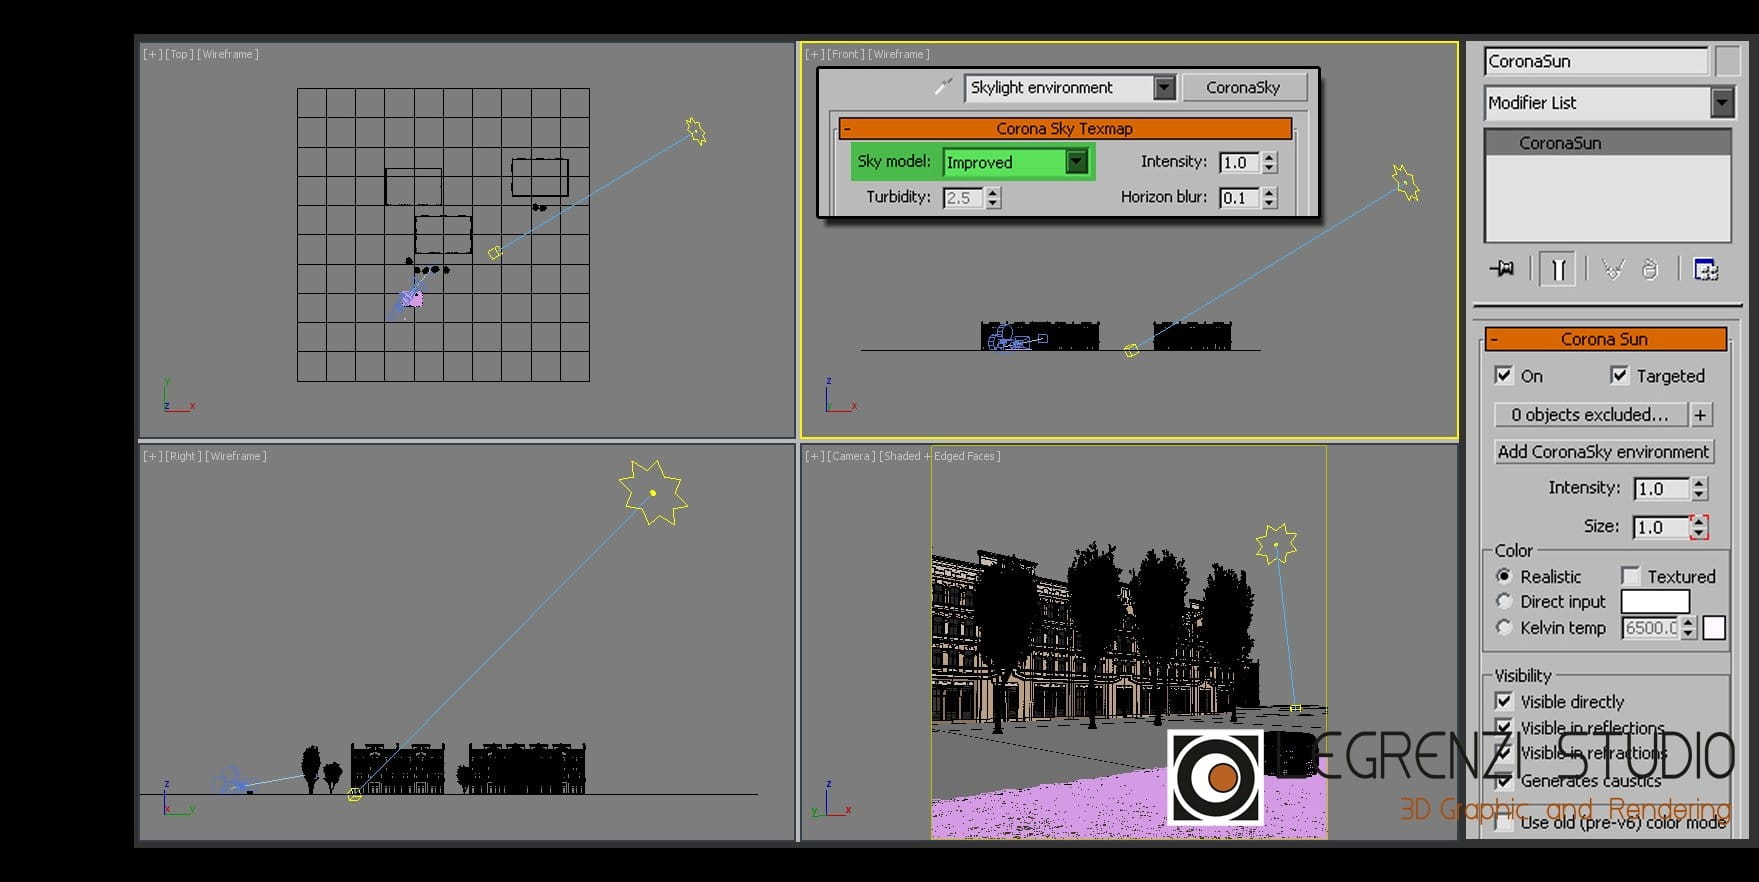
Corona Sun looks like a Target Direct Light, consisting of a target and an eight-pointed star-shaped source. The greater the distance between the two elements, the greater the size of the sun icon. Improved is the mathematical model used for the sky simulation, introduced with Corona v6.0.
Corona Sun simulates the sun, but it is not enough for the complete physical system setup “sun + sky” since a background is also needed: the sky (i.e. the Corona Sky map). Corona Sun and Corona Sky work closely, as changing the eight-pointed icon position in the viewport will change the background automatically.
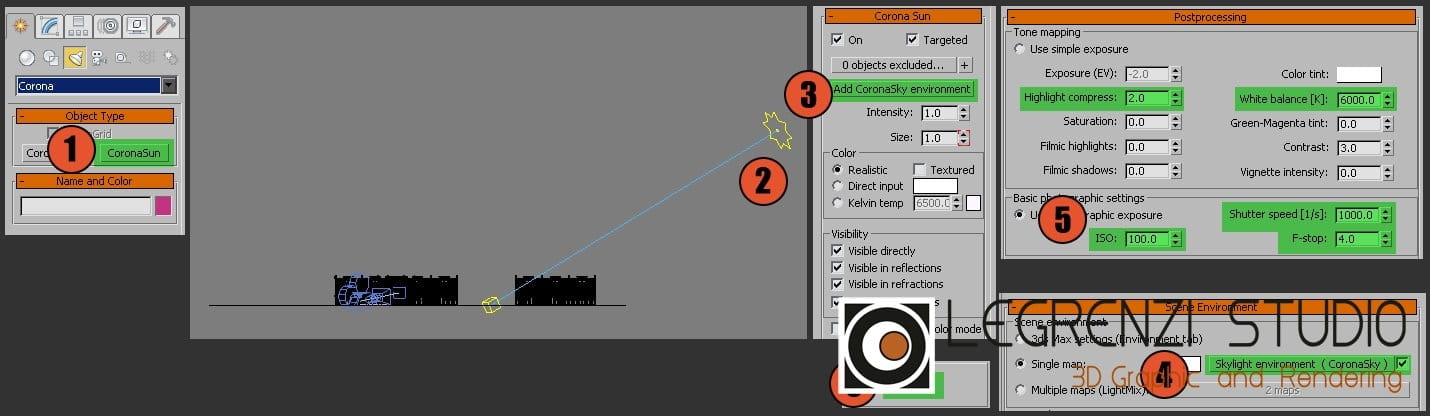
Corona Sun+Corona Sky setup: To create the sun we select the Corona Sun object (1) and, when we click in the TOP view, drag the mouse. Next, we release the mouse to determine the height of the sun, ensuring an angle of 30°/40° on the horizon (2). Then press the Add CoronaSky environment button (3) and Corona will load the Corona Sky map (Skylight environment) in the Environment slot (4). If the Single map option is enabled, Corona Sky will be loaded in the Corona Environment channel. After setting the photographic values (5), press Render (6).

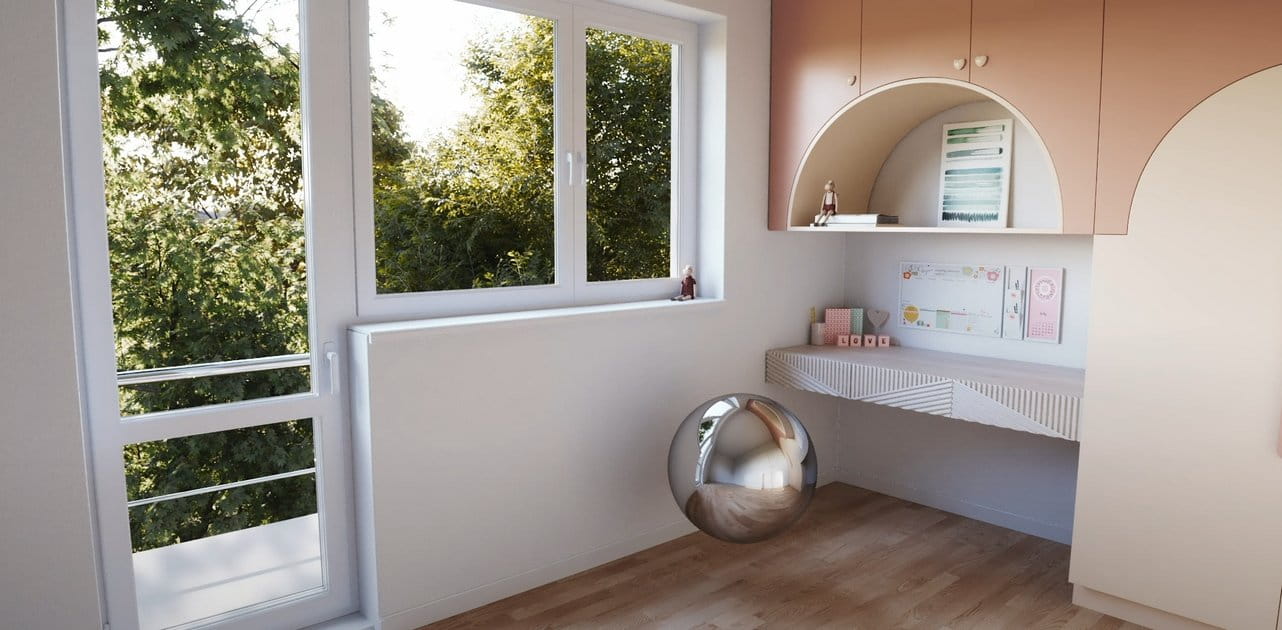
This image shows the 3ds Max viewport, the render, and a real photograph. Corona Sky faithfully simulates the sky.
Corona Sky is a 32-bit procedural map used to realistically illuminate a scene. As in reality, the sky is lighter near the sun and darker as we move away from it. In the photo on the right, the sun looks much larger than in render due to the Bloom effect and Turbidity parameter.
In the render, the position of the solar disk position does not match the icon in the viewport because the eight-pointed star is only a graphical representation of the sun. Our star is millions of kilometers away from the Earth, while the 3D space of 3ds Max has limits well below this distance. What is important for rendering are the horizontal and vertical angles of the sun in relation to the ground. Let’s try moving the Corona Sun icon downward.
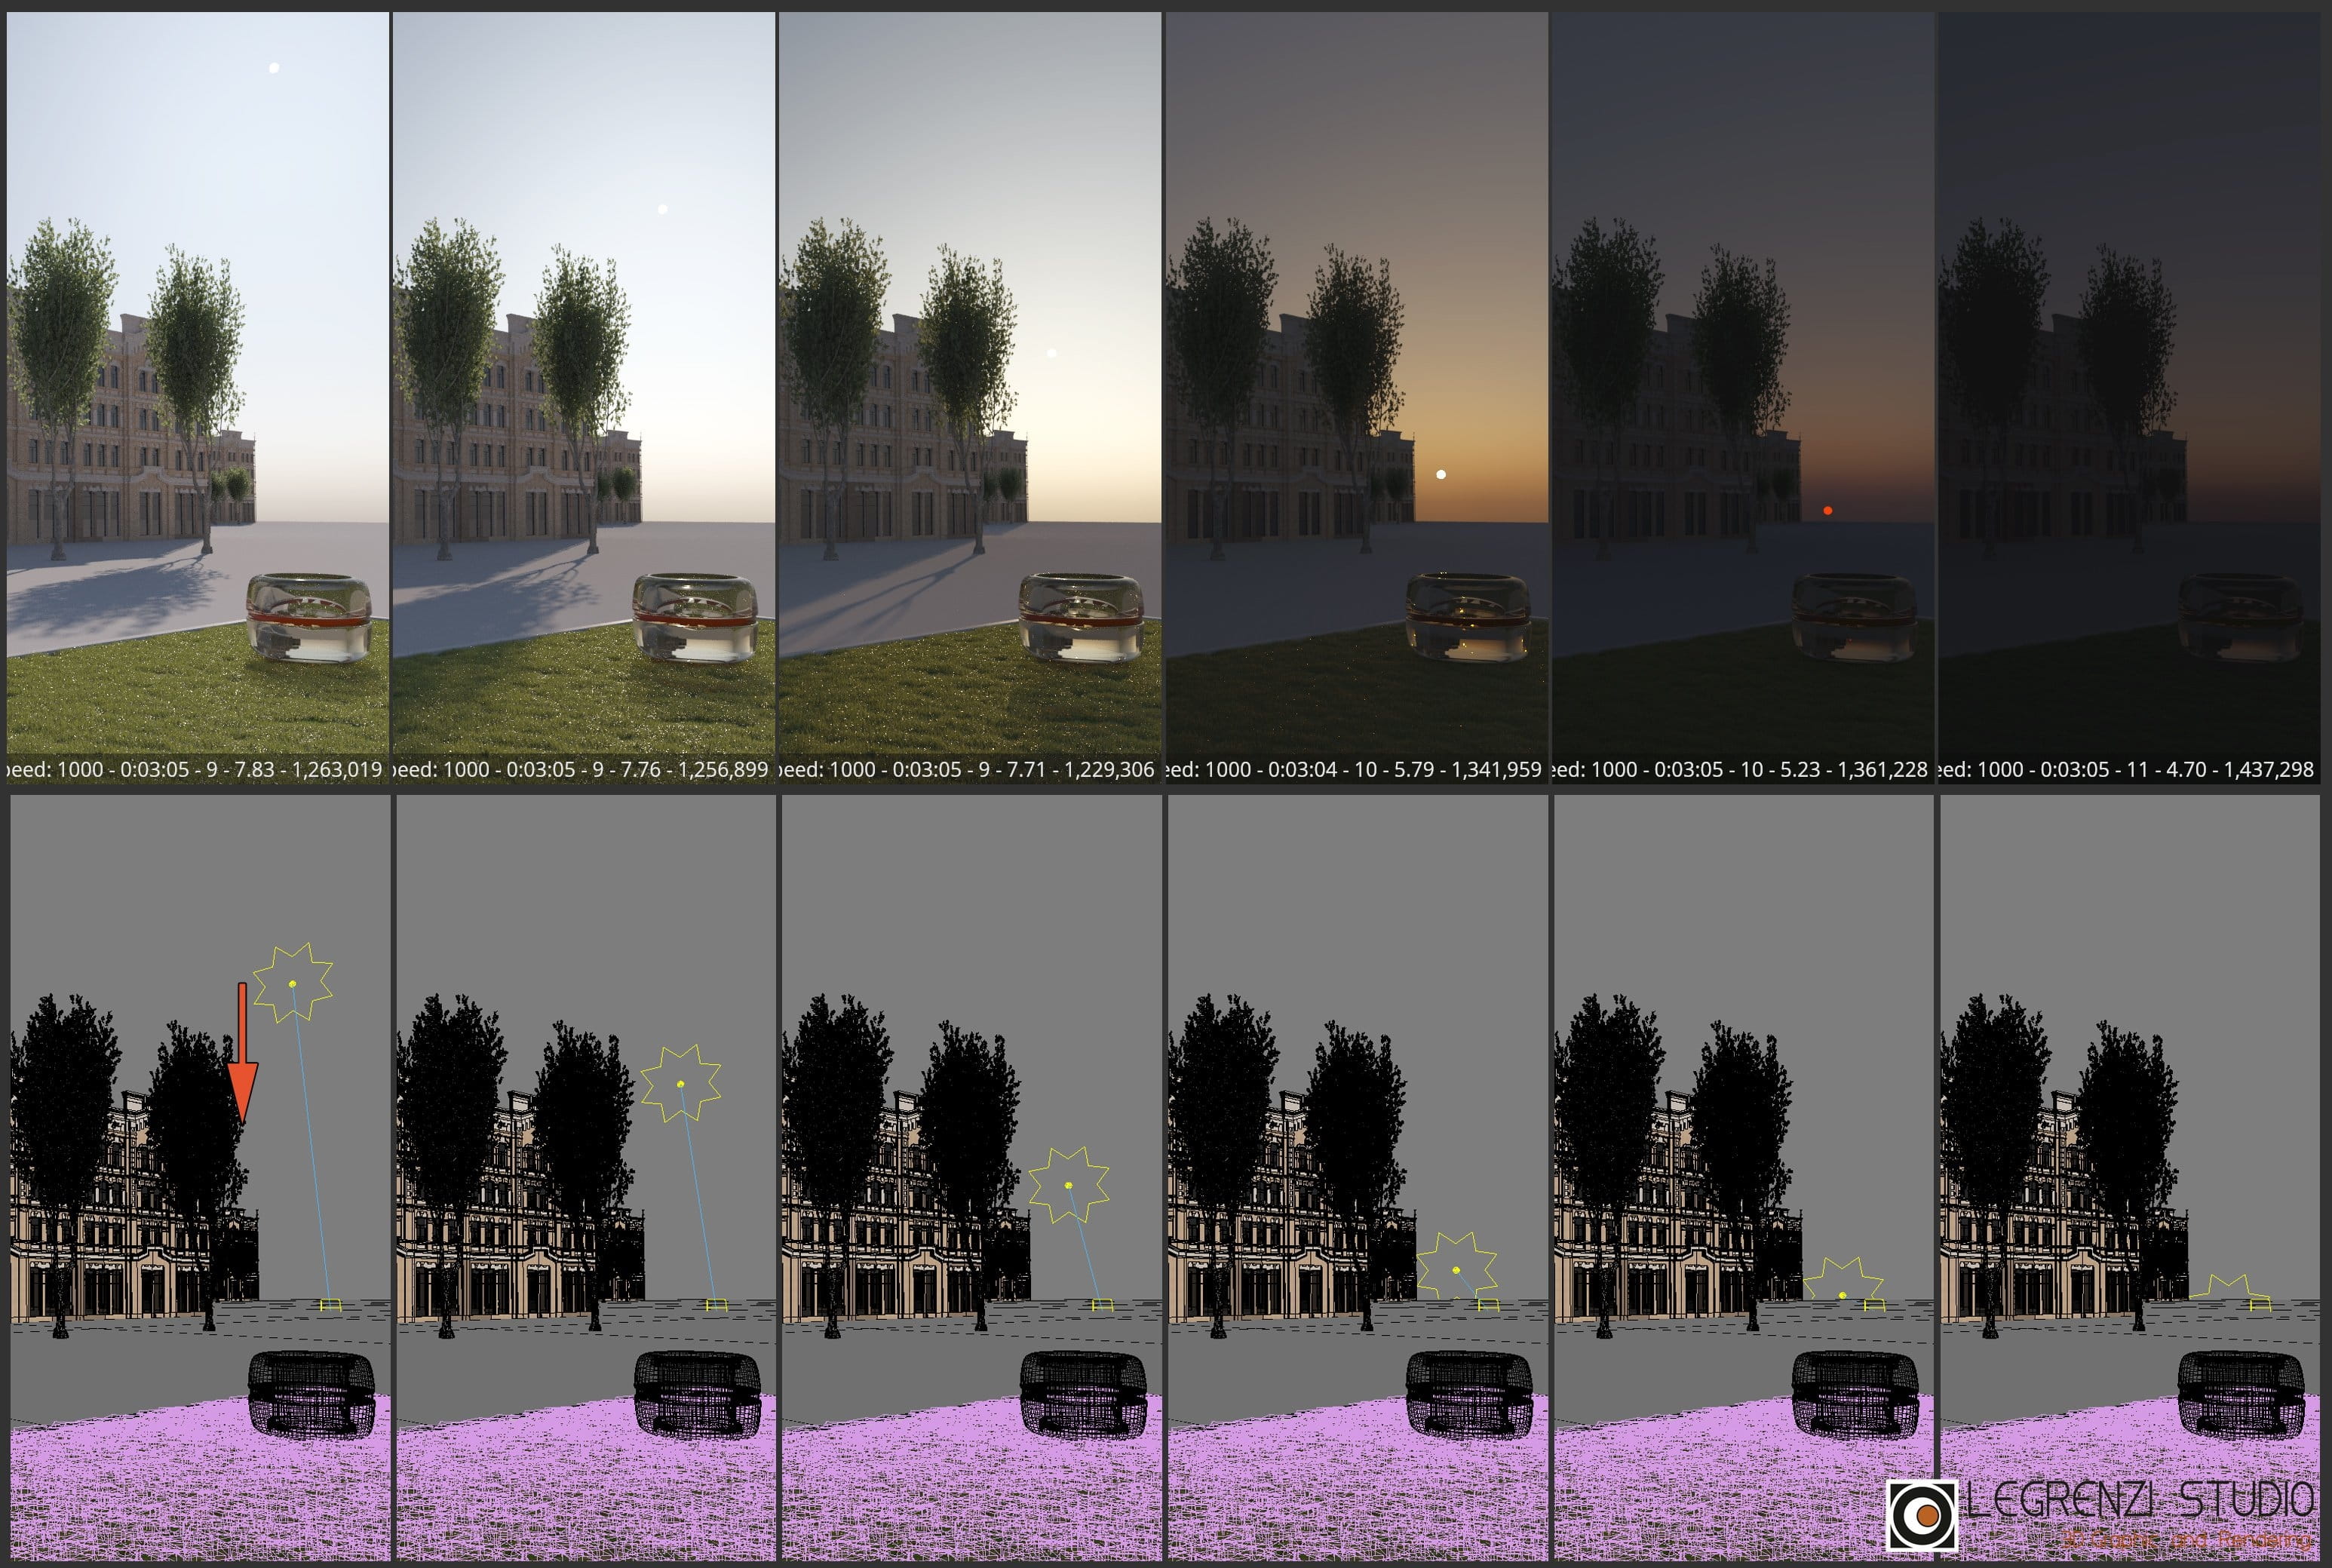
Renders with different heights of Corona Sun.
The change in height of the Corona Sun disk signifificantly changed both the Corona Sky map and the intensity of the sun and, consequently, the size of the shadows. When we lower (or raise) the eigh ht-pointed icon, it is like moving the clock hands (i.e. Corona modifies both sky and sun to simulate a sunset or a sunny day). By moving the sun horizontally, shadows and sky will change. Note how, placing the sun below the reference plane (Z< 0.00cm), Corona will correctly interpret the position of the sun at an altitude lower than 0.00 cm.
Changing the Corona Sun disk position affects both the shadows and the Corona Sky color, while the intensity of the sun does not change.
On - enables or disables the Corona Sun object.
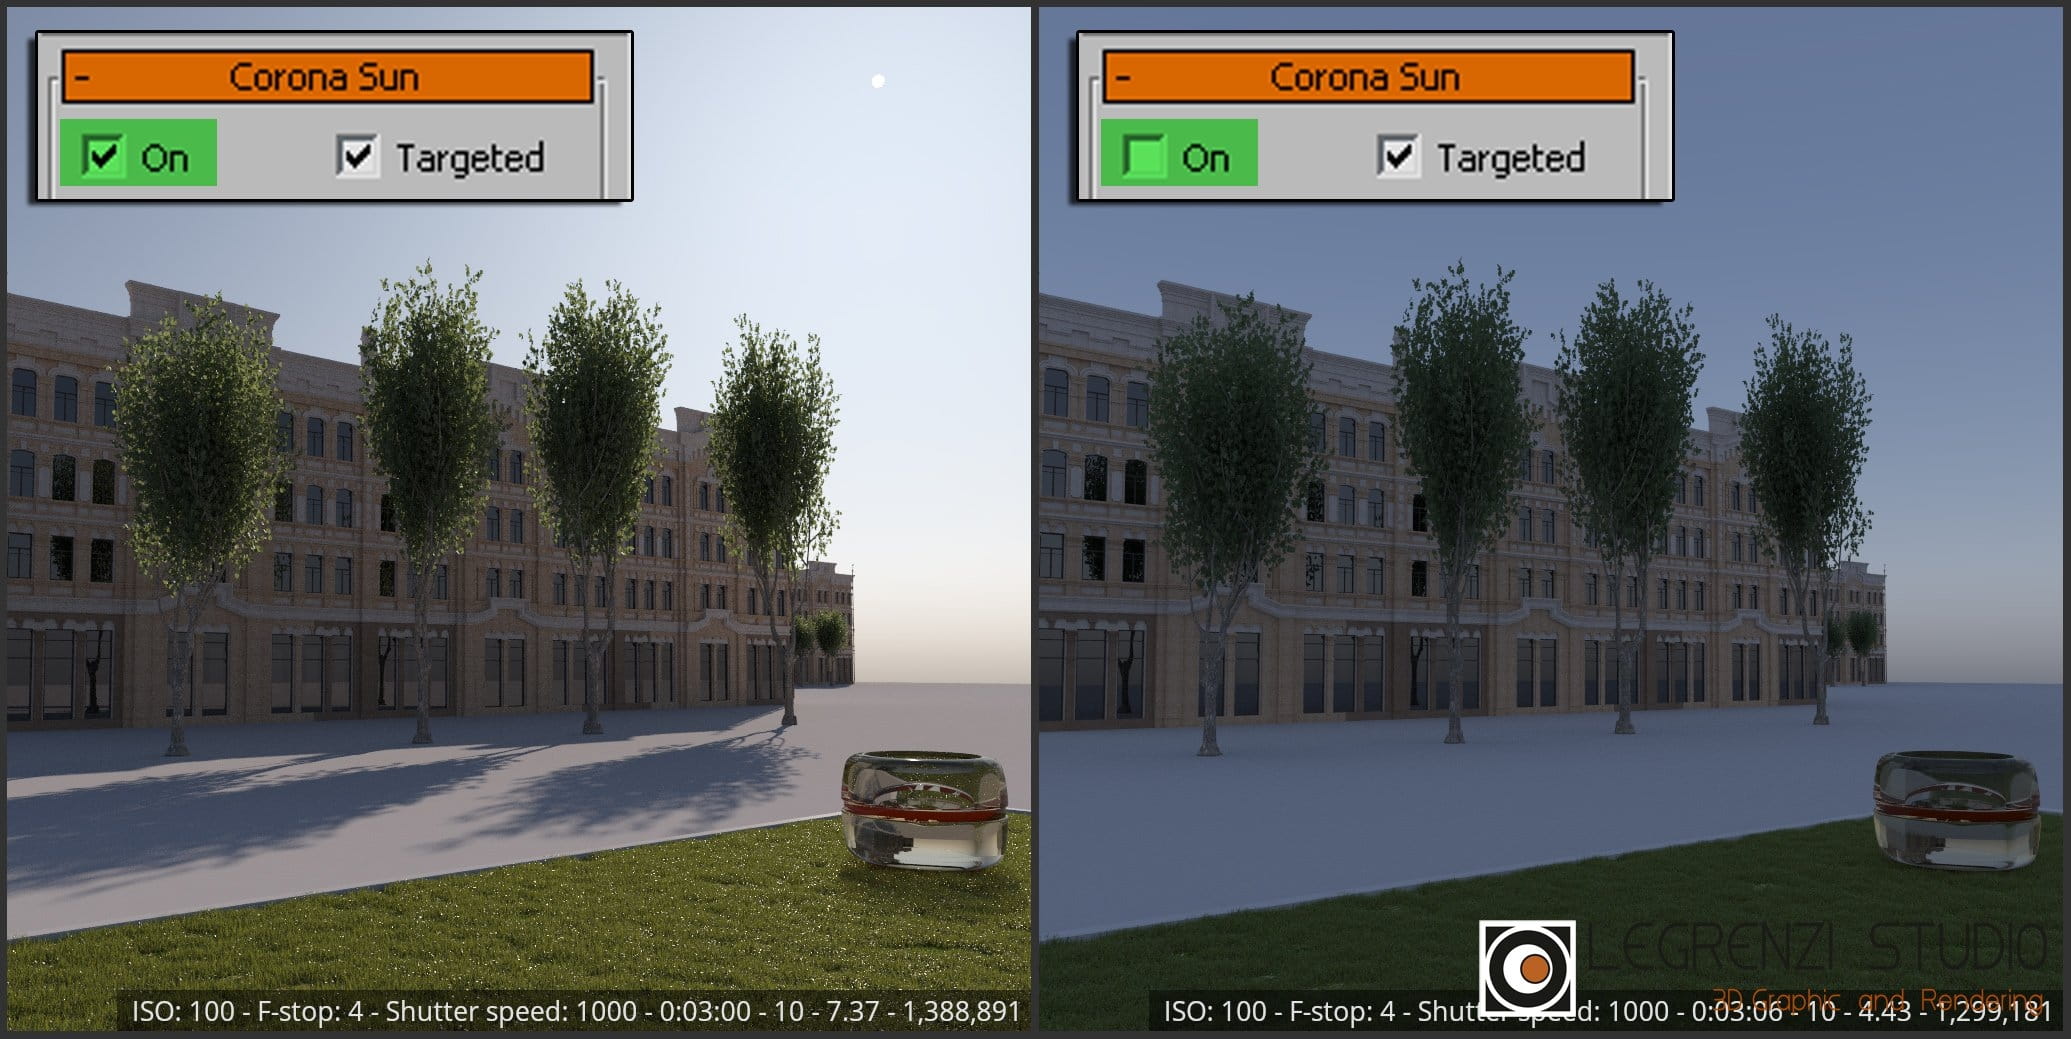
When Corona Sun is turned off, the Corona Sky map previously loaded in the Corona Environment is the only light source.
Targeted - in Targeted mode, Corona Sun can be changed by moving both the source (the eight-pointed star) and the anchor point (the target). When
Targeted is disabled, Corona Sun turns into an arrow, of which only the tip can be moved and rotated.
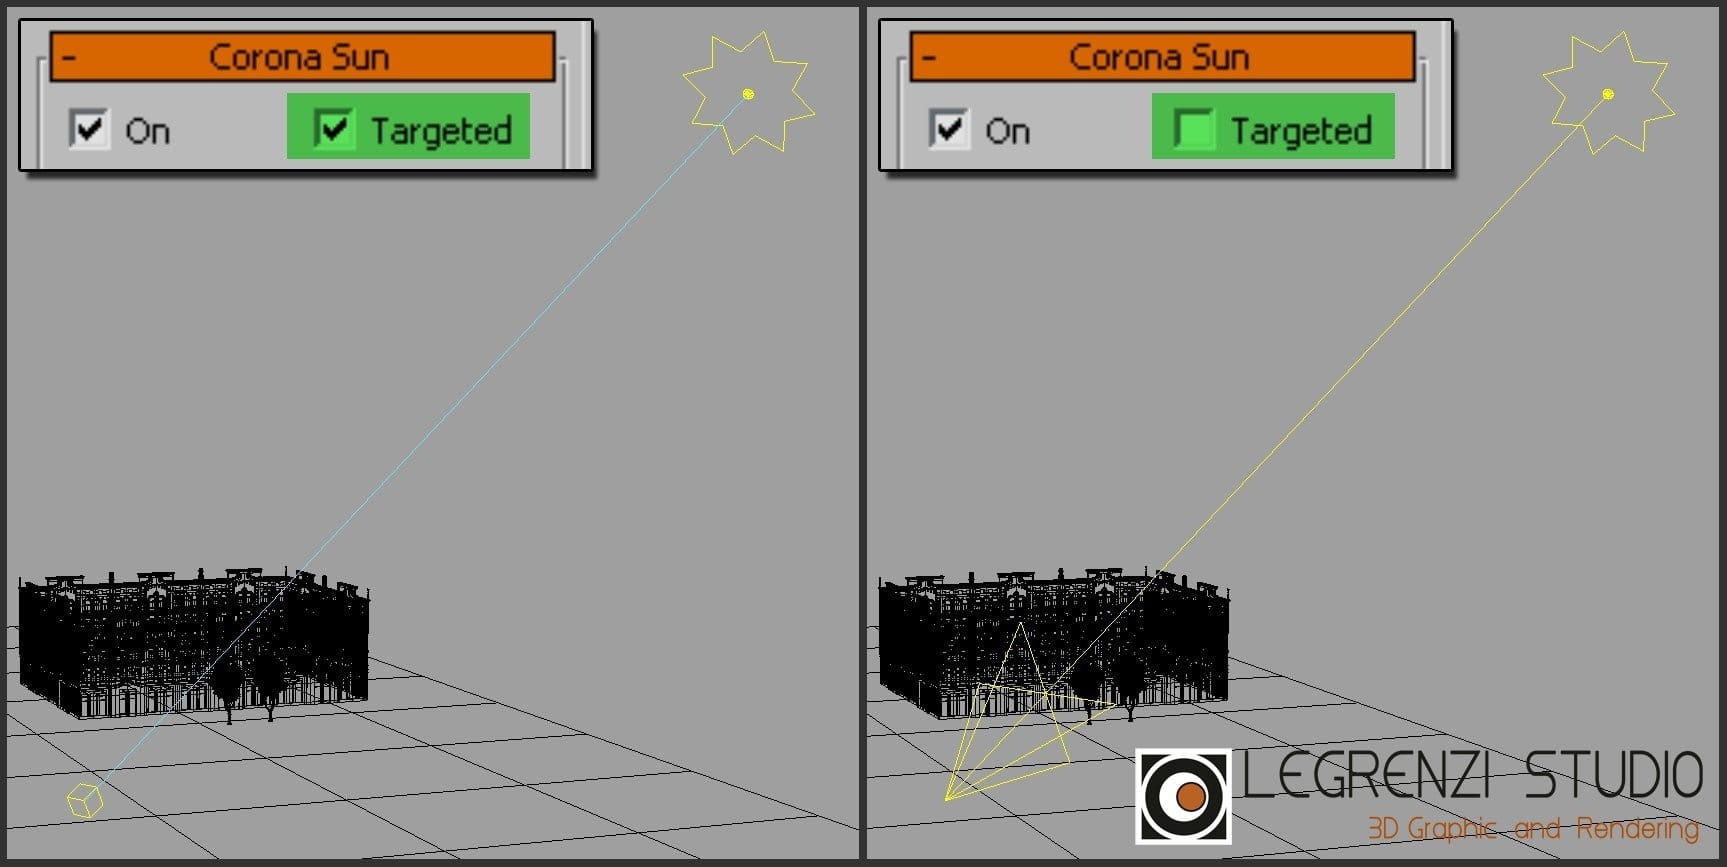
Changing the Corona Sun icon by disabling the Targeted parameter.
Objects excluded - the Exclude/Include table determines what Corona Sun will not illuminate. In our example, the ground plane was added to the list. Shadows were not cast on the ground, while th the plane is visible because Corona Sky is located in the Environment slot.
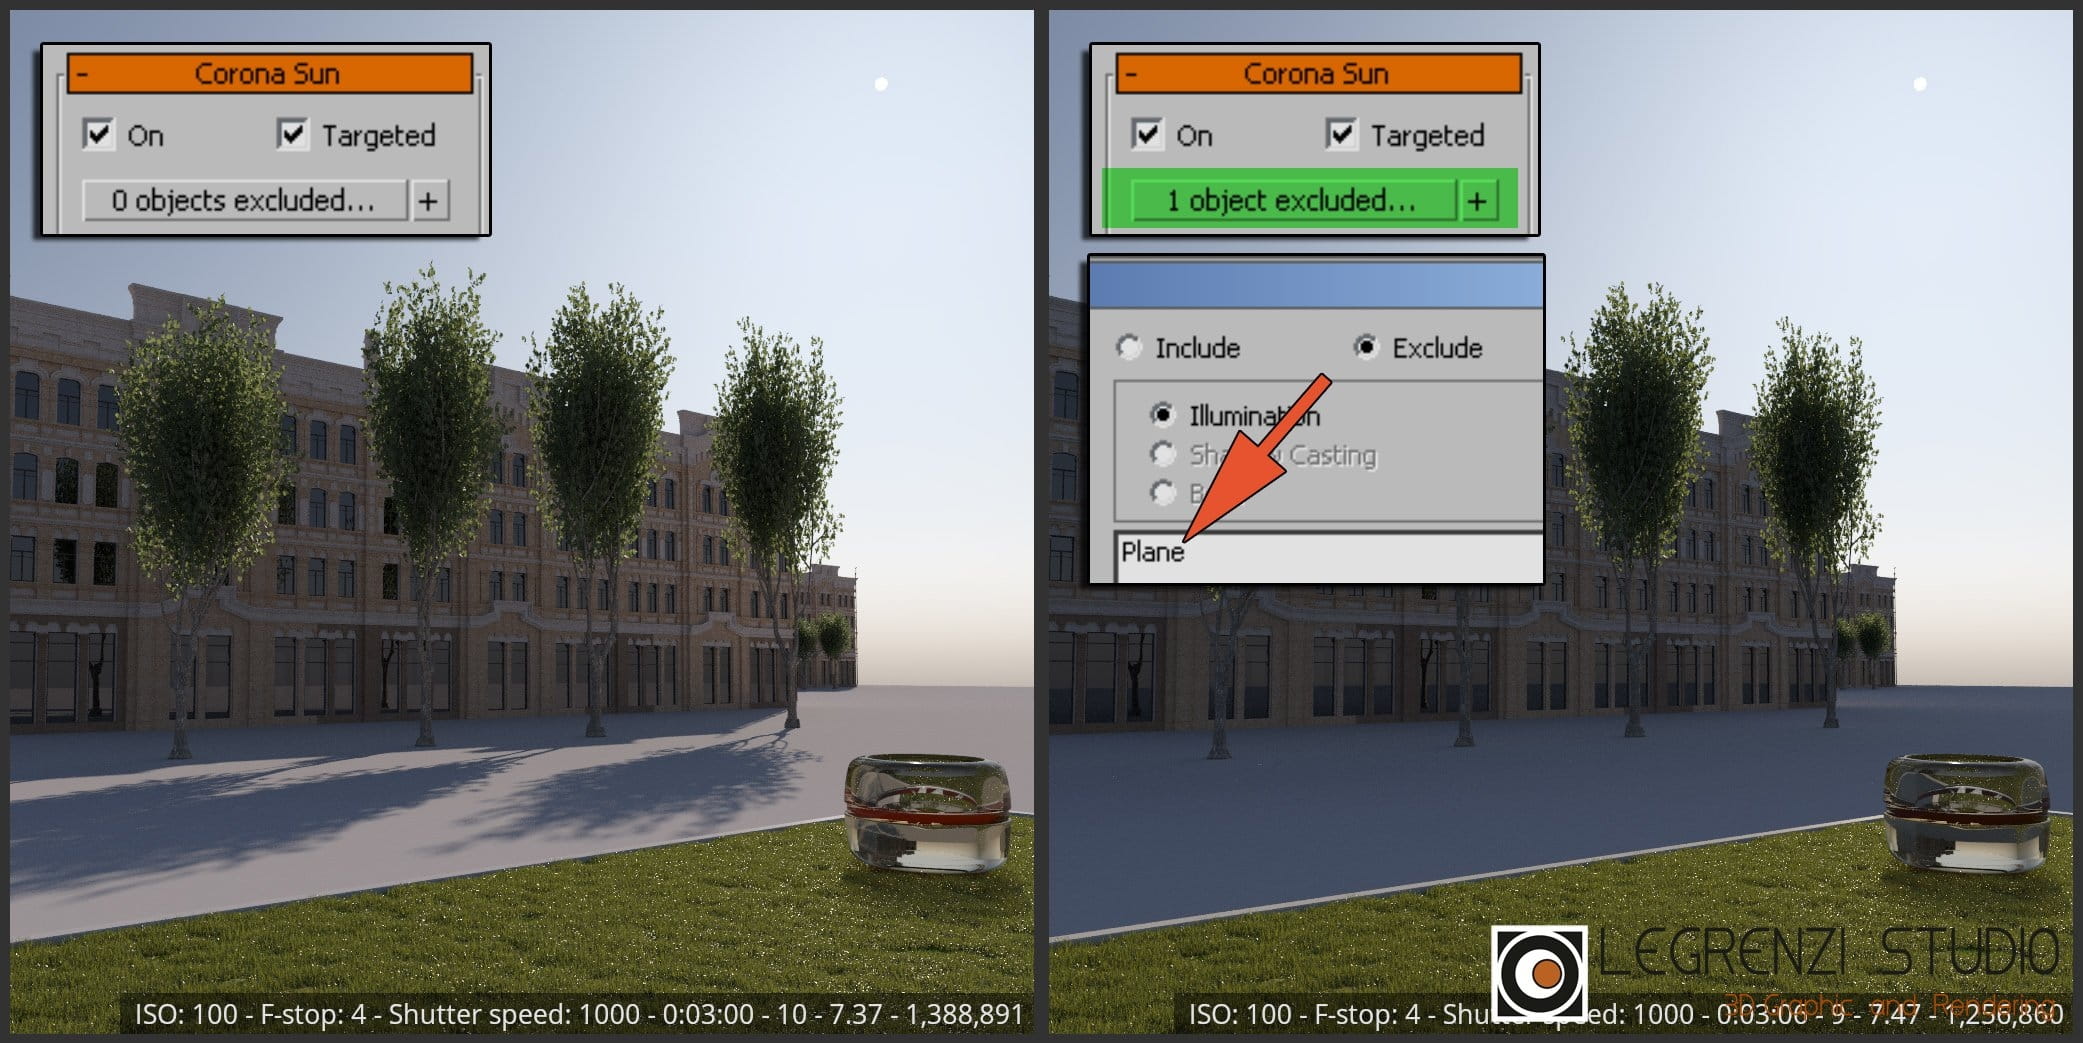
In the render on the right, the Corona Sun object did not illuminate the ground plane.
Add CoronaSky environment - press this button and the Corona Sky map will appear in the Environment slot. If Single map is enabled, the Corona Sky map will be loaded in the Corona Environment. The same procedure can also be performed manually.
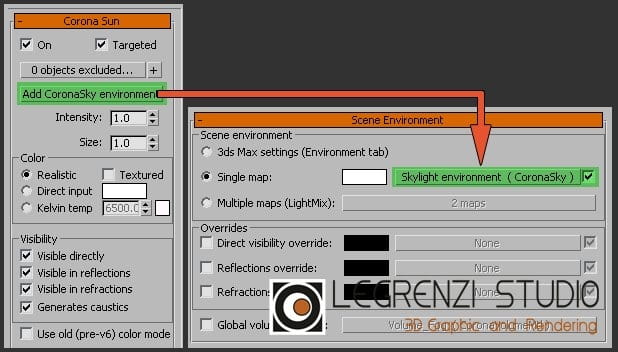
Corona Sky map in the Corona Environment.
Intensity - manages the intensity of the sun. The default value=1 generates physically correct renders. Intensity should never be changed, as we would be altering the relationship between Corona Sun and Corona Sky.
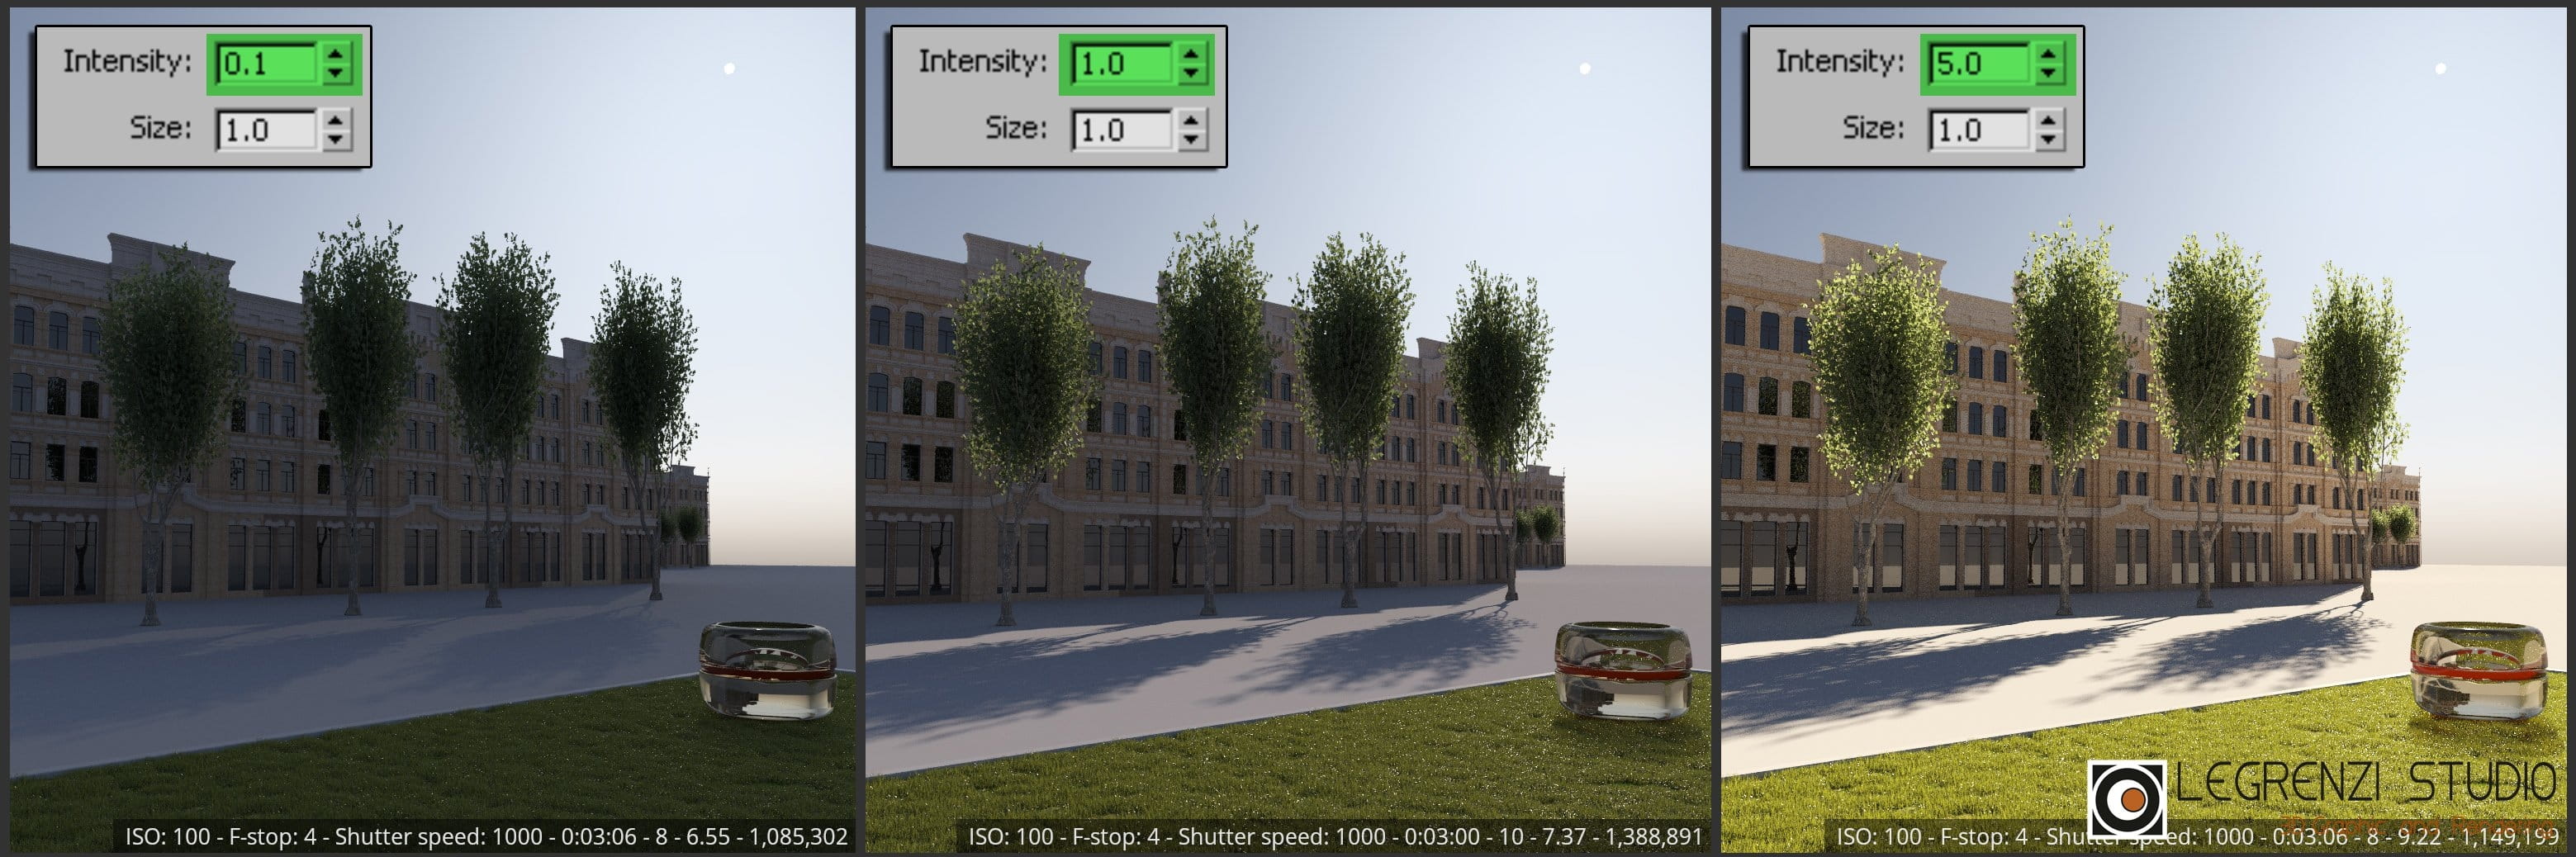
Corona Sun is brighter when the Intensity parameter increases.
By increasing Intensity the lighting of the scene increases as well. However, the brightness of the sky did not change and the renders are not realistic since Corona Sun and Corona Sky are designed to be used with default intensity values. Adding the Intensity parameter to the Corona Sun interface, Corona programmers wanted to give users the ability to modify the brightness of the sun (not recommended). If the brightness of the images needs to be increased, it’s advised to modify the photographic parameters instead of increasing the Corona Sun intensity.
Size - when the size of the sun changes, the solar disk will increase or decrease in size (also visible in the viewport). As a result, the shadows will be softer and more blurred.
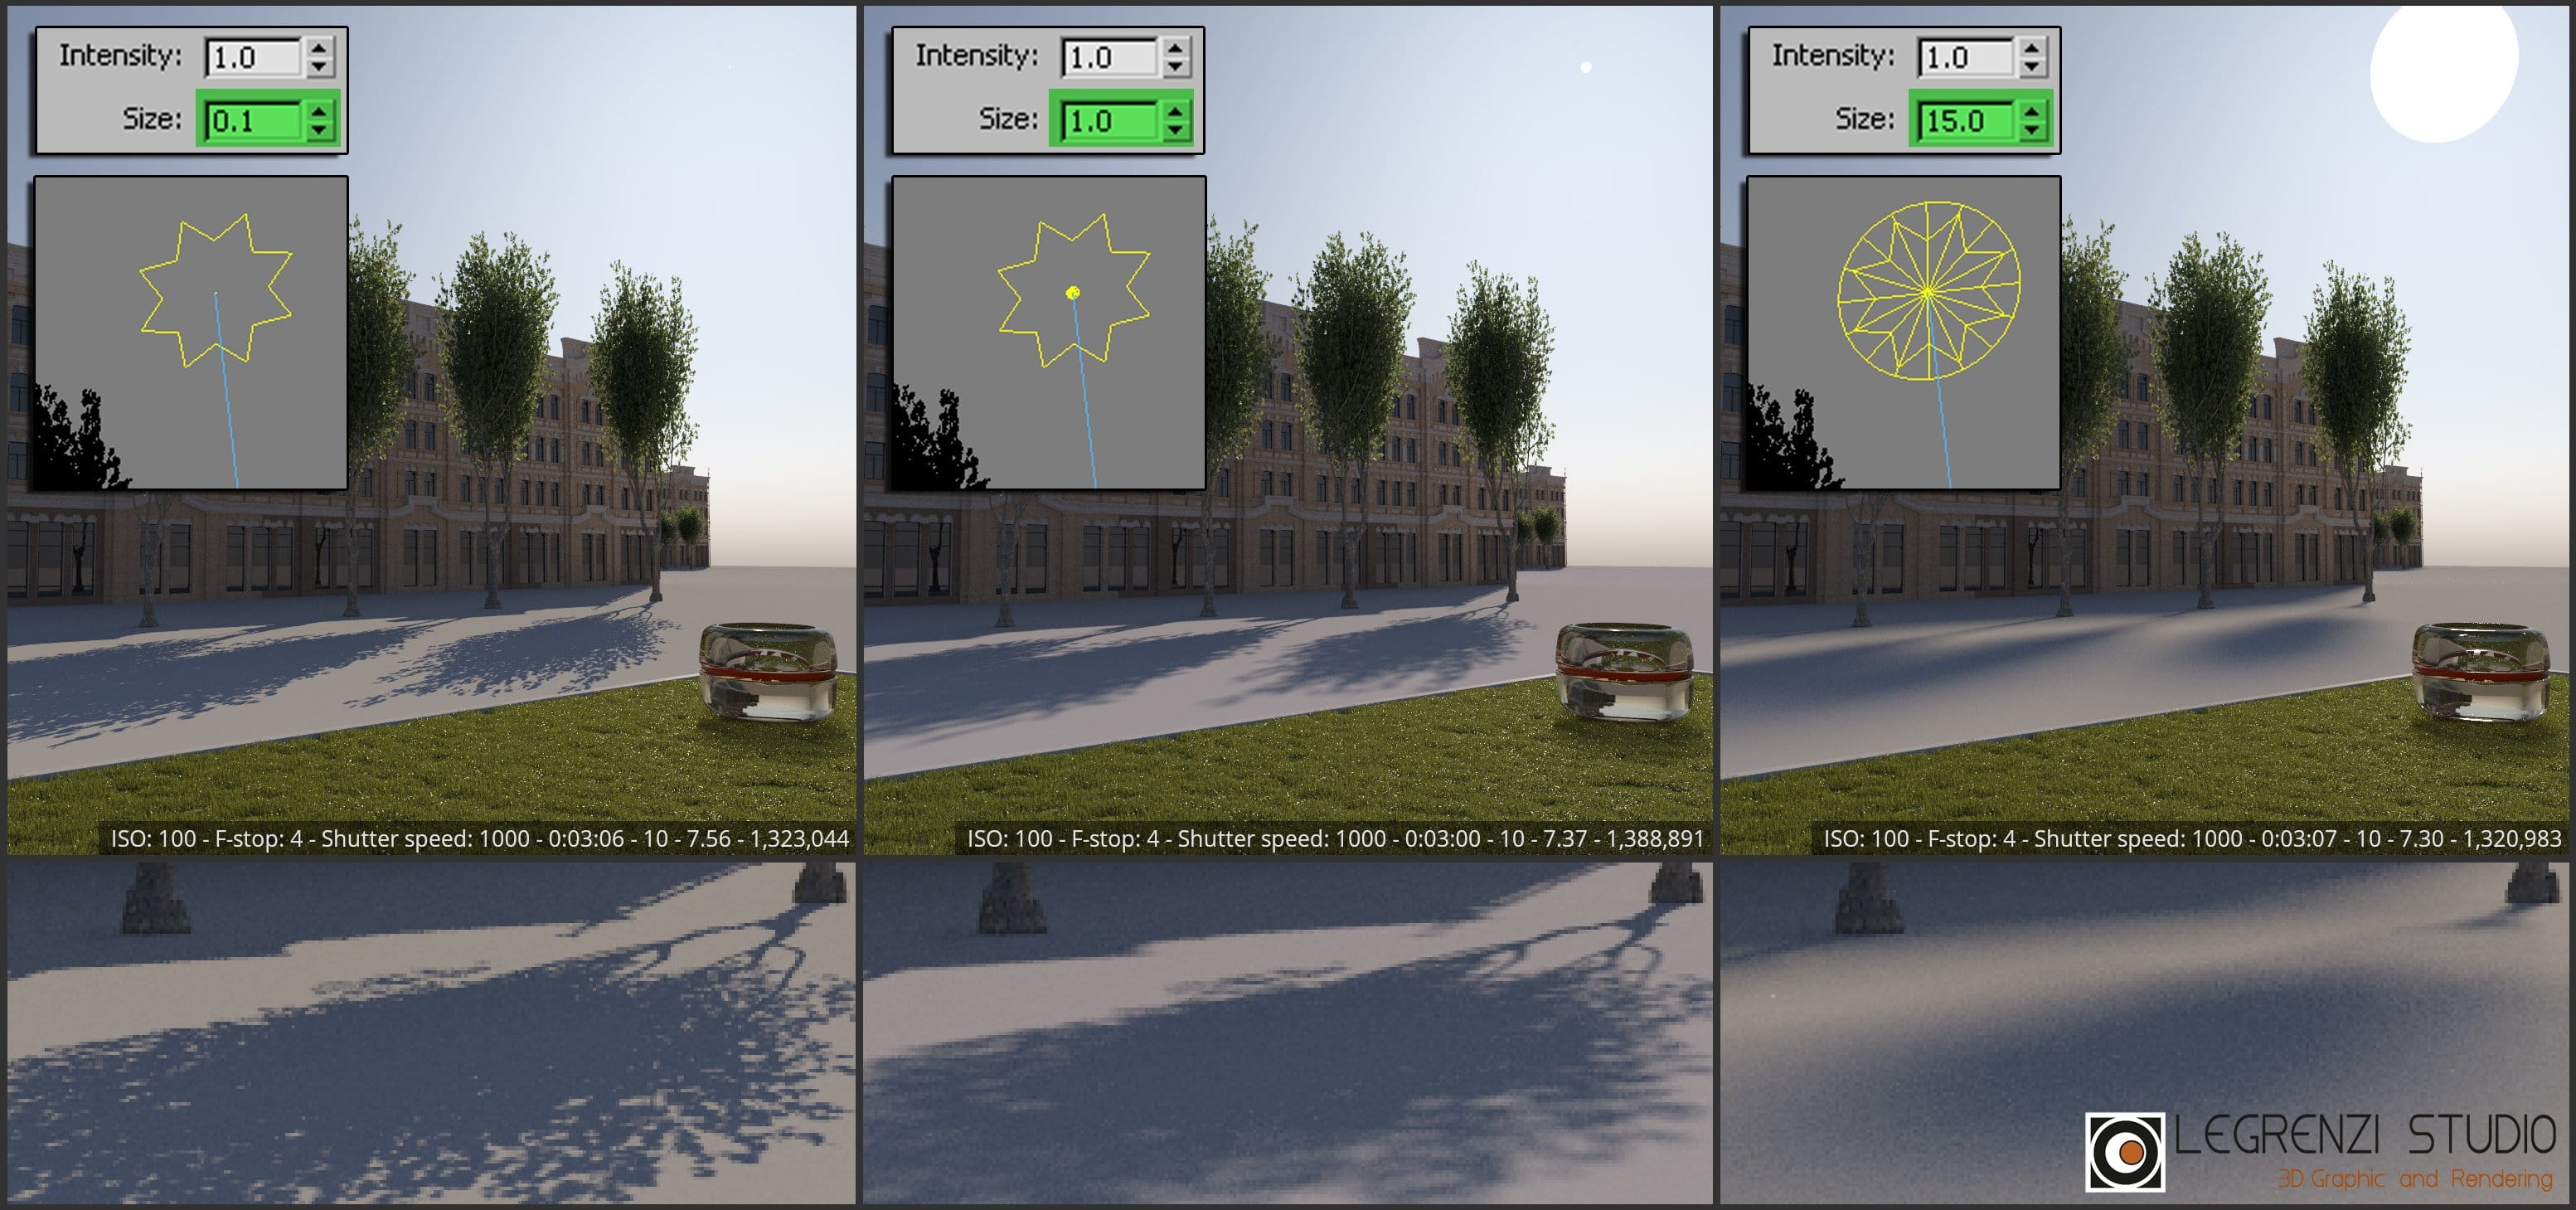
The Size parameter can create beautiful sunsets with the right height of Corona Sun on the horizon.
Color - options to determine the color of the sunlighht.
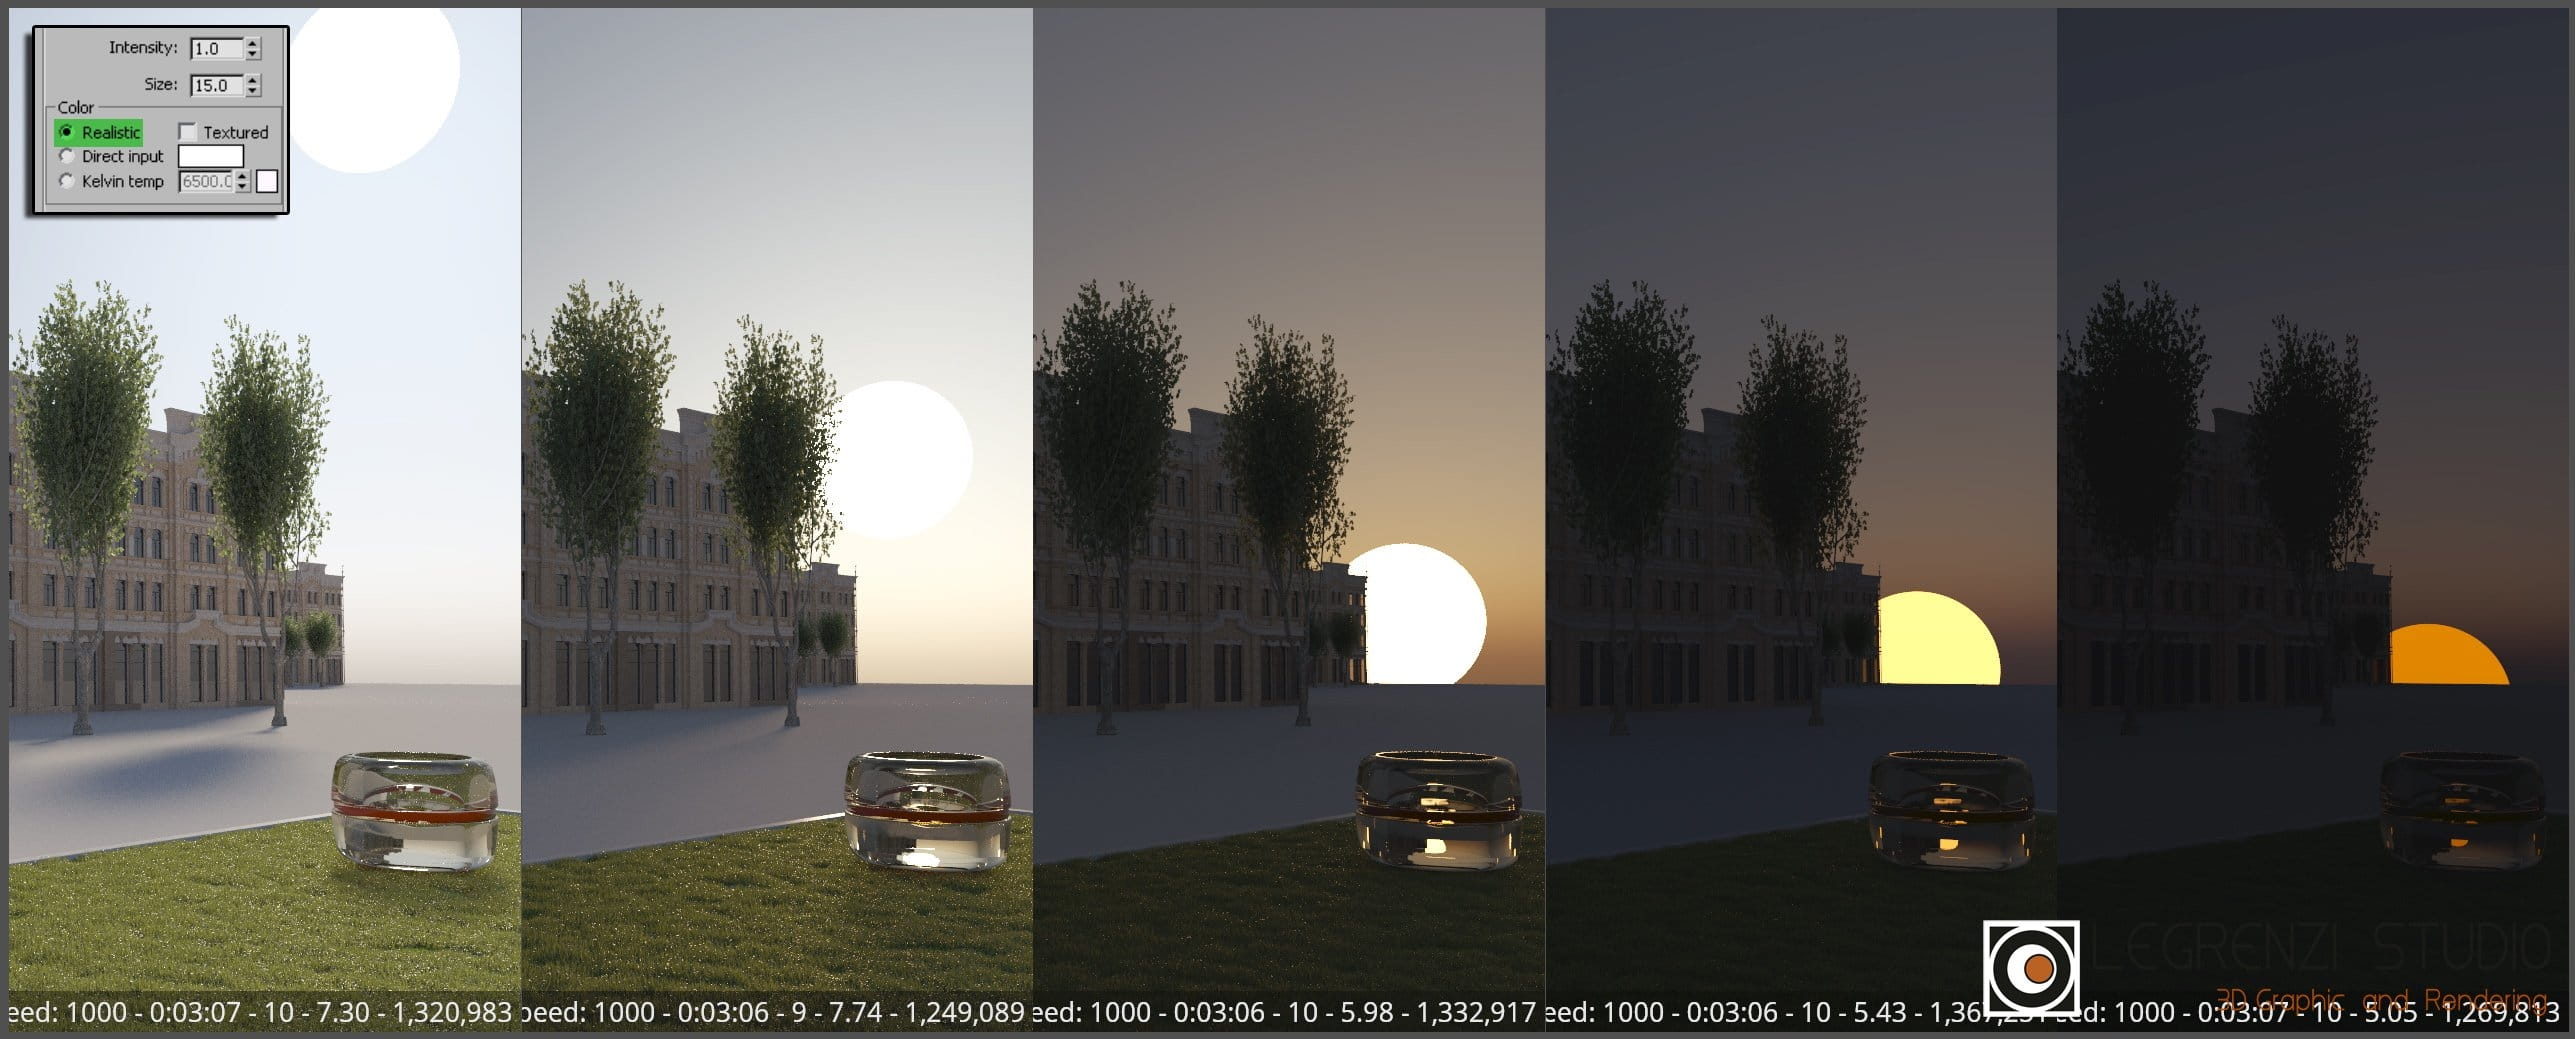
Sun Realistic parameter.
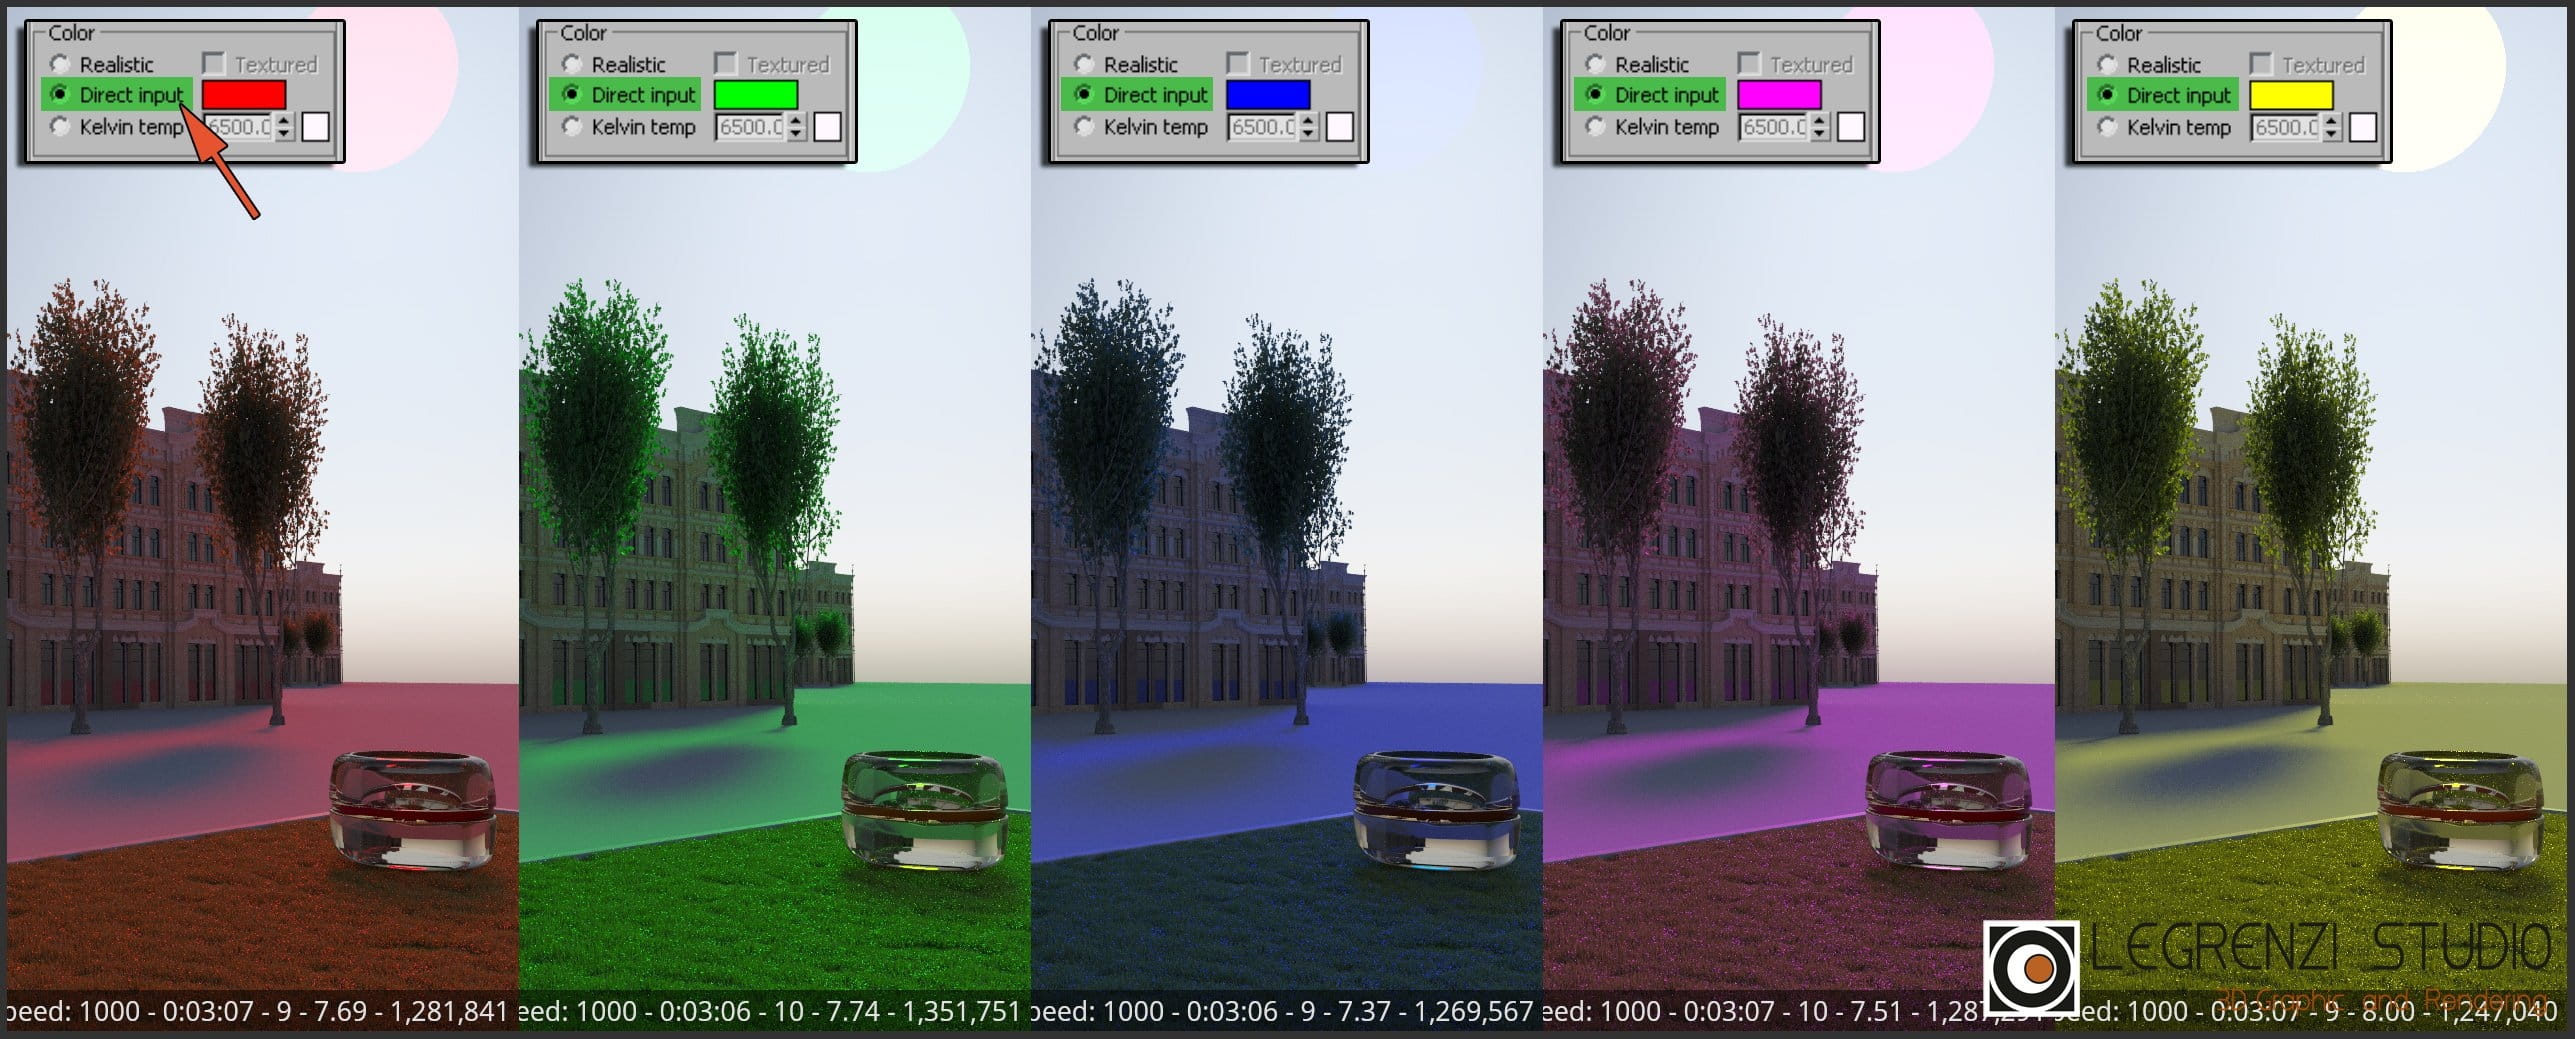
Direct input parameter. Click the colored rectangle to choose a color.
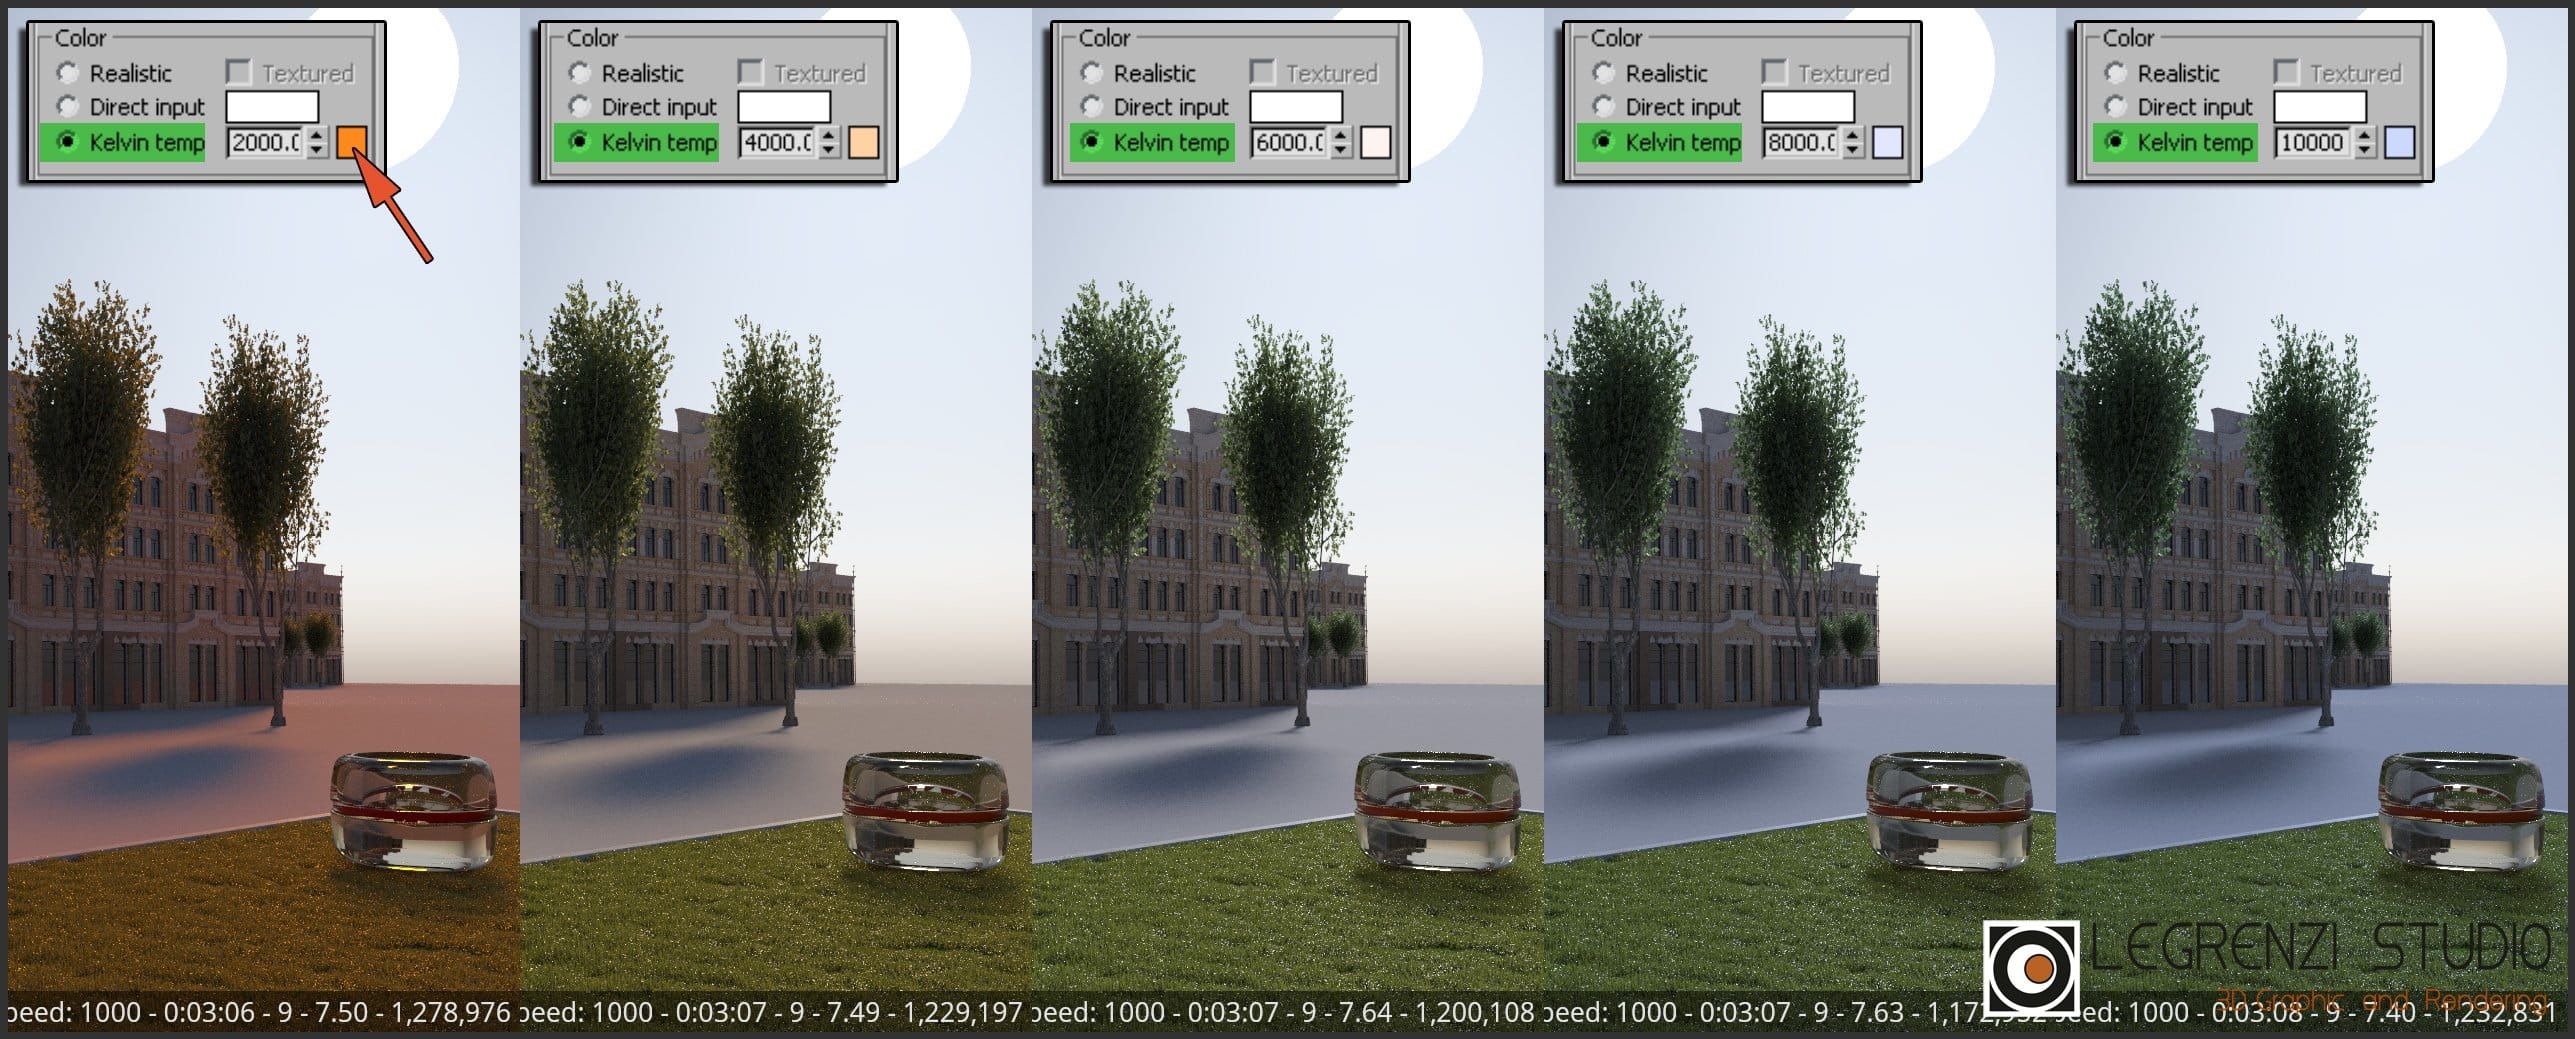
Kelvin parameter. Modify the numerical value and the small rectangle will change color (orange arrow).

Textured: the solar disk is a solid color by default. Enable Textured and a gradient will appear.
Visible directly - makes the solar disk visible when directly viewed. When Visible directly is disabled, Corona Sun will always generate light, but the sun will no longer be rendered.
Visible in reflections - if enabled, the solar disk will be visible in reflections.
Visible in refractions - if enabled, the solar disk will be visible in refractions.
Generates caustics - if the Caustics solver algoriithm is enabled, the solar disk will generate caustics.

Disabling of the solar disk visibility for direct view, reflections, and refractions. In the first image, all the parameters of the sun are enabled. In the second image, the Visible directly option is disabled and the solar disk is no longer directly visible. In the third image, the reflections on the grass and vase disappeared. In the last, the refractions are gone.
Use old (pre-v6) color mode - if enabled, the ccolor of the sun is managed by the Hosek & Wilkie model. Otherwise, the Improved algorithm introduced with Corona v6.0 will be used.
As we discussed several times, Corona Sun works in symbiosis with the Corona Sky map. This texture contains various algorithms for "sky coloring" and defining the solar disk color. Prior to v6.00, Hosek & Wilkie was the best way to create photo-realistic skies. It is still a good method, but its sunset gradient is unsatisfactory, especially in the evening configuration.
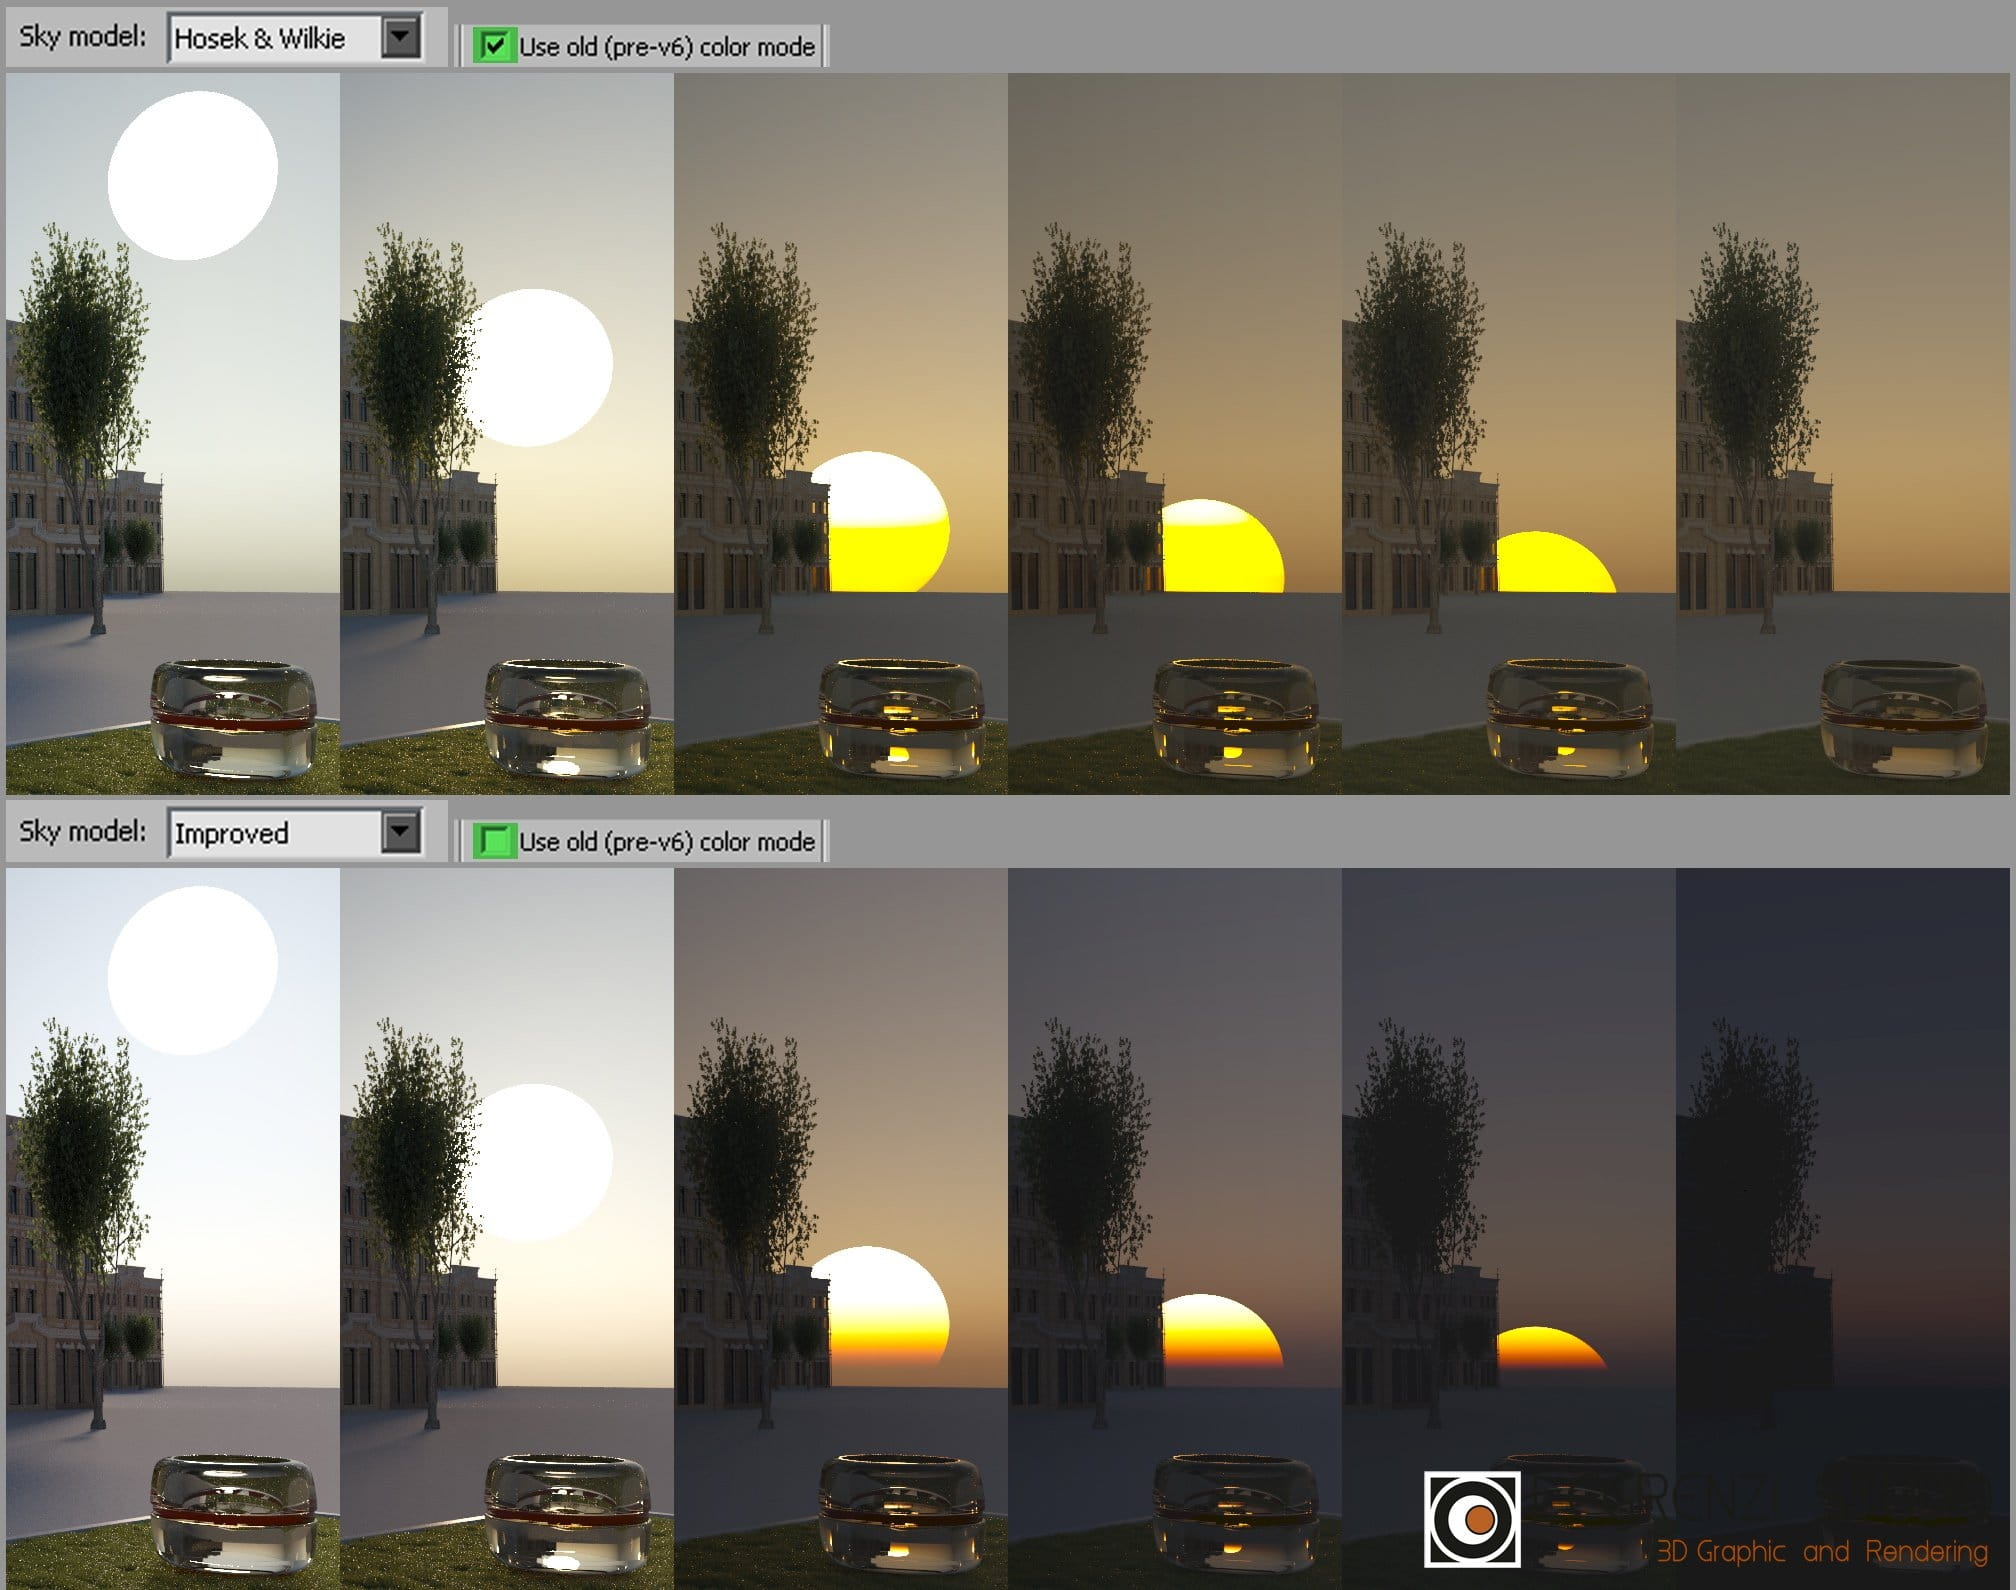
With the Improved method we can generate beautiful sunsets.
To maintain compatibility with files made with versions prior to 6.0, programmers added the Use old (pre-v6) color mode parameter. If we create a new project using v6.0, this parameter is grayed out since Improved is now the default method.
Finally, Corona Sun can be used in the 3ds Max Daylight system. Add the Daylight object in the viewport (1), click to place the new liight source (2), and set Corona Sun as Sunlight (3). The Corona Sun rollout will appear (4) with all the options previously seen. Press the Setup (5) and Get Location... buttons (6) to display a graph to select the city we want to simulate (7).

Use the 3ds Max Daylight system to define the Corona Sun position, city, time, and day.
CoronaSky
Another texture often mentioned in this book is the Corona Sky map, a 3D procedural map implemented to simulate daytime skies. When added in the 3ds Max or Corona Environment, the background will be textured as a sky. This map has two main features. First, it is a spherical HDRI texture capable of producing a 32-bit depth output, making it an effective light source. Second, it is a dynamic map that can change its colors based on the Corona Sun solar disk position.
For example, if Corona Sun is in a zenithal position, Corona Sky will adapt to recreate a clear sky, typical of a summer day at noon. Conversely, if the sun is in the sunset position, Corona Sky will automatically change, creating a darker sky with warm tones.
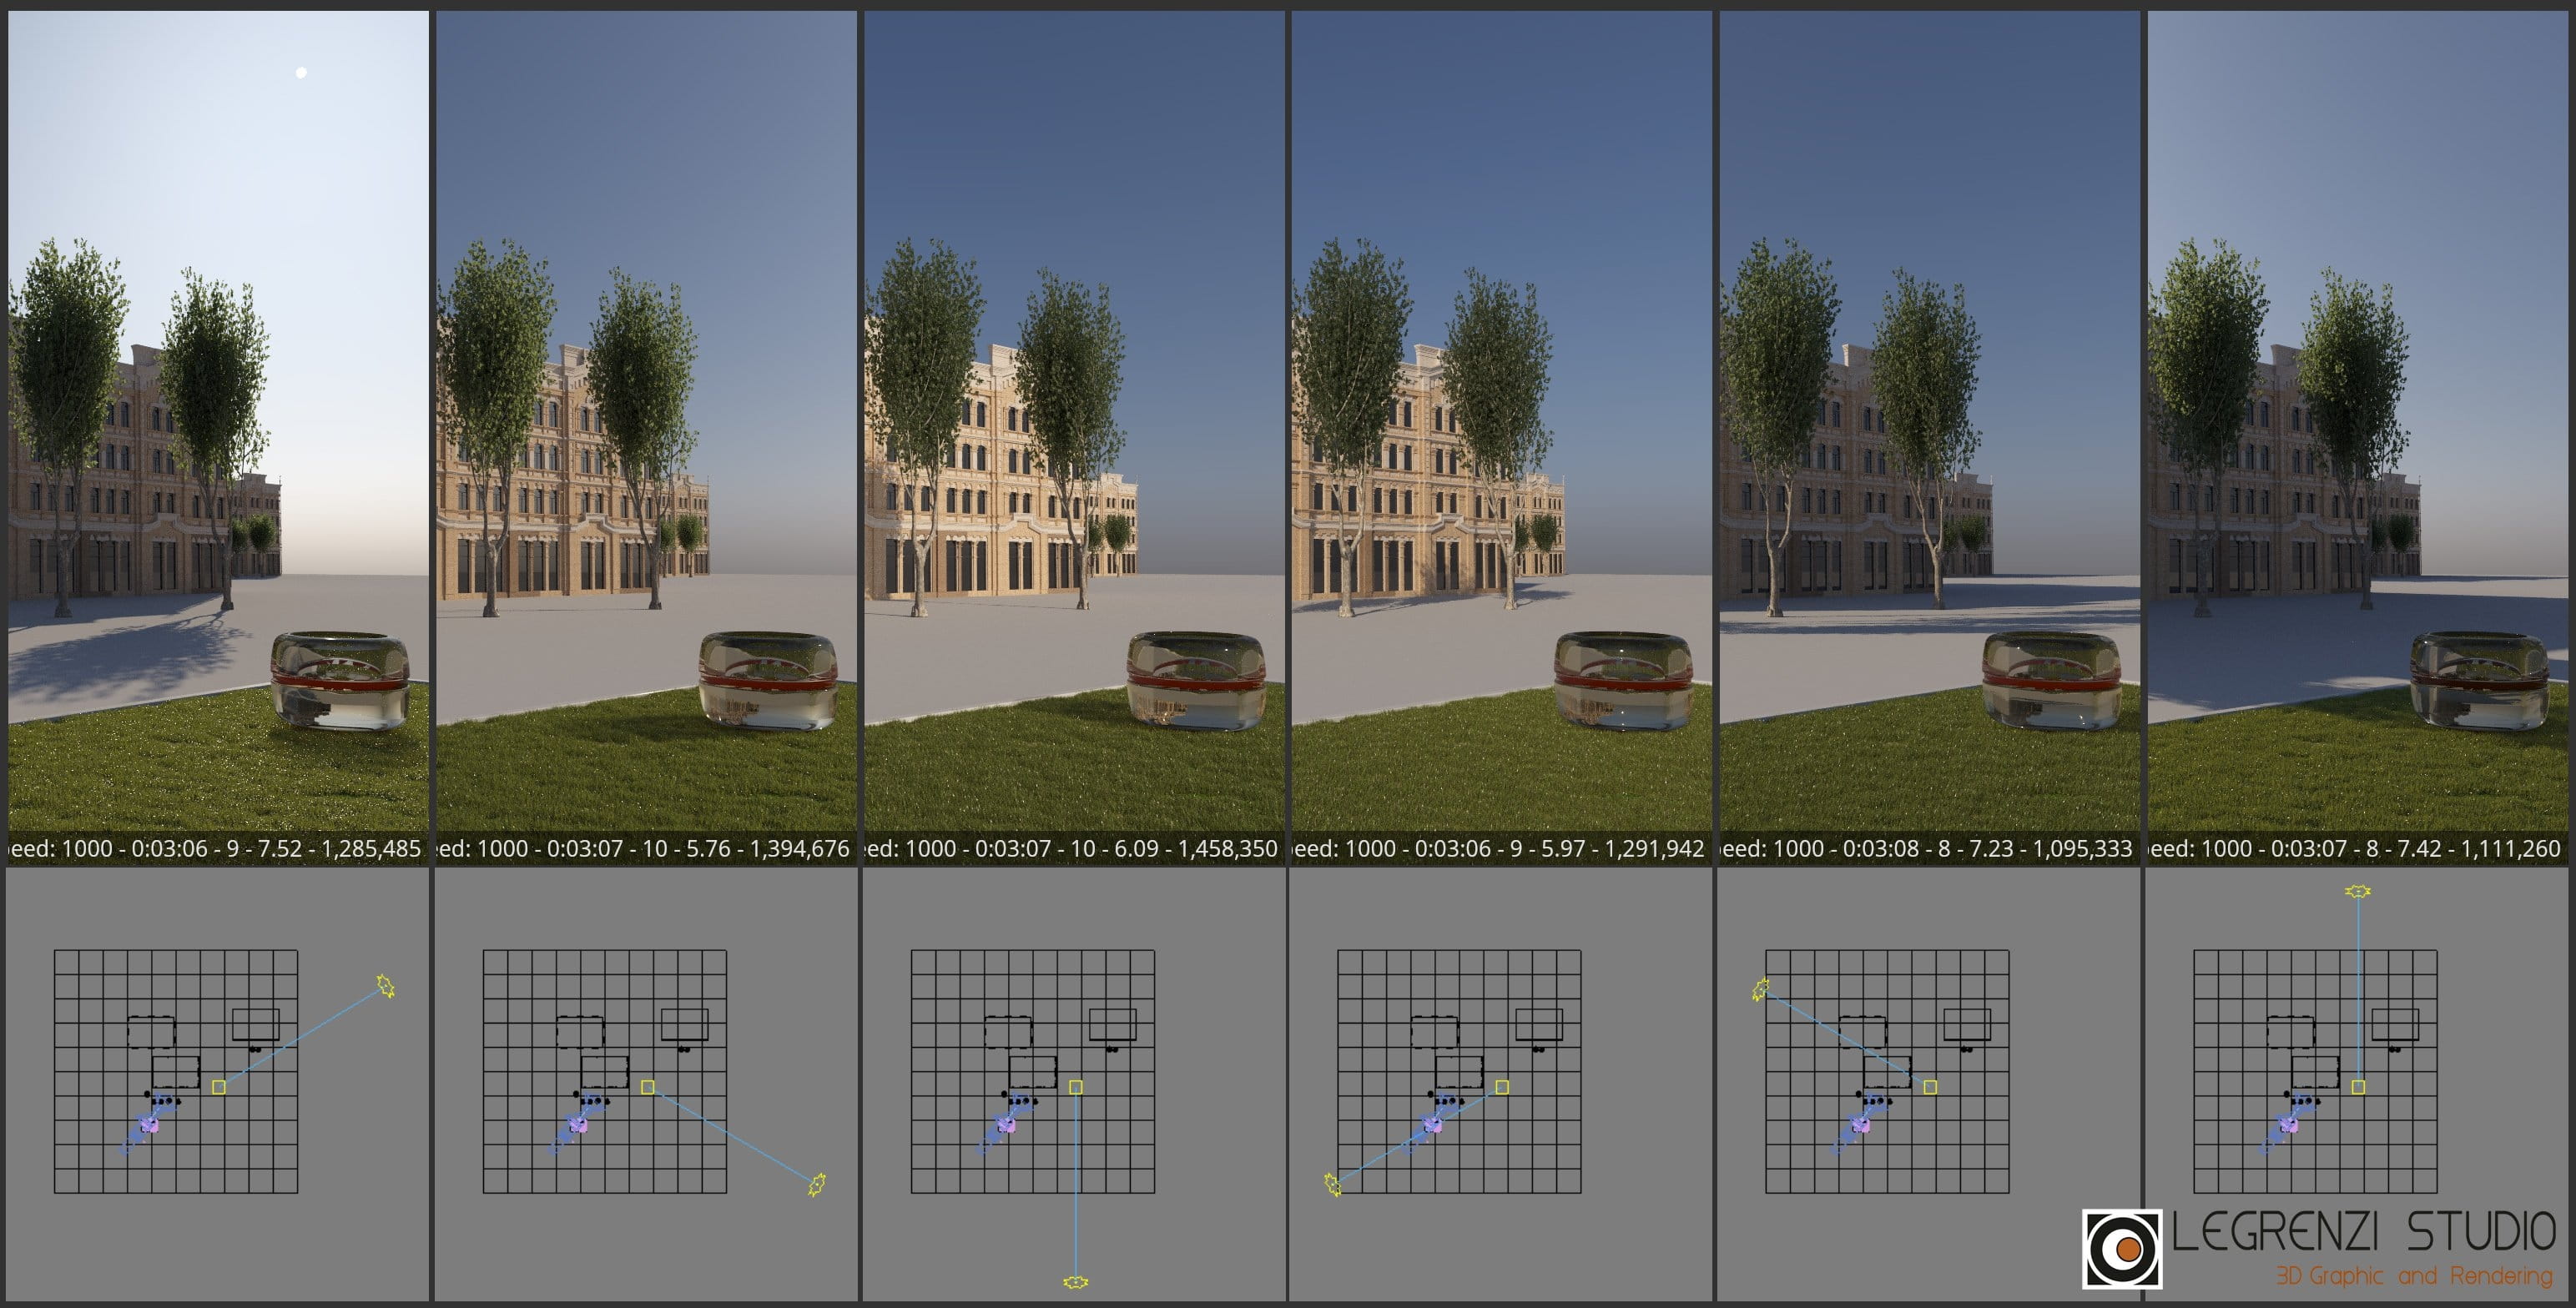
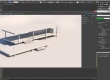
The scene used to explain this map consist of three objects placed on a circular plane illuminated by the Corona Sun object, with the Corona Sky map loaded in the 3ds Max Environment slot. To display the sky in its full width we applied the CoronaCameraMod modifier in Spherical mode to the camera. In this way we can see the entire Corona Sky map with a single render. Finally, we animated the Corona Sun disk at different heights.
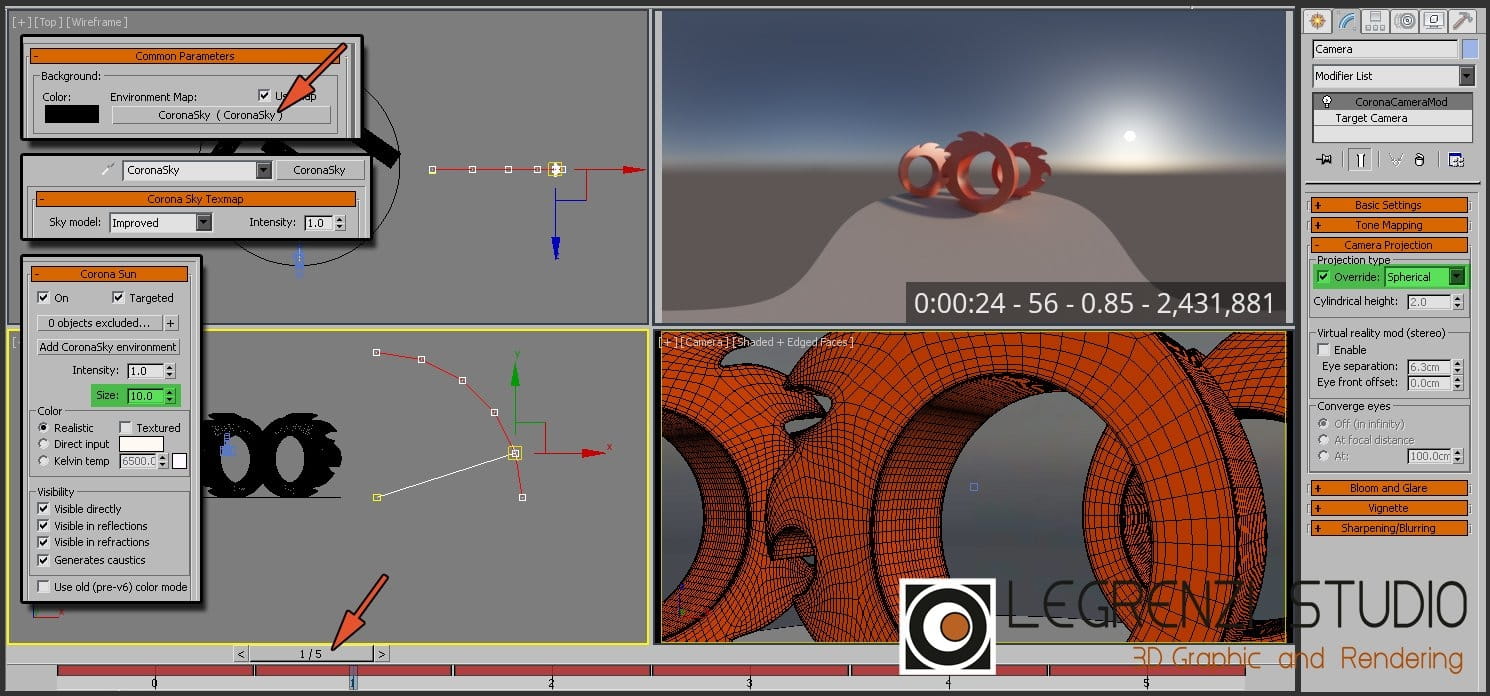
Screenshot and render of the scene. Note the Corona Sky map used as Environment. The Size parameter was modified to make Corona Sun bigger and more visible. Move the 3ds Max timeline to change the Corona Sun position.

This image shows the Corona Skay map interface. The Corona Sky map is divided into two rollouts. The first rollout allows us to choose four types of algorithms to calculate the sky: Preetham et. al. , Rawa-fake, Hosek & Wilkie, and Improved. The second rolout contains parameters for modifying the Rawa-fake model only.
Corona Sky Texmap
Sky model - via a drop-down menu, we can choose four types of algorithms used by Corona to generate the sky:
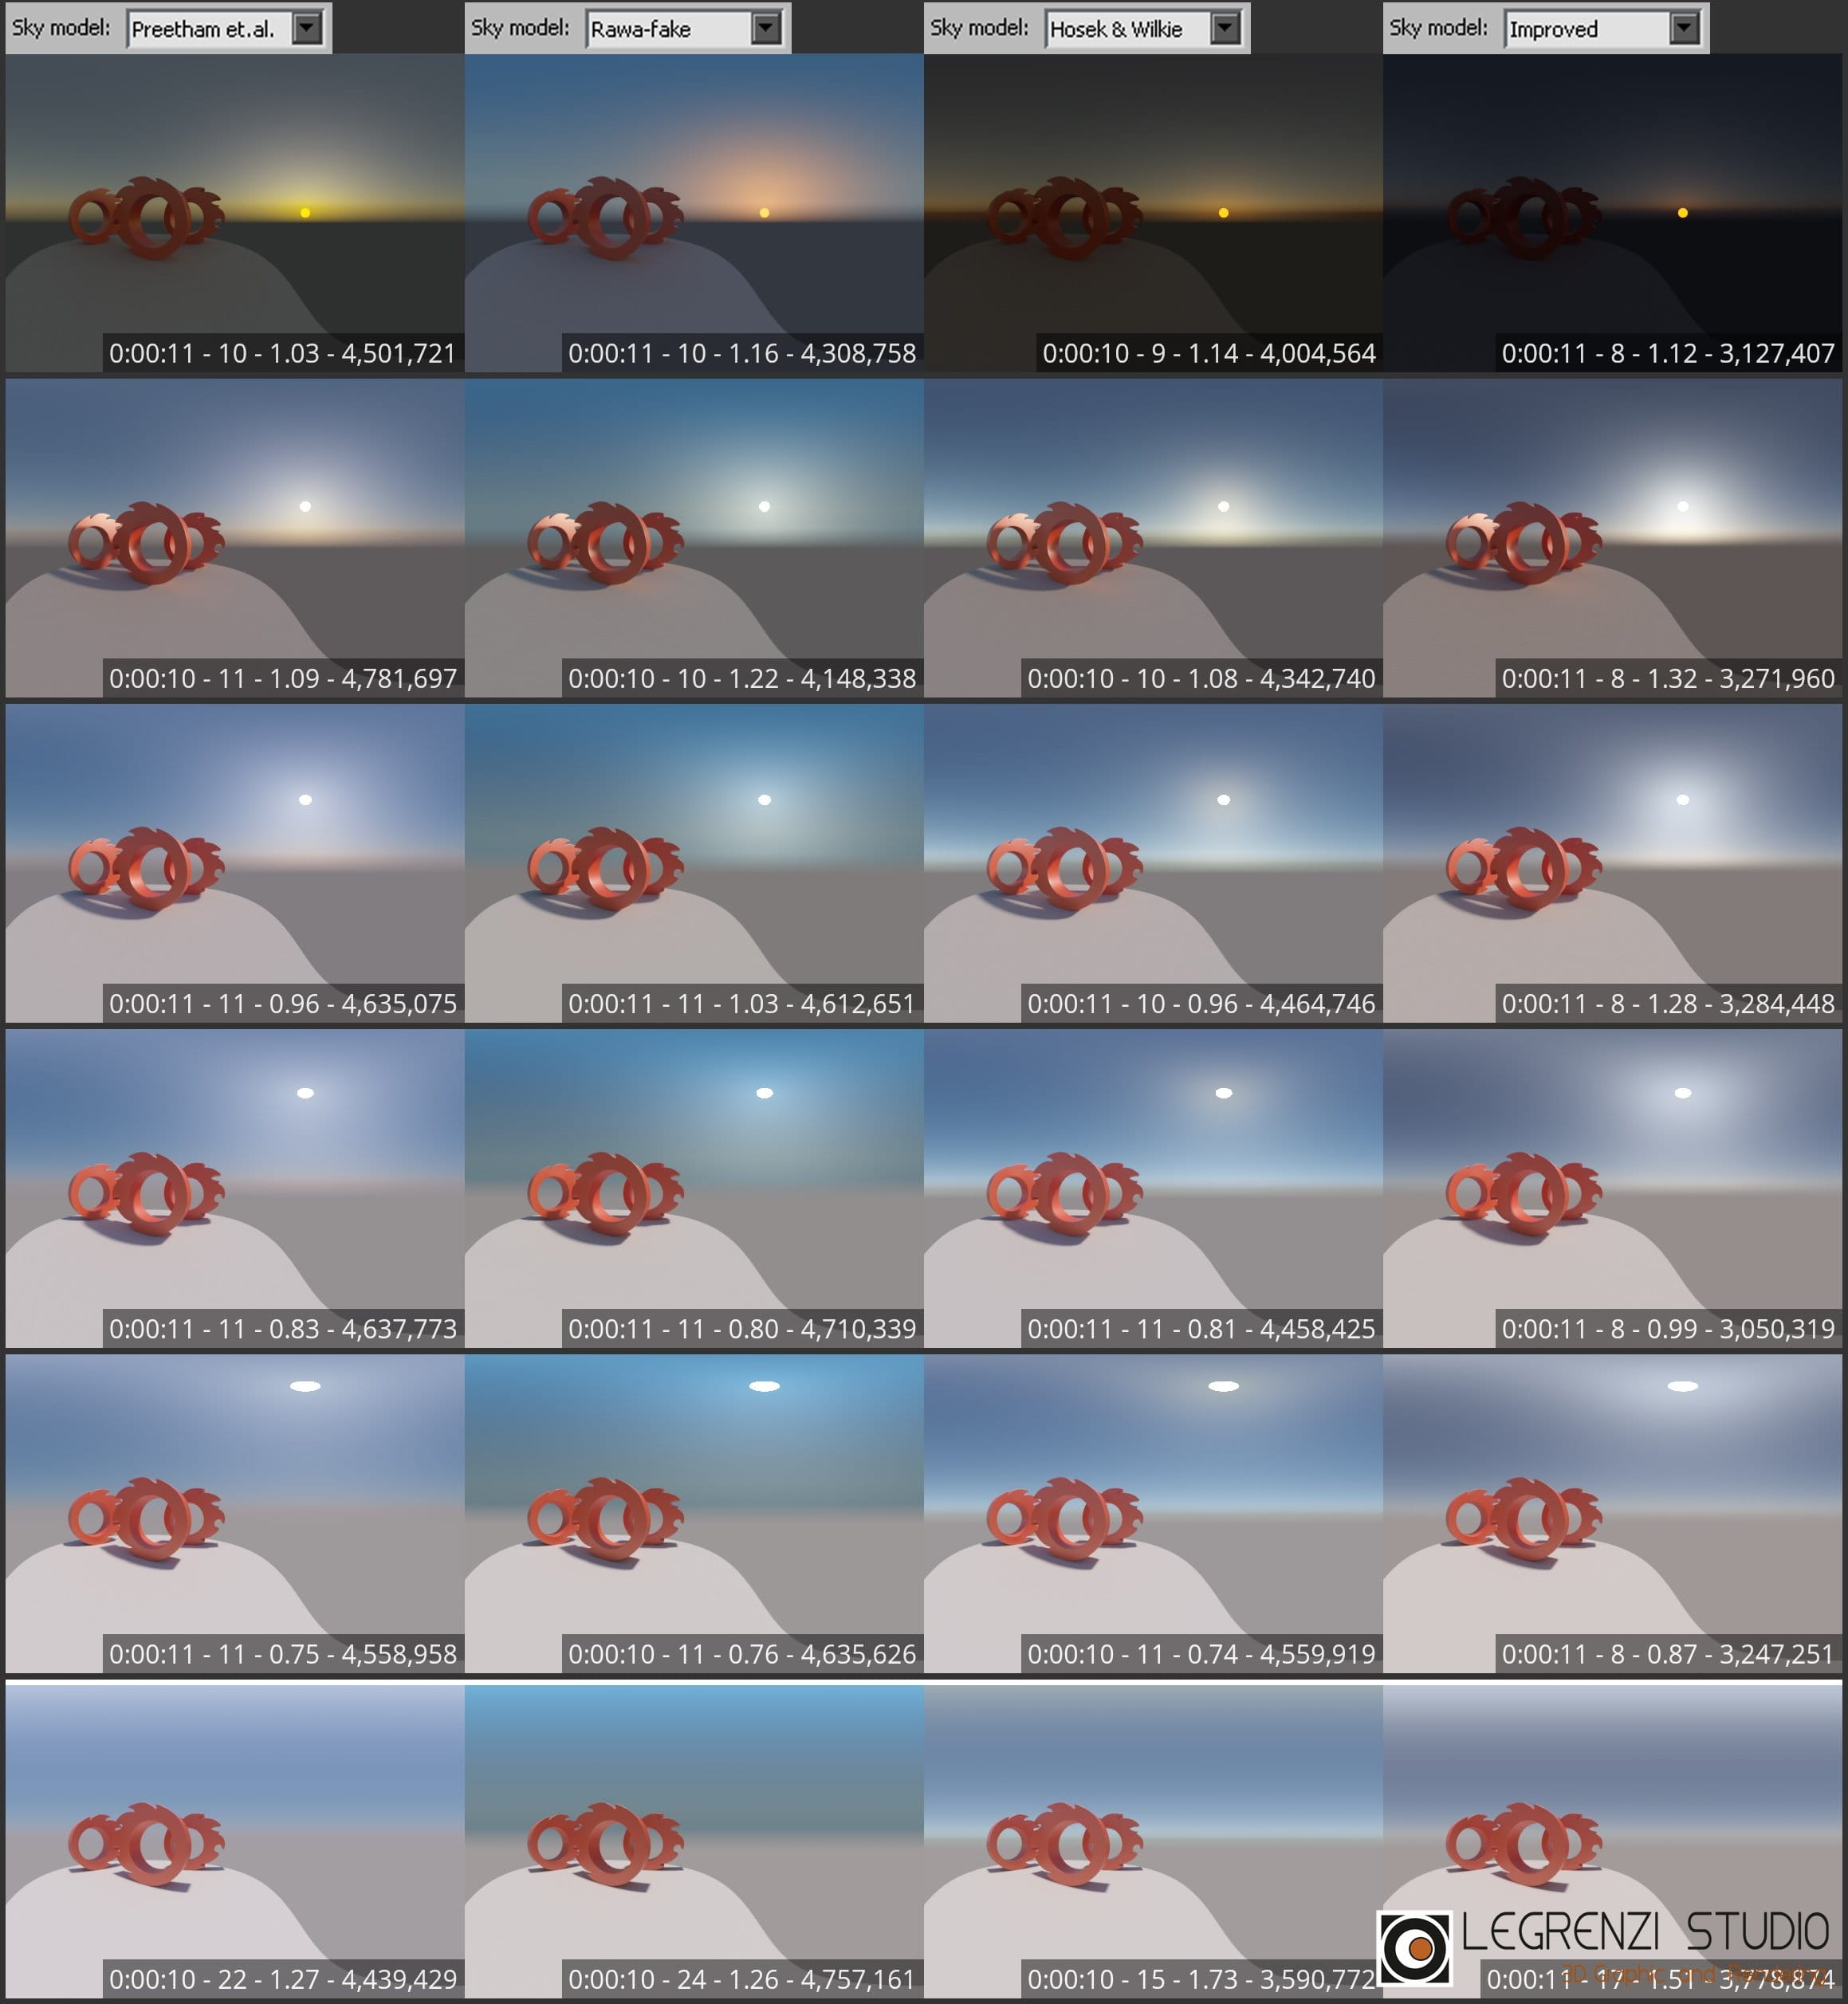
Comparison of the four algorithms when the sun is placed at different heights.
Turbidity - changes the amount of haze. High values make the portion of the sky around the sun less clear, creating a sort of halo. Turbidity is not available in Rawa-fake and Improved mode.

Variation of the Turbidity parameter. Hosek & Wilkie is the sky model used.
Intensity - increases the light intensity produced by the sky.
Corona Sky and Corona Sun are designed to generate physically realistic lighting. The lower the sun on the horizon, the less light Corona Sky will produce (and vice versa). For a physically accurate effect it’s advised not to change Intensity, otherwise the sky may appear brighter or darker, obtaining unrealistic renders.
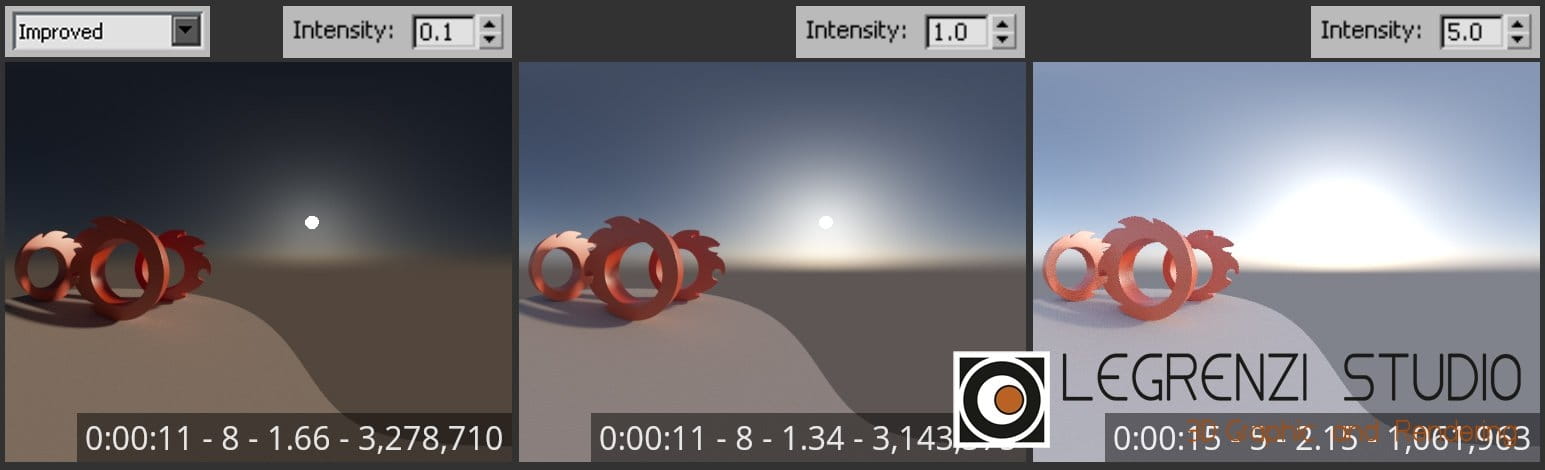
With Intensity = 0.1 the image is unconvincing, while the render is clearly overexposed when Intensity=5.0. Furthermore, the shadow generated by the sun tends to disappear due to the over bright Corona Sky.
Horizon blur - mixes the upper and lower portion of tthe Corona Sky map.

Increasing of the Horizon blur parameter. Note how the separation line betweeen the sky and ground gradually blurs.
Sun selection - allows us to manually select which Corona Sun to use for the Corona Sky processing.
Ground Color - defines the color of the Corona Sky portion used for the ground simulation. The sky near the horizon line will also be affected.
Affected by sky - when enabled, the lighting of the sky will affect the ground color. For a physically accurate render, it’s advised to enable it.
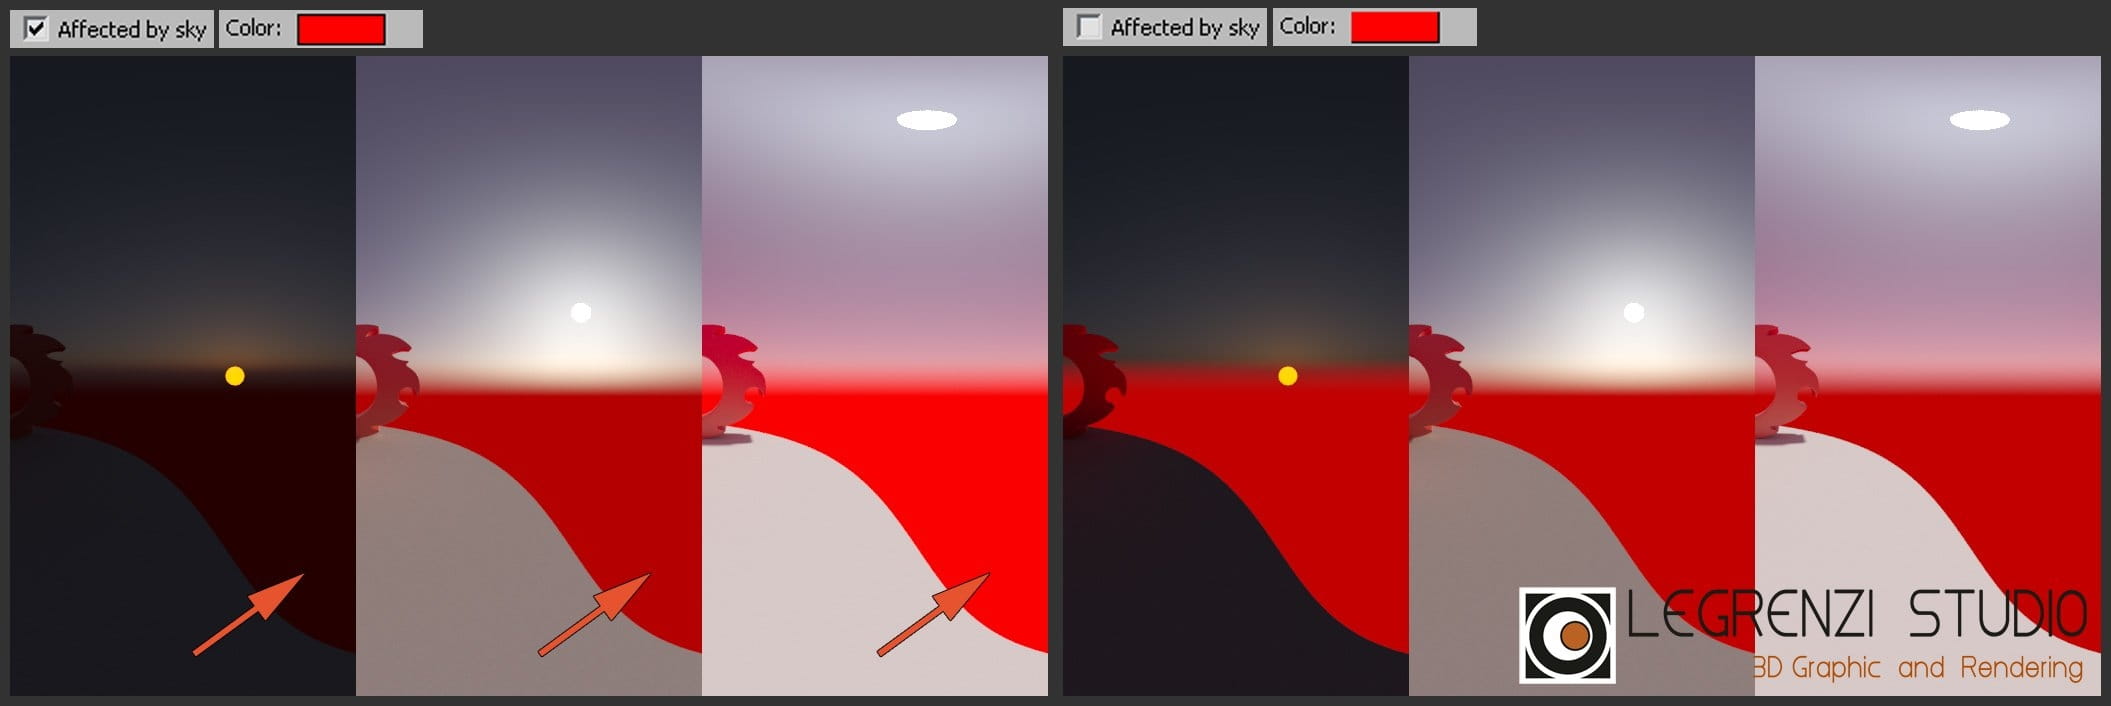
Effects of changing the Affected by sky parameter.
Rawa-fake model parameters
In this rollout we can modify some aspects of the Rawa-fake model.
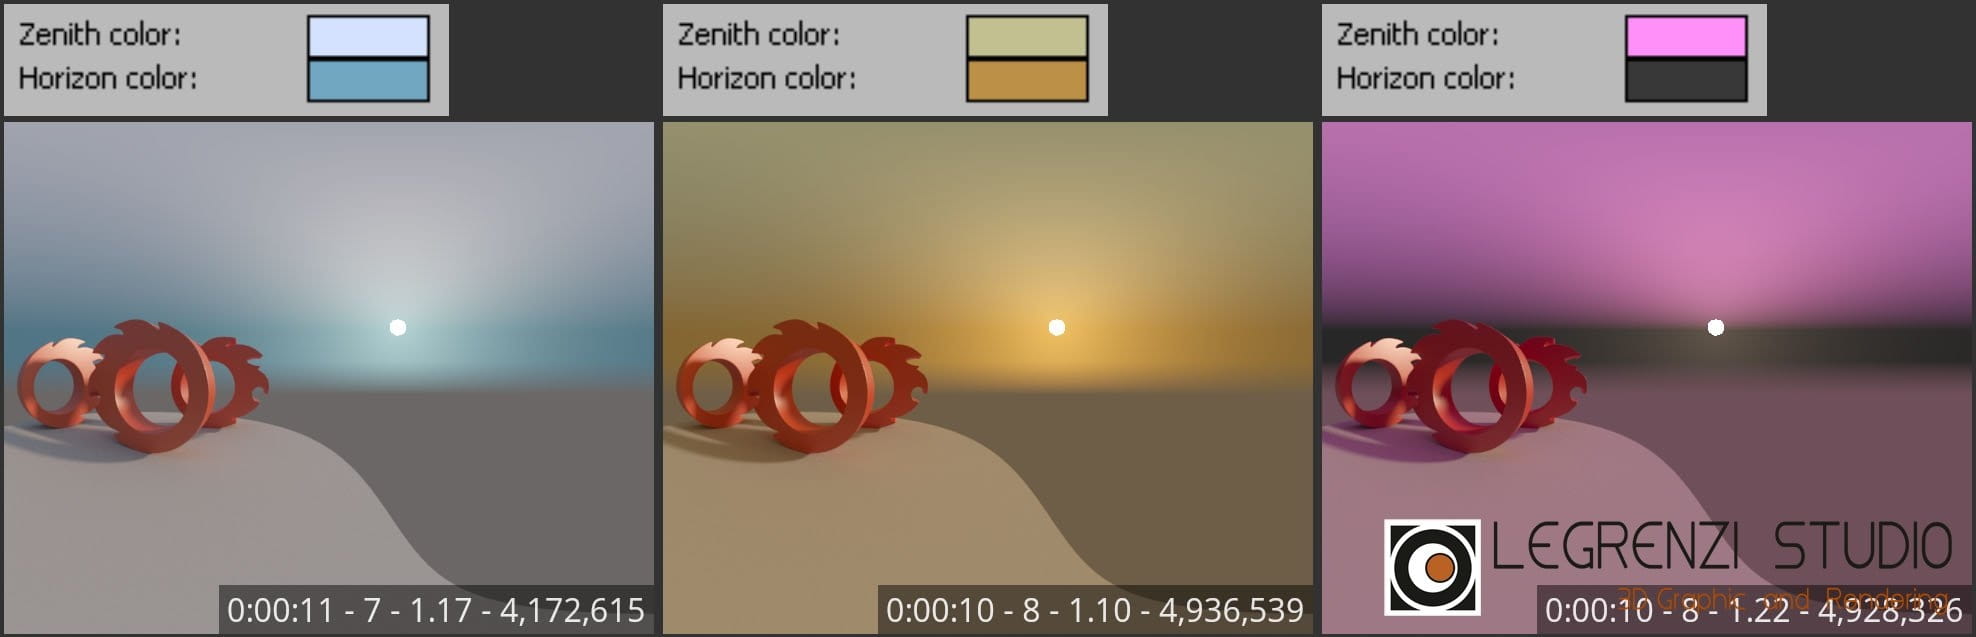
With Zenith color and Horizon color we can create surreal backgrounds.

Sundisk glow generates a halo around the solar disk.
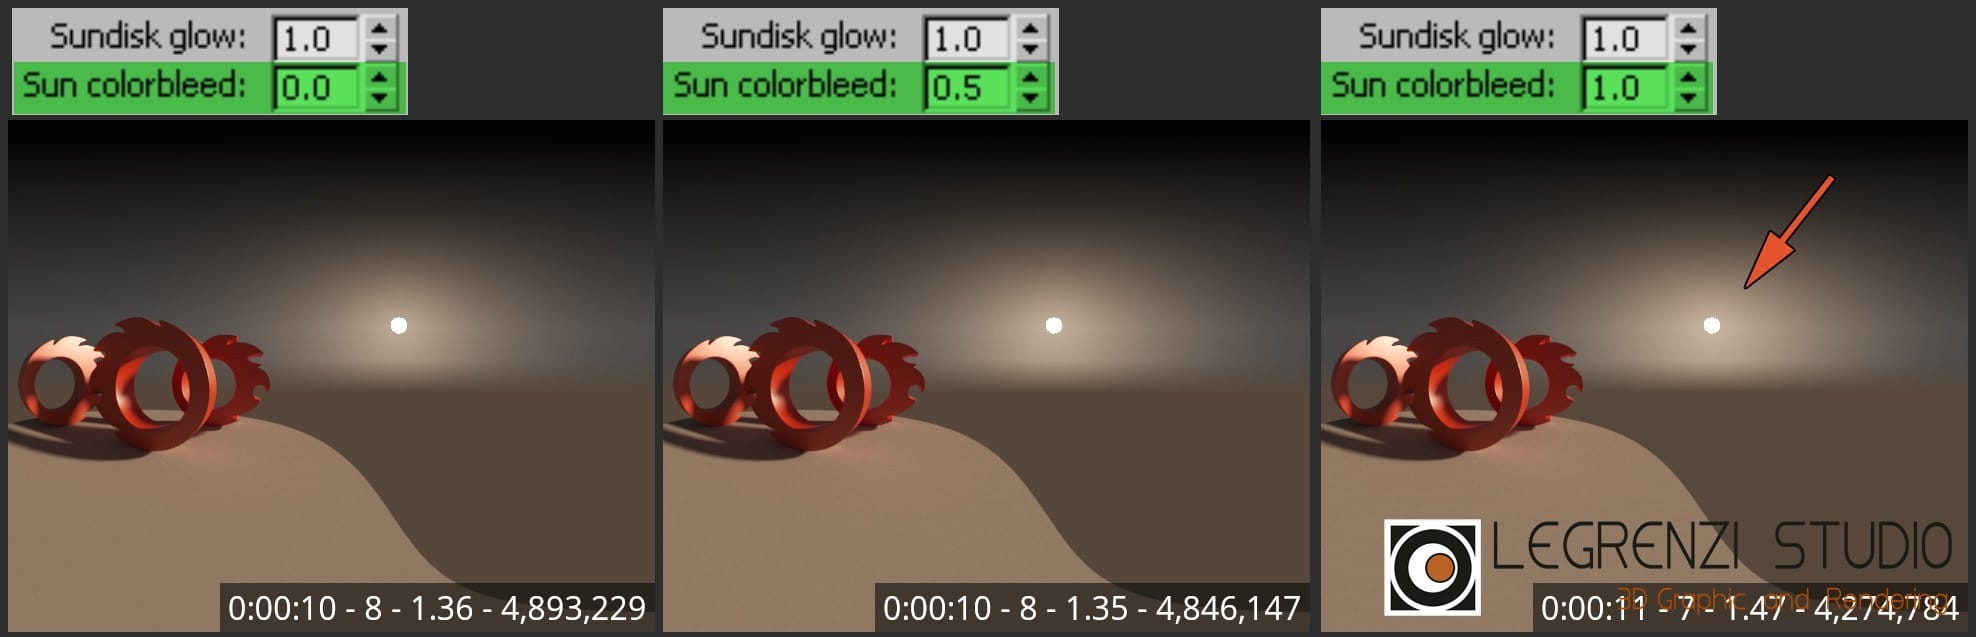
Sun colorbleed is barely visible.
Do you know more? Get "Corona - The Complete Guide" here!


LEAVE A COMMENT


|

|

|

|

|
 Customer zone
 Your special offers
 Your orders
 Edit account
 Add project
 Liked projects
 View your artist profile
COMMENTS