Evermotion Pass 10% Off - Get Instant Access to Thousands of 3D Assets

Check Plans

Information Clause

In accordance with the art. 13 section 1 and 2 of the European Parliament and Council Regulation 2016/679 of the 27th April, 2016 on the protection of natural persons, with regard to the processing of personal data and on the free movement of such data, and repealing Directive 95/46/EC (General Data Protection Regulation), hereafter RODO, I hereby inform that:

1. EVERMOTION S.C., 8 Przędzalniana Str., 15-688 Białystok, Poland is the Administrator of your Personal Data (APD)

2. Data Protection Inspector can be reached through e-mail: iod@evermotion.org

3. Your personal data are to be processed on the basis of art. 6 section 1 letter a, b and f of RODO in order to:
a) prepare, conclude and execute the agreement and for other purposes approved by you,
b) to execute the legitimate interest like marketing of products and the agreement, claim assertion or defence against claims resulting from the law regulations.

4. Entities entitled to the reception of your personal data may be the authorised public bodies; mail providers; providers of the services covered by the agreement; responsible for debt recovery, keeping the archives, document utilization, legal consulting, technical services, IT services and accountancy.

5. Your personal data shall not be transferred to the third country, nor to the international bodies.

6. Your personal data shall be processed within the period of the agreement and upon your additional consent until you withdraw it. APD shall keep the data for the period of any civil law claim execution connected with the agreement.

7. You have the right to demand an access to your personal data, to correct or to delete the data if there is no other basis for the processing or any other purpose of such processing or to limit the processing of the data, to transfer the data to another administrator and to raise objections to the further data processing if there is no legal basis for further processing and to withdraw any previous consent.

8. You provide the personal data voluntarily, however they are necessary to conclude the agreement. The refusal of providing such data may result in the refusal of the agreement conclusion.

9. You have the right to lodge a complaint to the Personal Data Protection Office when in your opinion the data processing violates the regulations of General Data Protection Regulation of the 27 April, 2016 (RODO).

10. Your data will be automatically processed, including the form of profiling.
11. You are obligated to forward above mentioned information to your representative, especially if you appointed this person in the agreement as the contact person or as the representative for the agreement execution.

OK

3D Compositing Guide (Part 02)

Simon Reeves 2008-03-03 00:00 tutorial  > Photoshop  > compositing

This is the 2nd part of this guide, more 'how' than 'what' from the first part.

I've just realised how long ago it was now when I wrote the first part nearly 6 months, time flies these days :) . Check the first part about the different passes you may want to use and why, here.

COMPOSITORS

There are a few major compositors, Shake, Combustion, After Effects, Nuke, Fusion and XSI's FxTree.

The most commonly used and standard is probably Shake (although it has now been discontinued by Apple) and as with the 3d side of things, probably even more so, the principles are the same.

Personally my preference is to use the FxTree within XSI. The similarities between FxTree and Shake are a good example of the lack of contrast between compositing apps, including similar nodes layout and workflow. They are what I have most knowledge in, so I will use them as the main apps in this guide.

Instead of using layers like you would in Photoshop (or Combustion/After Effects in fact), Shake and FxTree for instance are node-based so every effect/filter/operator is a node inside a 'tree' which can contain one or many in or outputs. Having this tree, you can always go back and adjust settings in any node as it will not have been applied permanently, frozen or collapsed, and thus non-destructive.

THE TREE

Now here is my compositing tree in FxTree, as well a comparison tree in Shake and Fusion, just to show you how much or little they differ. The nodes are very similar in the different apps, Shake and FxTree are nearly identical and have a few key features. They both have an edit button to bring up the properties of a node and a view button so you can view the tree up until that point. The small lumps around the nodes are where you plug in other nodes. These vary from node to node, for instance 'Input' nodes don't require an input, like 'Output' nodes don't require an output. And some nodes can have multiple inputs for different reasons.
On the FxTree, the green ones along the top are the inputs, the blue on the site are for mattes, and the red at the bottom is for the output.

FXTree:
 
 
Shake:
 
 
Fusion:


ESSENTIAL NODES

Now straight into those all important nodes. I'm going to use stuff from the first part of the guide so make sure you've read that too.
Input/Output Nodes

At all the tips of all the branches in the tree, there needs to be some kind of input node. Often it may be an image, a render/pass or a background plate perhaps. But it could also be a plain colour, a gradient or a rotoscope/mask of some kind also.

I've highlighted these on the tree in red:


Also worth mentioning here are Output nodes, this would be at the very base of the tree as the final output for the comp to output to whatever format you want.

So we have are inputs, but how to we stick them together I hear you ask! Well, more nodes...
Math/Layer Nodes

Here on the tree, they are highlighted in yellow:


'Over':


ESSENTIAL NODES - continue

In a layer based app like photoshop, you would place the beauty pass with its transparency ontop of the background plate it will lay over the background nicely.
Well the equivalent to that would be the aptly named 'Over' node - Which has two inputs, one for the background element (the left side of the tree in the image), and the other foreground element (the right side). If the foreground element contains an alpha channel (RGBA) it will use that as its transparency (by pre-multiplying, which can be tricky to get your head around so we won't go into that for now).

'Add':
In FxTree all the math nodes are selectable in one node named 'Math Composite' which you can see in the image. The node that "Spec_Signs_" is plugged into is set to add.
The first of the math nodes does literally what it says, it adds the pixel values of the two inputs together. We would usually use this to add reflections and specular passes to the comp.
These passes are mostly black apart from the bright highlights/reflections. Adding, effectivly removes the black but doesn't just lay the rest of the image over the background (like an over with an alpha channel) it brightens it.

So if we pick a random pixel on the background image, it will have 3 values from 0-255 for each colour channel (Red, Green and Blue). But for now we will just assume they are the same in each channel, so one value from 0-255 where 0 is black and 255 is white.

Now this is why the black pixels are effectivly removed with an add node, as any pixel value + 0 (black) will remain the original value. But any value greater than 0 will brighten the background pixels:


bg + fg = output
50 + 0 = 50 (no difference)
128 + 205= 255 (as colours will be clamped at 255, pure white)
190 + 55 = 245 (brighter)

Hopefully that didn't sound too complicated, but its also the base for the other math nodes so it should have got a lot covered.

'Multiply'
The Multiply in the tree above is the 'Math Composite' which the 'AO_' is plugged into.
Kind of the opposite to add, using Multiply removes the white from an image. Now for multiply I've found it best to consider the pixel values normalised, so the proper range of 0-255 is now 0.0 to 1.0
So when multiplying a Ambient Occlusion pass for instance, we want to remove all the white and keep the darker areas.
Remember, black = 0.0 (0), white = 1.0 (255)

bg x fg = output
50 x 0.0 (0) = 0 (black)
128 x 1.0 (255)= 128 (no difference)
190 x 0.22 (55) = 41 (darker)


So multiplying white pixels has no effect, but for anything less than 1, it darkens the pixels.

Other Math Nodes:
Multiply, Add and Over are the main layering nodes that you'll need to use, while there are other common nodes, including 'Screen', 'Subtract' etc. I won't go into these, have a play for yourself if you want to see what they do :)


ESSENTIAL NODES - continue

(Slightly) Channel re-ordering

These mostly concern extracting/switching mattes and alpha channels from different passes and colour correcting.

These can be found under some quite different names, and with different choices in the different apps. For instance, FxTree gives us a few nodes that with different levels of complexity:
- 'Swap Component'
- 'Component Parser'
- 'Pixel Parser'

Personally I tend to use the 'Component Parser'. A little more advanced than Swap Component as it gives you the chance to write a simple expression, and also multiple inputs so you can pick channels from more than one source.


You can use these nodes to change the alpha to a solid colour, effectively removing it. By setting the alpha to 1 (black) or 0 (white) - which is handy if you're adding a pass (reflection pass for instance) but don't want to add its alpha channel as well - which could cause those evil nasty black edges.

Often a you may have an image/pass that doesn't have the alpha channel you want, so you can replace the original using another image.
As well as alpha replacement, you can replace the alpha with the values from another channel (eg. green). And from the first part of the guide, this is why I have rendered an ID Pass.

First of all we plug the ID pass (input node) into the component parser. In the component parser settings, we decide what channel we want to use, red for now, so we type 'r' into the alpha's input area. It doesn't matter what we type for the R, G + B channels because all we're going to use is the new alpha.
Now we can plug this into the matte input of some other node, a colour correct for the beauty pass for instance - so we can colour correct a specific part of the render.

Copy and paste those nodes a couple of times and change the alpha inputs from 'r' to 'g' and 'b' respectively to use those mattes also.


In the image above, you can see the nodes in action:
- The beauty pass on the top left in its original state.
- The ID Pass on the top right, again in its original state.
- Below that, the ID pass's red channel has been extracted and set to be used in all the channels, but importantly, the alpha.
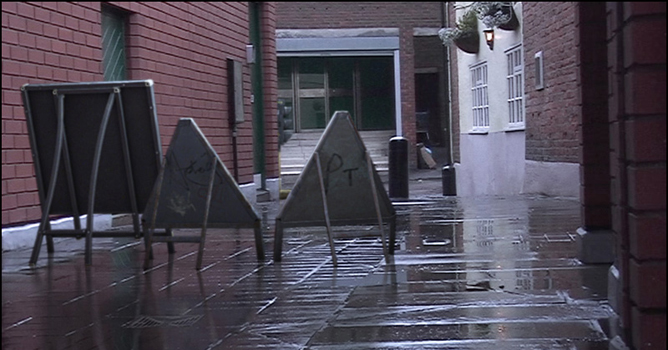
- This plugs into the colour correct's matte input, so that only the frame of the triangle sign is affected, and turned a lovely green colour, a fine improvment.

Thats about all for now, might add a little bit so feedback at this point would be welcome.
 

BIT DEPTHS

I was also planning on writing a wee bit about bit depth, but through rather very little research I found a couple of really great, clear sources and explainations.
Though I'd like to quickly mention that often these 2 links refer to 24bit (16 million colours) which is 8 bits per channel, and thats how it is usually reffered to in 3d software. ie When you save a png it will ask if you want to save in 8bit, or 16bit, not 24bit and 32.

- In Colour
- Wikipedia - Bit Depth

OTHER RESOURCES

Authors info

Author: Simon Reeves
website: www.simonreeves.com

 
Author: Simon Reeves
Tags: 3d
You may also like...
New AMD Ryzen Processors 3D performance

New AMD Ryzen Processors 3D performance

New AMD Ryzen CPUs - results in 3D rendering.
×

LEAVE A COMMENT

You need to be logged in to leave a comment. Don't have account? Register now.

calydon 18:18:29  |  23-06-2009
There's a missing tag at the beginning of the html so this whole section is being shown as code. I had to copy/paste fix the html and view in a new browser to read this.
houdhxp 06:35:19  |  29-06-2009
this whole section is being shown as code .