Search
Cart
Sign in
  • offerCustomer zone
  • offerYour orders
  • offerEdit account

  • offerAdd project
  • offerLiked projects
  • offerView your artist profile

  • Dark mode

We care about your privacy

We use cookies to provide you with the best possible experience. They also allow us to analyze user behavior in order to constantly improve the website for you. The consent is voluntary. You can withdraw it at any time or renew it in Cookie settings on the home page. Withdrawal of your consent does not affect the lawfulness of processing performed before the withdrawal. Privacy Protection Policy
Accept all
Accept selection
Reject all

Making of small office interior - Tip of The Week

Michał Franczak 2015-02-27 11:44 tutorial  > 3ds MAX  > rendering

Making of scene 1 from Archinteriors vol. 36.

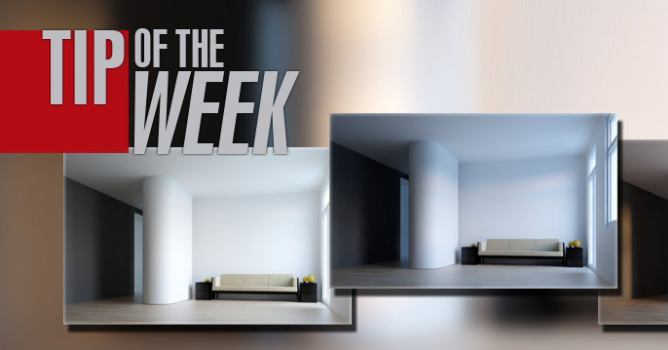
It's rather small office. In such little space lighting is crucial - it's easy to end with claustrophobic look that is not attractive at all. In this case we need many sources that come from different directions. So we used Vray Lights  (planes) from variety of directions. This scene  was made by Evermotion and comes from Archinteriors vol. 36 collection that is available in Evermotion Shop.

Click on image to enlarge nr_AI36_001_PP_077.jpg

Final image after post-production in Photoshop


Click on image to enlarge nr_001_wire_076.jpg

Wireframe


Click on image to enlarge nr_AI36S01_0025_camera_view_072.jpg

This is how interior looks in 3ds Max Viewport. Notice many possibilites of lighting - opening on far left, glass plane on the close left, window on the right, three lamps over the table.


Click on image to enlarge nr_AI36S01_0012_interior_083.jpg

Props were put even behind glass plane on the left. they are not visible, but cast realistic shadows on the plane.


Click on image to enlarge nr_AI36S01_0023_floor_070.jpg

Floor plane.


Click on image to enlarge nr_AI36S01_0022_floor_material_1_069.jpg

Floor has quite interesting material. It's vrayBlend material made of base and one coat material, blended with fallof map for greater photorealism.


Click on image to enlarge nr_AI36S01_0021_floor_material_2_068.jpg

Floor base material settings. Composite of color map and Vraydirt is in the diffuse slot, reflection map is controlled by falloff, another subtle map is put in glossines slot.


Click on image to enlarge nr_AI36S01_0020_floor_material_3_067.jpg

Base material is blended with coat material that has slightly higher glossines value.


Click on image to enlarge nr_AI36S01_0011_glass_material_082.jpg

Close to the camera, on the left side you can see glass wall. It has square bump pattern. For greater reality glossines is controlled by bitmap with stains


Click on image to enlarge nr_AI36S01_0010_glass_material_map_081.jpg

Gradient ramp settings


Click on image to enlarge nr_AI36S01_0009_blueprint_080.jpg

There is a blueprint on a table.


Click on image to enlarge nr_AI36S01_0008_blueprint_material_079.jpg

Blueprint material


Click on image to enlarge nr_AI36S01_0016_bg_063.jpg

Background plane, visible through the window.


Click on image to enlarge nr_AI36S01_0015_bg_material_062.jpg

Background material settings


Click on image to enlarge nr_AI36S01_0014_bg_material_map_085.jpg

Background material map settings


Click on image to enlarge nr_AI36S01_0019_lights_position_066.jpg

Lights placement. As you can see - there is one vray plane light on the left (behind glass plane), one behind the camera, one behind terrace window on far left and one behind terrace door. Another plane is put on the right. There are also three lamps over the table. So there is total 8 light sources in this scene.


Click on image to enlarge nr_AI36S01_0018_lights_position_2_065.jpg

Lights - external view.


Click on image to enlarge nr_AI36S01_0017_light_lister_064.jpg

Vray Light lister


Click on image to enlarge nr_AI36S01_0013_camera_settings_084.jpg

Camera settings


Click on image to enlarge nr_AI36_001_raw_078.jpg

Raw render output


Click on image to enlarge nr_PASSES_073.jpg

Passes


Click on image to enlarge nr_PS_STACK_074.jpg

Post production - we added some light glow, corrected levels and shifted saturation of table area to yellow, so there is more warm lighting over the table.


 nr_AI36_001_PP_077.jpg

GIF animation of post-production layers


Click on image to enlarge nr_RENDER_SETTINGS_075.jpg

Render settings


Click on image to enlarge nr_AI36_001_PP_077.jpg

Final image
Author: Michał Franczak Editor: Michał Franczak
Tags: evermotion office archinteriors36 vol.36
You may also like...
Make fast realistic visualisations with Archexteriors vol. 18

Make fast realistic visualisations with Archexteriors vol. 18

Making realistic visualisations is not an easy task when you have to start from a scratch. But You don't have to setup everything by yourself.
×

LEAVE A COMMENT

You need to be logged in to leave a comment. Don't have account? Register now.

ilmattiapascal 00:54:03  |  02-03-2015
hi there, great work. There is one thing that i cannot understand for the most of your making of tutorials. The floor textures are just perfect, but i can't understand how you can reach the wood variation for each floor element without using multi-texture plugin. It seems too strange to me that only a vrayblend material is able to make the variation between the boards so cool. I asked myself the same question for a lot of other scenes that you put in tutorial, but it's never explained (except when you use the cg source items, like in the winter pavillon tutorial). Can you explain that thing ? thanks!
dr_After 22:21:32  |  06-03-2015
At holiday at the moment, will respond when I get to desktop! :)
karthikeyancg3d 12:31:13  |  07-03-2015
HOW MUCH TIME TOOK FOR RENDER WITH THAT SUBDIVISION IN LIGHTING.MAN GREAT WORK WITH LESS NOISE GREAT
dr_After 14:08:58  |  11-03-2015
Floor tezturing: there is one floor texture, but every board is moved by hand in UV editor, so we don't end with continuous look, but with more variations. this technique is quite common and very effective.
march 09:14:16  |  19-03-2015
Congrats for the aniversary! Very instructive tutorial, as always Mr Francz. Could you explain a bit more about "every board is moved by hand in UV editor..." and, I would like to know what are your Composite maps usual settings? Thanks in advance.
jpmartin 13:54:31  |  19-03-2015
Where is the VRay Sky portal pulling the light from? I don't see a VRay sun or anything.