Evermotion: More Than an Asset Library
How Evermotion became a full-scale production partner for archviz, automotive and synthetic data.


Total: € 0
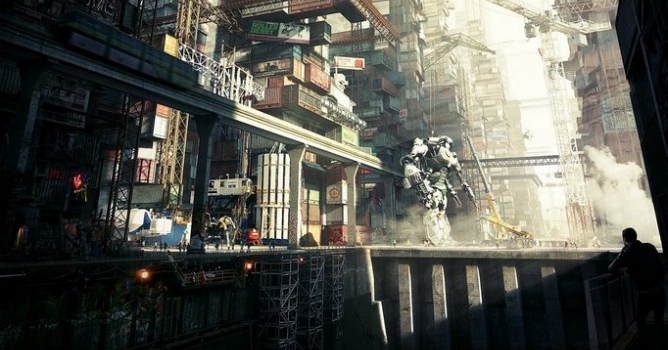

Hello Everyone! My name is Tamas Medve and I am currently working as an architectural illustrator in Norway. First of all, I wish to thank Evermotion very much for the opportunity to share this short “making of” about my project called "Metallum City - Giants in The Dust."
Just a few words about the project. This image was made for Evermotion Challenge 2013, but the main idea of the concept hatched in my head only three weeks before entering this competition. Every day on my way to work I pass by hundreds of shipping containers and this gave me the idea of an image of future city built entirely out of these containers but incorporating apocalyptic elements.
Click on image to see bigger version
Click on image to see bigger version
From the very beginning I had a vision about the whole image including the composition and mood so before I touched 3ds Max, I searched references for matte painting because I knew that I had to include some attractive details in the final image. Otherwise I would spend a lifetime in front of my screen modeling cranes and similar industrial machinery.
Click on image to see bigger version
Modeling
I have to admit that modeling is not my greatest skill so I had to figure out the easiest way to build my scene. The idea was simple: "LEGO." I used to love to play with it :) ! I made just a few different elements and reused them in my scene many times. That saved me a lot of time.
Click on image to see bigger version
Here is the first proxy tower which was the main Lego element. To achieve some variation, I rotated towers by 45 degrees.
Click on image to see bigger version
Materials
For the mapping I used only the basic uvw map. Simple and easy for lazy guys like me ::). All textures which I used for the materials are tiled and I combined these with vray dirt as you can see below. Basically I used almost the same material on the models, of course changing the diffuse map and the highlight glossiness of some of them.
Click on image to see bigger version
Click on image to see bigger version
Lighting
The first step was to build up the scene which was in my imagination using only boxes. This small trick gave me just a few seconds of render-time to set up the exact lighting that I wanted to achieve.
Click on image to see bigger version
There is no special trick. I used VraySun and VrayDome with an HDRI image in the texture slot. At the same time I picked the final background for the post-production and I also added this as Vray light material applied on a plane. I think this is a really important part of the lighting set-up because this gives "real" reflections and colours.
Click on image to see bigger version
Click on image to see bigger version
Click on image to see bigger version
Click on image to see bigger version
Post-production
Yes! Finally we have arrived to the most exciting part and at the same time this is the hardest one to explain because there are no rules... Every human being has got a different point of view and ideas for creating moods and color tweaks.
Click on image to see bigger version
I spent a few hours cutting out cranes and small details like the "Burger King" logo or the robot in the middle which is the main focal point. Also the foreground is 2d and I asked one of my colleagues to take a photo while I was standing on our balcony. All of these small things provide a lot of richness to the image. The concept for the mood was to achieve a really dirty and dusty feeling and the best tool was to get this is the Zdepth mask. It was a bit tricky because I had to paint the 2d elements on the mask.
A really short VFX breakdown showing the main steps of the post-production:
Bye, Guys! Thank you for your attention and I hope you enjoyed it and found something useful in this article.


LEAVE A COMMENT


|

|

|

|

|
 Customer zone
 Your orders
 Edit account
 Add project
 Liked projects
 View your artist profile
COMMENTS