Evermotion: More Than an Asset Library
How Evermotion became a full-scale production partner for archviz, automotive and synthetic data.


Total: € 0

This tutorial is for every max users - beginers and advanced. You have to remember that to create good grass we need many, many polygons - and that is only one problem in this subject - as you will see it's very simple job to create grass. I will show you how to do it by standard max "scatter".

 |
Well, as you probably know every grass has got many kinds of stalks - they have different heigh and shape. So to create real grass we need few stalks. On this picture you can see 4 different stalks. The shorter is simply plane - I converted it to poly, and welded to top vertex. Others stalks have got more poly (4) because we have to modify them (by "bend" modifier - just need to tape diffrent angle and direction). |
 |
Of course we need some ground to plant our grass on it. Here you can see simple object - I selected faces where grass will be planted. |
 |
Now we select the smaller stalk - we have to choose scatter so we go to create panel - then we select compound objects. Then we choose scatter. In its paremeters we select pick distribution object and then we click on our ground. |
 |
Now our stalk is planted. We have to decided how many copies will be in the scen - we make 50000 copies - so we have to write this value in suplicates field. As you can see now, there are many stalks on the ground. |
 |
But we wanted to plant our grass only in some places of our ground - so we select use selected faces only. Now as you can see our grass moved to selected places. I decided to change value of copies to 40000 (but in every grass we have to use different value - i always make some rendering test to see the best value). |
 |
But there is something wrong with this grass - stalks don't "stand" they "lie" one the ground. To improve this we have to write some values in rotation fields. On this image you can see this values - the most important is choose 90 deg in X - that will make pur grass "standing" not "lieing". We can change some values of scaling - that make our grass more differential. |
 |
But as we can calcuate - there is over 40000 polygons in the scen and this is only first part of the grass! To make our work easier and faster we can change display options. Here you can see that I set up display parameter to 1% - now only 1% of our grass is displayed!! Very important is to hide distribution object - we don't want it in our render. |
 |
Now we will make next part of grass. We have to convert our ground object to poly once again - because we want to select new faces to different stalk. |
 |
Here you can see which faces I selected. Thanks to this operation our grass will be much more differential. |
 |
And once again we select stalk - choose scatter and pick distribution object - ground. On this picture you can see my value of duplicates - I choose less value than before, cause this stalk is tonger than first stalk. And of course we have to turn use selected faces only on.! |
 |
On this picture you can see my values of rotation and scaling parameters - as before the most important is to choose 90 deg in X rotation. |
 |
Once again we set display parameter to 1% and hide distibution object. |
 |
Now, we convert our gorund to poly once again and we select new faces to plant next stalk. |
 |
We select next stalk and we do the same things like before - choose scatter and choose gorund as distribution object. Here you can see values of duplicates - 20000. Remember to select use selected faces only. |
 |
On this picture you can see how I set up rotation and scaling parameters. And to safe time and our computers we change display values to 1% and we hide distribution object. |
 |
Well on this picture You can see nuumber of duplicates and places which I selected on the ground to plane last (the bigger) stalk. |
 |
On this image you can see values of rotation and scaling parameters. |
 |
And the last thing to do - change display value and hide distribution obect - it's very important cause now we have got many, many, many!!! plygons in this grass... |
 |
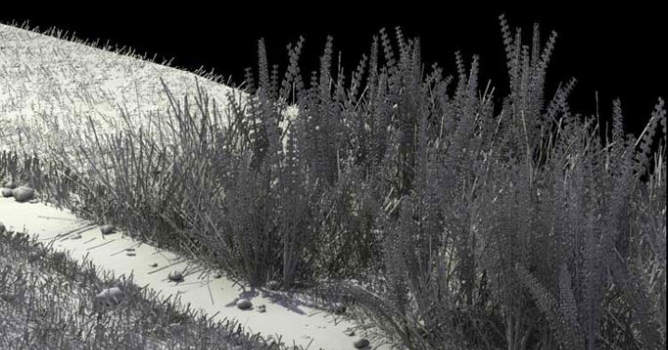
Well, no we have very nice and differential grass, but whis is not enough to make realistic grass. We have to make some plants or flowers. On this picture you can see my version of plant - its simply cilinder with many smal boxes - remember that plants don't have to be very detailed!!! In the finish, i copy it 2 times and I used bend modyfier once again |
 |
On this picture you can see faces where I will plant my plants:) |
 |
I decided to make 70 copies of plants - there can be to much of it, couse it will be unnatural. |
 |
Here you can see values of rotation and scaling parameters.. |
 |
The last thing to do is to change mesh to proxy in display parameters - it is enough, we dont have to change value of display, because there are only 70 copies of this plant. |


LEAVE A COMMENT


|

|

|

|

|
 Customer zone
 Your orders
 Edit account
 Add project
 Liked projects
 View your artist profile
COMMENTS