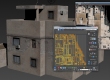
How To Make Your CGI Walls More Realistic
Realistic walls with noise modifier.
Total: € 0
Continue Shopping
In accordance with the art. 13 section 1 and 2 of the European Parliament and Council Regulation 2016/679 of the 27th April, 2016 on the protection of natural persons, with regard to the processing of personal data and on the free movement of such data, and repealing Directive 95/46/EC (General Data Protection Regulation), hereafter RODO, I hereby inform that:
1. EVERMOTION S.C., 8 Przędzalniana Str., 15-688 Białystok, Poland is the Administrator of your Personal Data (APD)
2. Data Protection Inspector can be reached through e-mail: iod@evermotion.org
3. Your personal data are to be processed on the basis of art. 6 section 1 letter a, b and f of RODO in order to:
a) prepare, conclude and execute the agreement and for other purposes approved by you,
b) to execute the legitimate interest like marketing of products and the agreement, claim assertion or defence against claims resulting from the law regulations.
4. Entities entitled to the reception of your personal data may be the authorised public bodies; mail providers; providers of the services covered by the agreement; responsible for debt recovery, keeping the archives, document utilization, legal consulting, technical services, IT services and accountancy.
5. Your personal data shall not be transferred to the third country, nor to the international bodies.
6. Your personal data shall be processed within the period of the agreement and upon your additional consent until you withdraw it. APD shall keep the data for the period of any civil law claim execution connected with the agreement.
7. You have the right to demand an access to your personal data, to correct or to delete the data if there is no other basis for the processing or any other purpose of such processing or to limit the processing of the data, to transfer the data to another administrator and to raise objections to the further data processing if there is no legal basis for further processing and to withdraw any previous consent.
8. You provide the personal data voluntarily, however they are necessary to conclude the agreement. The refusal of providing such data may result in the refusal of the agreement conclusion.
9. You have the right to lodge a complaint to the Personal Data Protection Office when in your opinion the data processing violates the regulations of General Data Protection Regulation of the 27 April, 2016 (RODO).
10. Your data will be automatically processed, including the form of profiling.
11. You are obligated to forward above mentioned information to your representative, especially if you appointed this person in the agreement as the contact person or as the representative for the agreement execution.


Mateial parameters can save a lot of time - instead of continuously fixing textures and re-importing them, we can change their look directly in engine. It's even more convenient when we realize that it is almost impossible to achieve the look of material that will be consistent between different applications.
After importing textures to Unreal Engine 4 we often see slightly different result than in texturing software like Substance Painter. It's natural - these applications use different rendering engines and the same textures will look different on meshes in Substance Painter and in Unreal Engine 4.
That means that we are not getting what we see (at least: not perfectly), so we either need to iterate between two programs or we need a solution that will allow us to finetune material settings in Unreal Engine 4. And it's the moment, when material parameters come very handy.

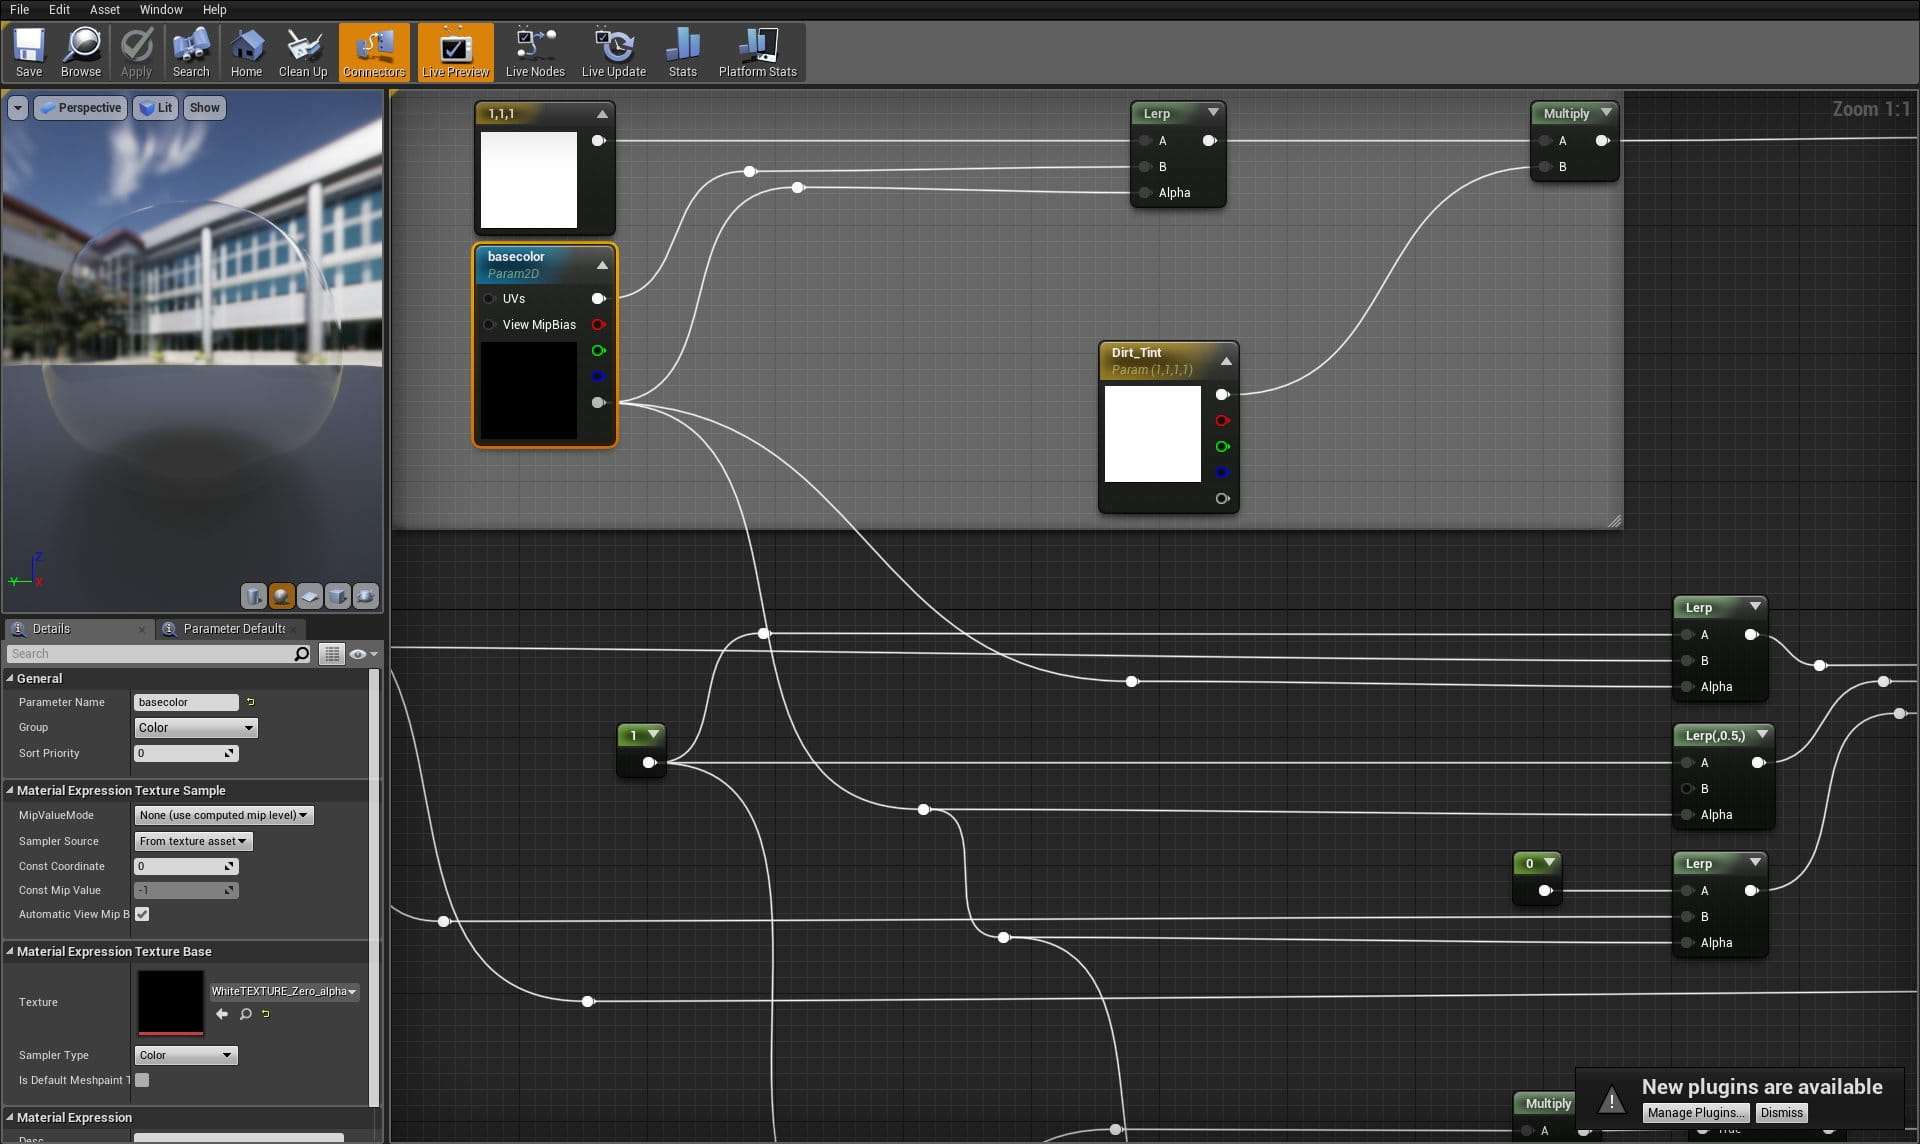
In Unreal Engine, the best workflow is to create a couple of base materials and then, use instances for our meshes. Material instances expose only these parameters that are important for us, they update the look on the fly and are generally easier to deal with. Here you have our base material for standard materials - it utilizes some nodes for tweaking, but it is generally very simple setup. It uses base color, normal and occlussion-roughness-metallic maps (3 total).
Unreal Engine materials are made of nodes that are connected to material output - it is a standard that gains increasing popularity among common 3d applications. We can find node editor for materials in 3ds Max, Blender, Unity, etc. The principles are similar, so if you used one of these editors before, you will feel at home when you will start your work with Unreal Engine Material Editor.
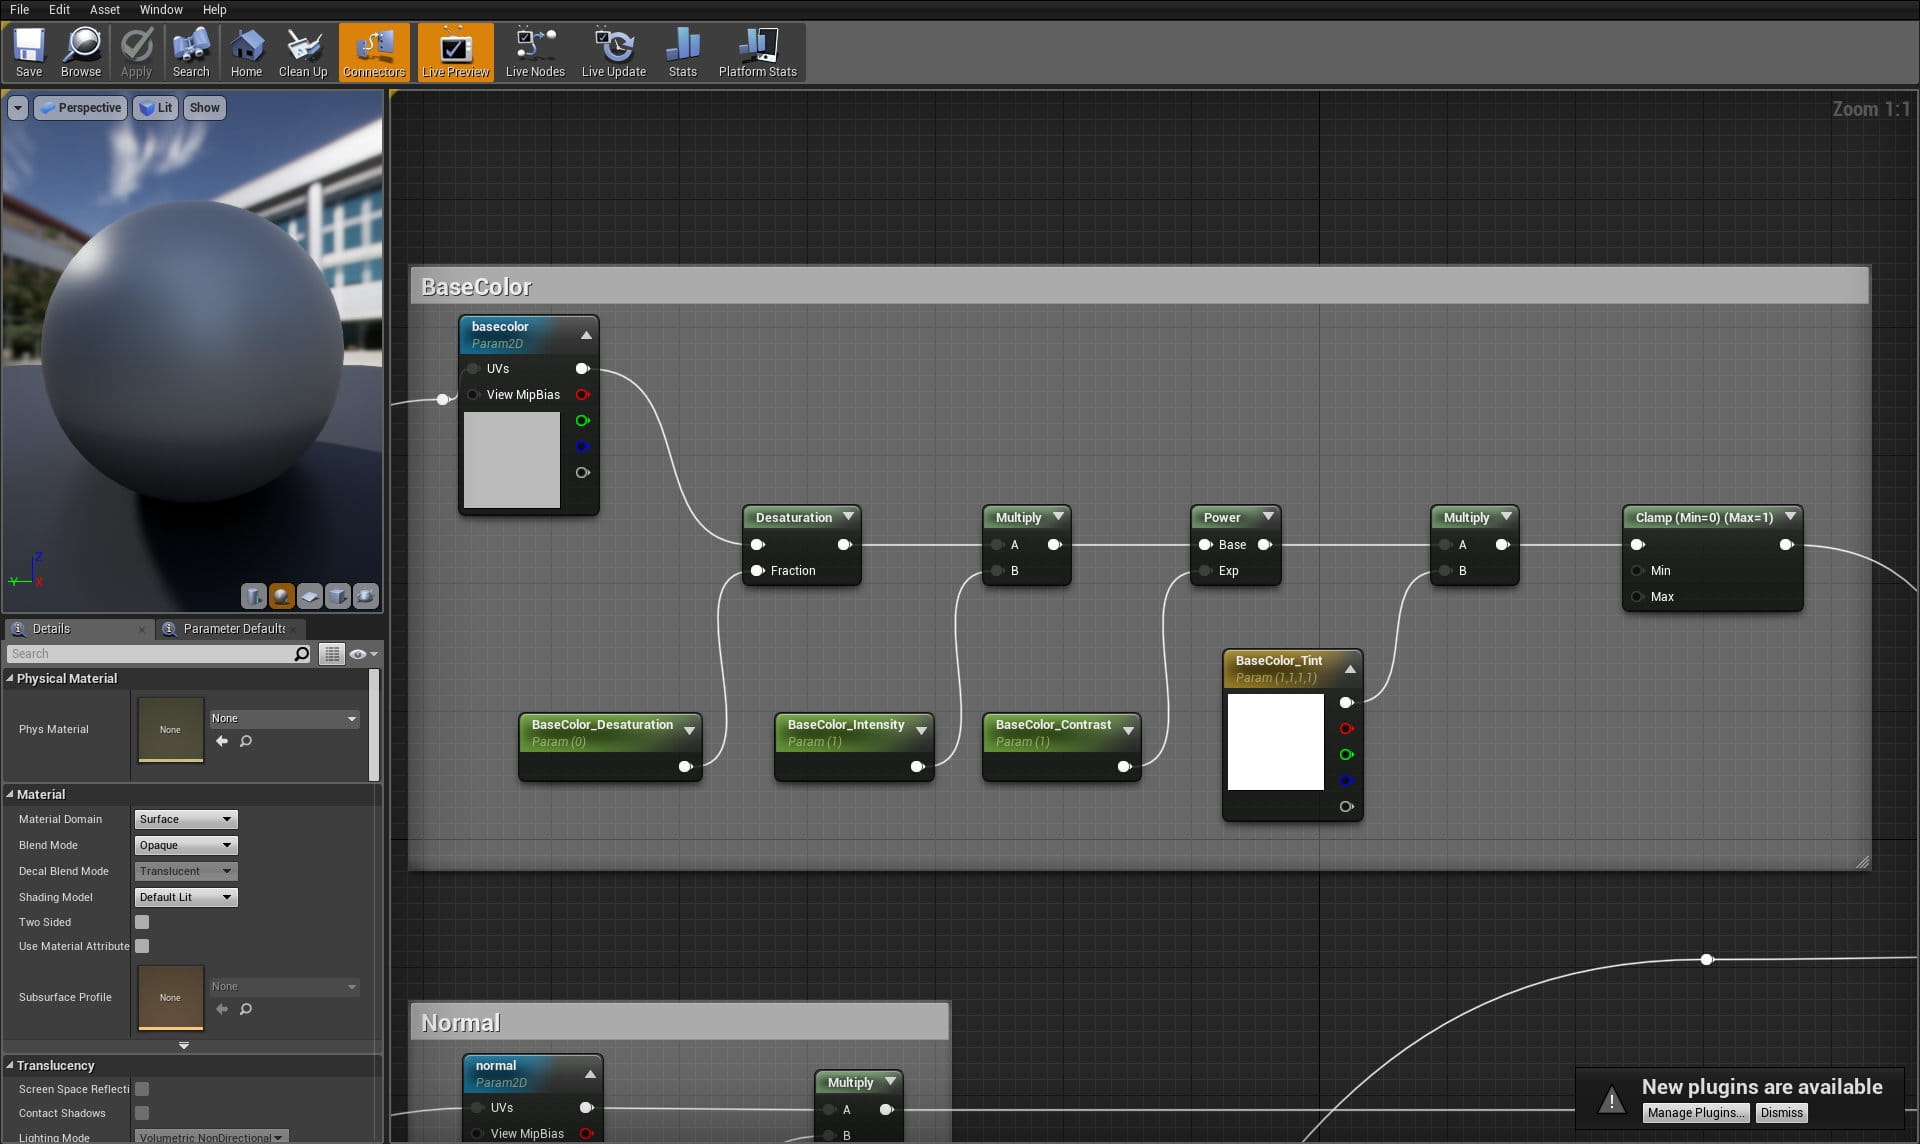
We can tweak color of our material by creating some chain of nodes that will alter our base color texture. What we have here?
- Desaturation node that allows us to desaturate our texture
- Multiply node with a scalar parameter that is named "BaseColor_Intensity" - it controls color intensity
- Power node that controls contrast
- Another Multiply node that has 3-vector node assigned, which allows us to control tint of the base color.
All parameters were grouped in Color group, which gives us nice and tidy result in instance of the material.

Simple setup for controlling tiling of our textures - a texture Coordinate node with Multiply node and scalar parameter that was named "Tiling".

We can control normal map intensity by multiplying it by 3 Vector parameter.
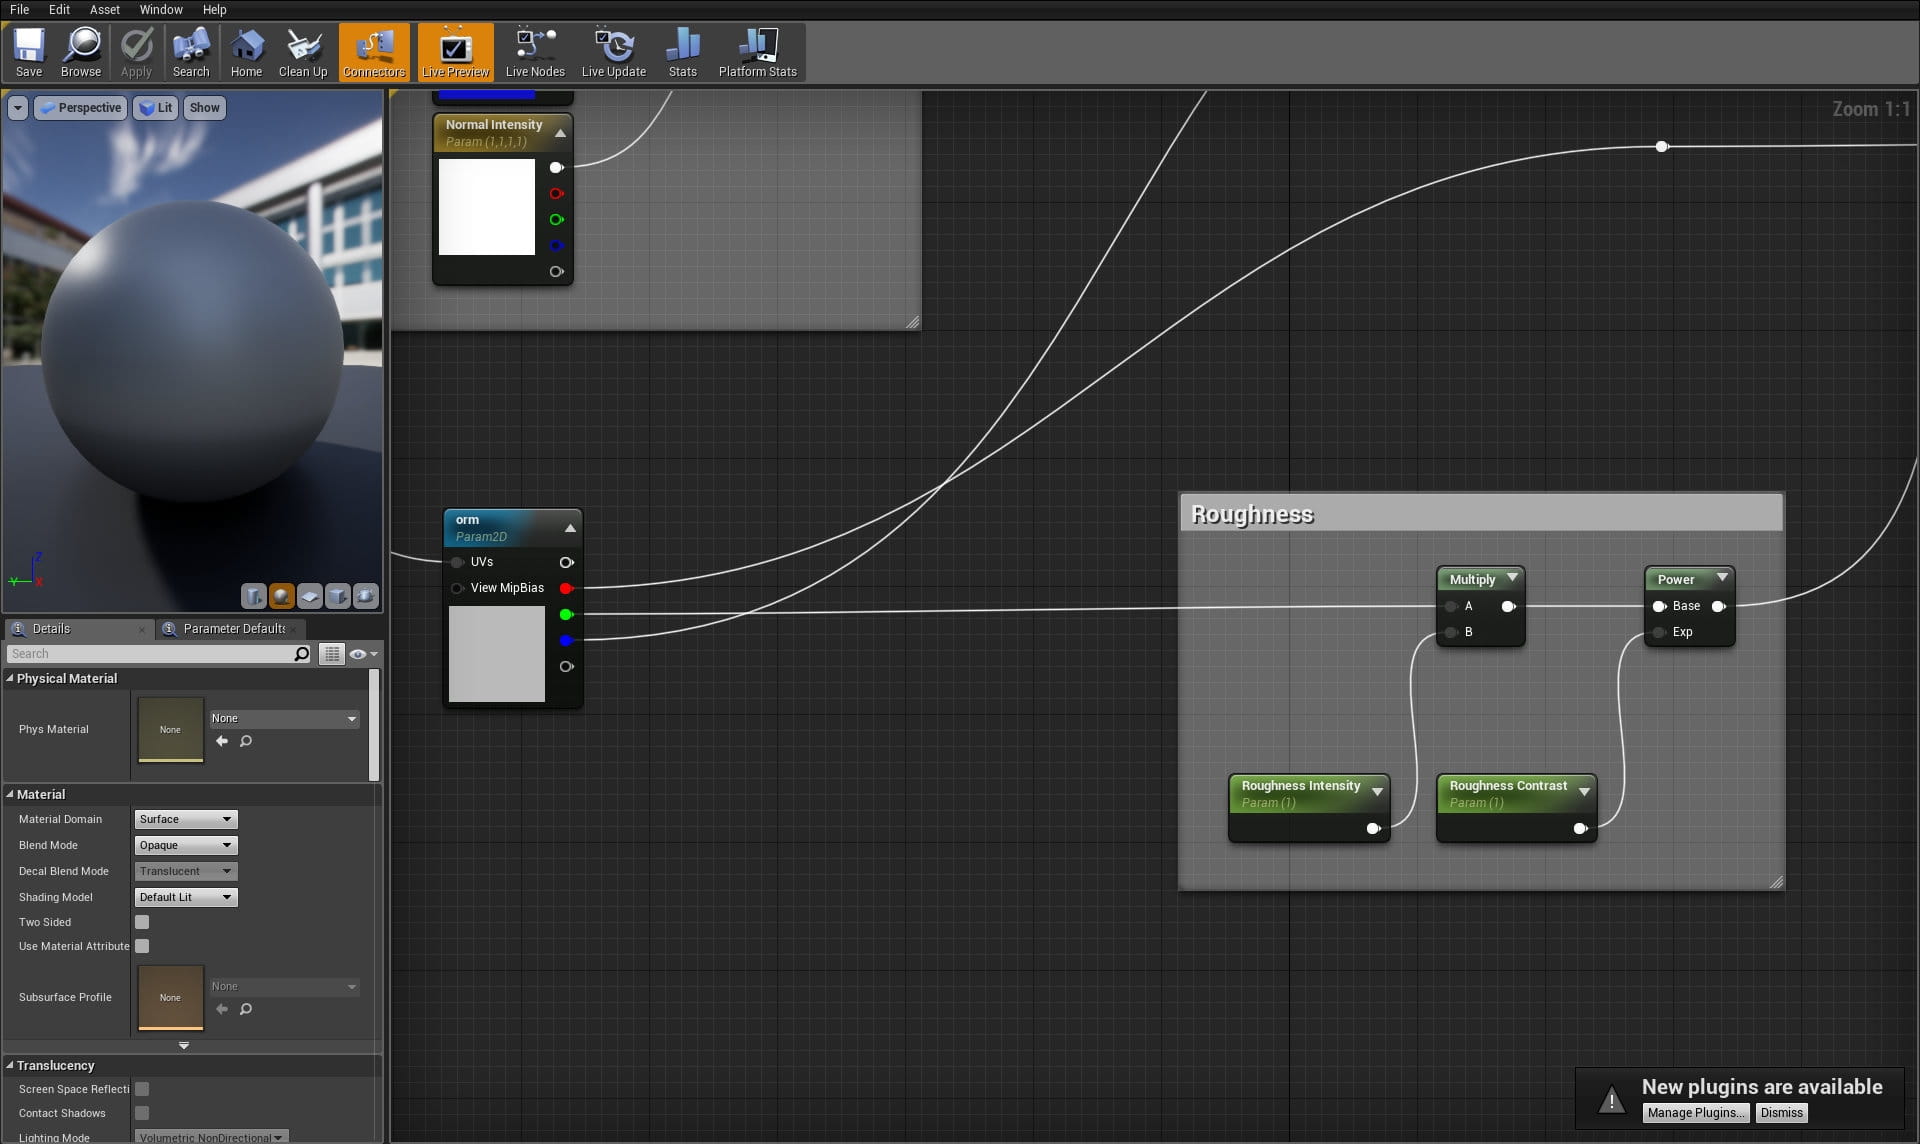
I added two parameters to control roughness - multiplication controls roughness intensity and power is controlling contrast.
That's all for the most basic material (but also: the one that is the most often used). Of course, there are more possibilities - we can use masks for controlling emissive elements, we can use height maps for tesselated materials or parallax occlussion mapping. There are also Blend materials that we can mix invertex painting mode. For these I recommend to download Game Textures Shade Materials Pack from Unreal Marketplace (for free). They are really nice base materials that can be used in various situations. They utilize POM, displacement, tesselation and blending.
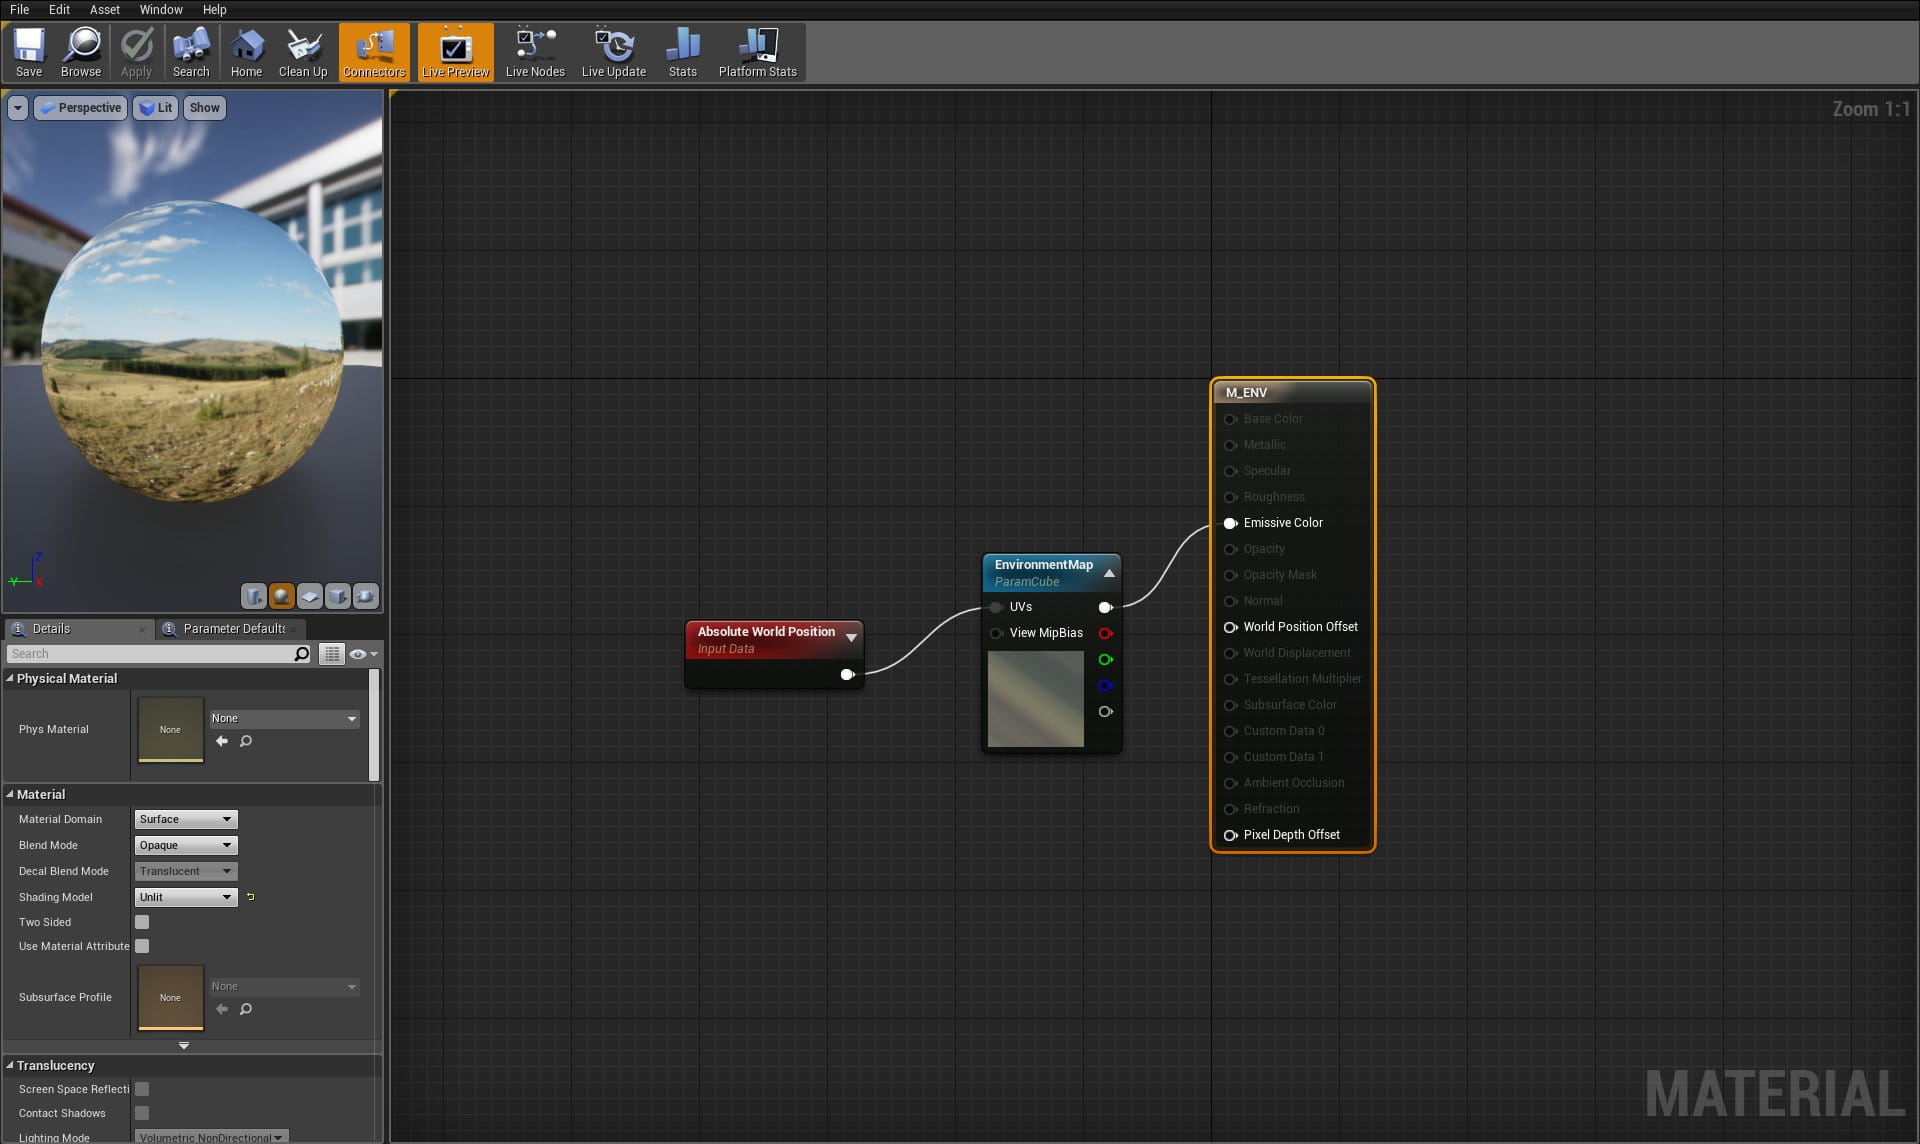
I use this simple material for my environment sphere - it's set to "unlit" mode, so it is unaffected by scene lighting, all it does is projecting HDRI map on a sphere with Absolute World Position coordinates (which means: proper mapping for HDRIs). I exposed EnvironmentMap as parameter, so I can make multiple instances of this material with different HDRI maps.
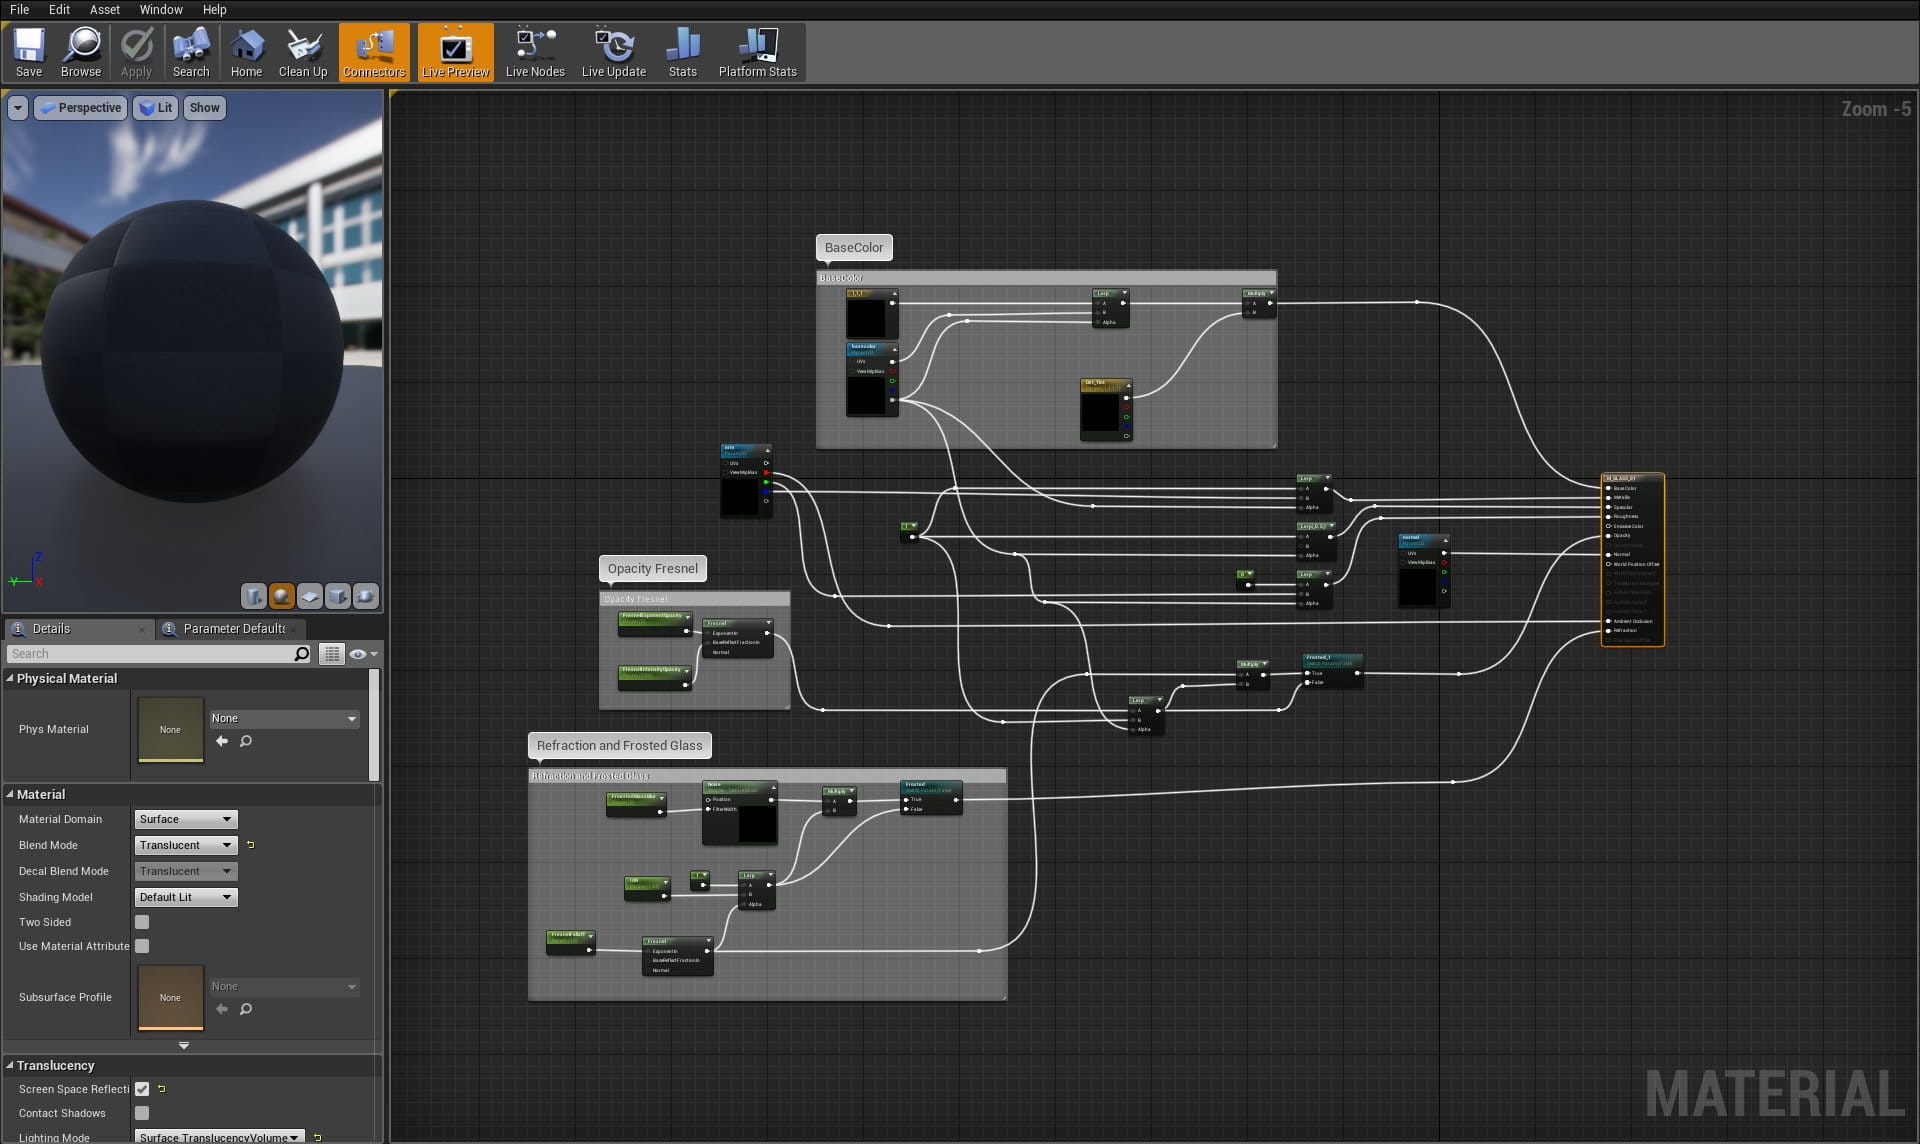
This is simple glass master material. I used some parameters for altering color, refraction and IOR values. This mateial also uses alpha channel from color texture to control dirt and non-refractive areas.

Normal map is inserted without any changes, metallic, specular and roughness chanlles receive inputs from Lerp nodes. Lerp node is a simple ramp / logic node that outputs either data that is inserted to A or B input. The final result is controlled by alpha mask. So - if we insert red color into A input of Lerp and blue color into B input and then we insert an alpha mask into alpha input, we will get red color, where alpha is equal 1 and blue color, where alpha is equal 0. So it's simple blending node, like ramp or gradient node with additional alpha input.
Lerp nodes in this material are used to vary metallic, roughness and specular values if there is a dirt mask on a surface. If there is no mask, roughness is 0, metallic is 0 and specular is 1. The mask is present on an alpha channel of base color map. It is exported this way by Substance Painter.
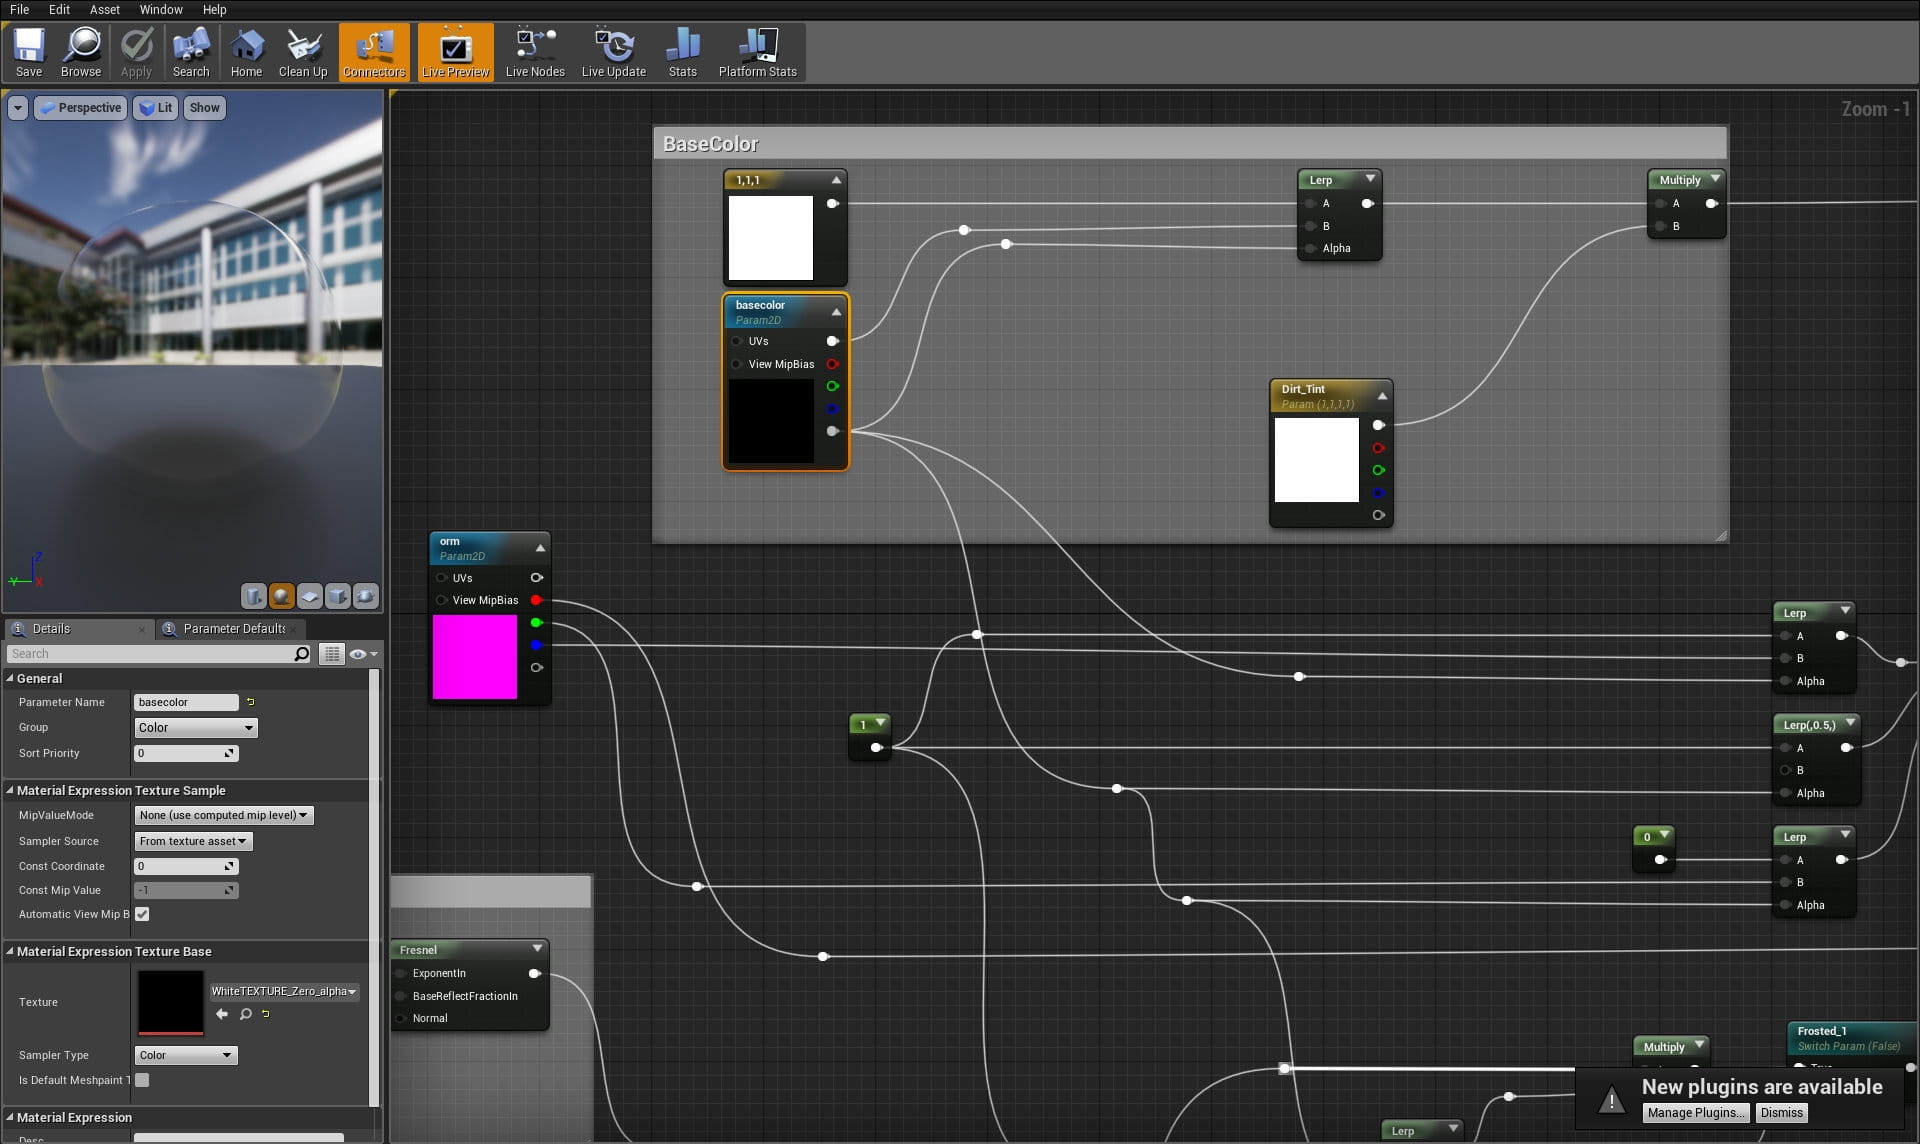
Occlussion, roughness and metallic values come from "orm" map channels exported from Substance Painter by using standard Unreal Engine export preset.

We can tweak Fresnel value by using Fresnel node and two parameters: ExponentOpacity and IntensityOpacity. Fresnel is lerped as the rest of the channels. When there is no alpha map, material is calculating fresnel from these nodes, if there is any dirt mask, fresnel of the dirt equals 1.

As an additional feature I added "frozen" glass look. It is based on noise node (and fresnel nodes for refraction). If the boolean value of "Frozen" node is "false", material only takes fresnel nodes into account. If it's true, it adds noise to refraction, giving "frosted glass" look.
There are of course many other possible materials and solutions that can be made in Unreal Engine Material Editor, but these are quite common ones. Thanks for reading!


LEAVE A COMMENT


|

|

|

|

|
 Customer zone
 Your special offers
 Your orders
 Edit account
 Add project
 Liked projects
 View your artist profile
COMMENTS