Removing LUTs from Textures for better results
Remove the LUT from a specific texture in order to get perfect looking textures in your render.
Total: € 0
Continue Shopping
In accordance with the art. 13 section 1 and 2 of the European Parliament and Council Regulation 2016/679 of the 27th April, 2016 on the protection of natural persons, with regard to the processing of personal data and on the free movement of such data, and repealing Directive 95/46/EC (General Data Protection Regulation), hereafter RODO, I hereby inform that:
1. EVERMOTION S.C., 8 Przędzalniana Str., 15-688 Białystok, Poland is the Administrator of your Personal Data (APD)
2. Data Protection Inspector can be reached through e-mail: iod@evermotion.org
3. Your personal data are to be processed on the basis of art. 6 section 1 letter a, b and f of RODO in order to:
a) prepare, conclude and execute the agreement and for other purposes approved by you,
b) to execute the legitimate interest like marketing of products and the agreement, claim assertion or defence against claims resulting from the law regulations.
4. Entities entitled to the reception of your personal data may be the authorised public bodies; mail providers; providers of the services covered by the agreement; responsible for debt recovery, keeping the archives, document utilization, legal consulting, technical services, IT services and accountancy.
5. Your personal data shall not be transferred to the third country, nor to the international bodies.
6. Your personal data shall be processed within the period of the agreement and upon your additional consent until you withdraw it. APD shall keep the data for the period of any civil law claim execution connected with the agreement.
7. You have the right to demand an access to your personal data, to correct or to delete the data if there is no other basis for the processing or any other purpose of such processing or to limit the processing of the data, to transfer the data to another administrator and to raise objections to the further data processing if there is no legal basis for further processing and to withdraw any previous consent.
8. You provide the personal data voluntarily, however they are necessary to conclude the agreement. The refusal of providing such data may result in the refusal of the agreement conclusion.
9. You have the right to lodge a complaint to the Personal Data Protection Office when in your opinion the data processing violates the regulations of General Data Protection Regulation of the 27 April, 2016 (RODO).
10. Your data will be automatically processed, including the form of profiling.
11. You are obligated to forward above mentioned information to your representative, especially if you appointed this person in the agreement as the contact person or as the representative for the agreement execution.
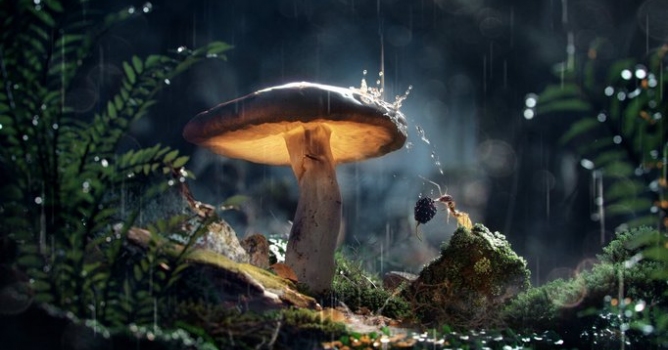

Editors' note: Leandro Oliveira took the 1st Place in Evermotion Challenge 2016. You can see all winners' works here.
Hello guys, Evermotion Challenge was really great and fun for me, it allowed me to get really creative and get out from the “Arch-viz Box” for some time. I will show you the process and the thinking of how I got to the final image. I used Cinema 4d with Corona Renderer and Photoshop.
Concept
When I first saw the theme of this challenge, The Secret Garden, immediately came to my mind this set of macro shots from the photographer, Martin Pfister, and in that moment I knew that I wanted to do a macro shot, inspired on those images.
Click on image to enlarge

However my idea was based on those photographs, I wanted to make an image with something more, I mean those photographs are amazing, but I wanted to bring more action, so that my final image was not only about a glowing mushroom stopped in time.
I needed a story, something that would connect the viewer to the scene. So my initial mood board was about a drama macro shot, deep in the forest, in a moody wet rainy evening, with an animal hiding from the rain. The idea of the ant came later.
Click on image to enlarge

Camera and Scene Setup
A macro shot means using very shallow depth of field and extreme focus on the subject.
I tried to mimic all the details of real life photography, not only the camera settings but also the entire environment with real scale, so that the depth of field and the blurred background looked as realistic as possible. I used a 100mm focal lens, as I always use such in real life for macro shots.
Click on image to enlarge

The main issue I found with this scene was the big differences in scale between the tiny foreground scene and the big scale elements that would exist in background. I would need to model a huge environment to make it look as much real as possible. I solved this issue modeling only elements visible for the camera.
So, this is the viewport with the geometry inside:
Click on image to enlarge

But because I wanted to keep the real world distances and scale from the background elements, and I didn’t want to model an entire forest/cave, I placed all this elements in the right distance, but I didn't include the ground.
Click on image to enlarge

And like this I could really focus on all the details of the foreground. So as mentioned before, the scene I wanted was a wet, muddy, really deep in the forest cave and for that I would need to create believable vegetation characteristic for this environment. I was looking for ferns, moss, muddy ground and a lot of small rocks, branches and twigs were what .
I gathered all this assets together, tweaked their materials and they were ready:
Click on image to enlarge

I used mainly Megascans assets, Evermotion grass, and some moss models from Turbosquid (thank you, PaulMcCann). The mushroom itself was also from Megascans. In terms of materials, all the materials in the scene are quite simple, no big trick. Megascans models come all with great textures and I just tweaked the translucency and reflection maps so it fitted my needs.
The mushroom for instance, I just pushed the bright zones in the translucency map, on the top, so that more light passes through and I could get the glowing effect with the warm light.
Click on image to enlarge

For populating the scene I used Surface spread, which is the plugin that I always use for this task. I used it also for spreading some moss on trunks, rocks and on geometry so that these elements get more realistic.
Click on image to enlarge

The splash on the mushroom was really fun to do. I used the Realflow plugin for Cinema 4D, and it was reall easy and intuitive to use. The plugin did set up the scene for me, and I basically only needed to tell it what the mesher was, so that it could calculate where the water collides, in this case: the mushroom.
Click on image to enlarge

The Ant
The idea of the ant appeared with my admiration for this insect that, despite its size is so strong that can lift much more than their own weight. So I decided to tell a story of an ant. Initially at first I was thinking about placing the ant under the mushroom, hiding from the rain, but I figured out that I wanted to make the image more dramatic.
So I placed it, seeking for protection from the rain, on the move and carrying a big blackberry. A hard day for an ant! :)
Lightning
In the final, the lightning got a little bit complex. I started the scene with 2 main area lights, one big, cold one illuminating the entire scene, and a smaller one, warmer, hitting the mushroom and bleeding some of this nice warm colour in the scene. Warm / cold contrast was what I was looking for.
Click on image to enlarge

I wanted to keep this dark mood as a base for my scene, but when I placed all the assets I ended with many very dark shadows, with no details, just black. I was getting also almost no specular highlights, and I needed them first because I need the scene to look wet to be consistent with the rain, plus they give this extra nice sparkling to the scene.
So I ended up placing 2 lights for each element in the scene. One fill light to enhance the details in the shadows and one light for enhancing those speculars. All of the background elements also had their own lights.
Click on image to enlarge

This way I could control exactly how light affects each element. Here you can see the process, where the blue represents the main light, hitting the entire foreground, the red hitting the mushroom, white affecting the speculars, and the green recatngles are fill lights.
Click on image to enlarge

Post Production
The post production was not complicated, Corona did the heavy lift for me here, and the raw render was quite good already.
Click on image to enlarge


Here is the final image:
Click on image to enlarge

And that’s all guys, hope you enjoy this article :)


LEAVE A COMMENT


|

|

|

|

|
 Customer zone
 Your special offers
 Your orders
 Edit account
 Add project
 Liked projects
 View your artist profile
COMMENTS