How To Make Your CGI Walls More Realistic
Realistic walls with noise modifier.
Total: € 0
Continue Shopping
In accordance with the art. 13 section 1 and 2 of the European Parliament and Council Regulation 2016/679 of the 27th April, 2016 on the protection of natural persons, with regard to the processing of personal data and on the free movement of such data, and repealing Directive 95/46/EC (General Data Protection Regulation), hereafter RODO, I hereby inform that:
1. EVERMOTION S.C., 8 Przędzalniana Str., 15-688 Białystok, Poland is the Administrator of your Personal Data (APD)
2. Data Protection Inspector can be reached through e-mail: iod@evermotion.org
3. Your personal data are to be processed on the basis of art. 6 section 1 letter a, b and f of RODO in order to:
a) prepare, conclude and execute the agreement and for other purposes approved by you,
b) to execute the legitimate interest like marketing of products and the agreement, claim assertion or defence against claims resulting from the law regulations.
4. Entities entitled to the reception of your personal data may be the authorised public bodies; mail providers; providers of the services covered by the agreement; responsible for debt recovery, keeping the archives, document utilization, legal consulting, technical services, IT services and accountancy.
5. Your personal data shall not be transferred to the third country, nor to the international bodies.
6. Your personal data shall be processed within the period of the agreement and upon your additional consent until you withdraw it. APD shall keep the data for the period of any civil law claim execution connected with the agreement.
7. You have the right to demand an access to your personal data, to correct or to delete the data if there is no other basis for the processing or any other purpose of such processing or to limit the processing of the data, to transfer the data to another administrator and to raise objections to the further data processing if there is no legal basis for further processing and to withdraw any previous consent.
8. You provide the personal data voluntarily, however they are necessary to conclude the agreement. The refusal of providing such data may result in the refusal of the agreement conclusion.
9. You have the right to lodge a complaint to the Personal Data Protection Office when in your opinion the data processing violates the regulations of General Data Protection Regulation of the 27 April, 2016 (RODO).
10. Your data will be automatically processed, including the form of profiling.
11. You are obligated to forward above mentioned information to your representative, especially if you appointed this person in the agreement as the contact person or as the representative for the agreement execution.

This is a tutorial by cg artist and animator Kamil Kuklo from Evermotion. Watch "Christmas Dinnersaurs" animation directed by Kamil Kuklo.
As everybody knows there are good ways to skin your character inside 3ds Max using its built-in tools. As an animator myself I have to admit that they are pretty powerful and allow you to gain full control over the final result. Still it all comes with the prize of time you need to spend tweaking the strength and range of each envelope from the armature. In order to work a bit more efficient I often use BonesPro that takes care of all the heavy-lifting that's involved in the process. In this brief tutorial I'll explain you how to use this plugin and get skinning done in just a few short steps.
Step 1: Prepare your model
For the upcoming archmodels collection I needed to skin a few realistic characters and arrange them in several poses. I created a simple CAT rig and matched it with my model. In order to see things better I ticked See-Through property from Object Properties of every single bone. I set a few simple poses in keyframes just to test skinning that was just about to happen.

Step 2: Launch Bones Pro
Bones Pro comes as a modifier that you need to pick after selecting your model. There are several icons and settings but let me focus at those that are important the most.

Step 3: Assign Bones
First things first we need to assign bones to our model. Hit Assign and choose all the bones that you need to influence your mesh. As you can see naming convention is crutial as it can save you a whole lot of time selecting the right objects from the list. Once ready hit OK and check briefly whether you are satisfied with raw result. Most likely you won't... not yet.

Step 4: Strength of Envelopes
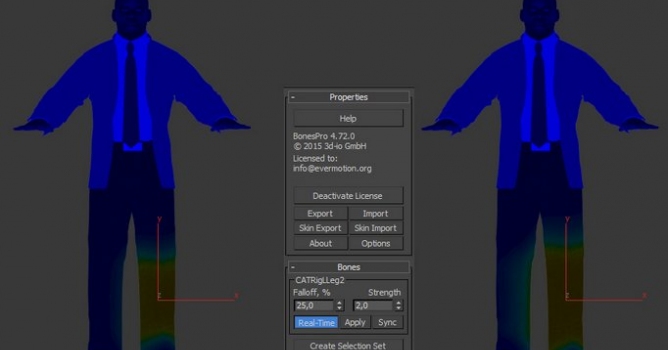
Default settings usually change your model into jelly that tends to bend way too much during animation. My first advice would be to select all the bones, set their strength to somewhere around 1 and limit their range (falloff) to 0.25. BonesPro comes with a really neat option called Visualize that represents influence of any given bone with colors (where blue stands for no influence and red - maximum strength). If bones mess with comfort of your work you can hide and unhide them back by clicking two icons with skulls.

Step 5: Adjust Strength of your Bones
Some envelopes will require your assistance. Select every one of them and check their influence, once you catch a mismatch, adjust Strength option according to your needs.

Changing strength value of a bone that controls calf of the character
Step 6: Adjust Falloff of your Bones
Usually I adjust Strength and Faloff of each bone simultaneously. Keeping it low works best for most of cases but such areas like shoulders and spine may require wider range of envelopes' power.

As most of rigs are symmetrical take advantage of plugin's Mirror options. They will allow you to copy selected bone influence to the one that is located in the same distance on desired axis.

Step 7: Adjust your Bones Manually
There are situations where either Strength and Falloff cannot solve an issue. Very often problem occurs around fingers that are too close to one another. In such cases enable Vertex from Sub-object Selection and select parts of the mesh that you want to correct for selected bone. In example below I highlited vertices that I wanted to exclude from the range of envelope of one finger. Once selected I limited their Strength to 0 that immidately changed their color to blue (not-active).

When one bone influences too many fingers go to Vertex mode, select parts of the mesh you won't to exclude from the envelope and lower it's strenght to 0.
Step 8: How about a meta bone?
If you still struggle to achieve perfect result Meta-Bones might come in handy. Available from Create section as a separate object they look like simple sphere and do not cause any force at all. But wait till you link them to bones and tick Para-Bones+Meta-Bones ON option to enjoy the effect.

These objects push in or out mesh in given place and order. They may be used as simple muscles or solid bones in such spots as elbows and knees. Their strength may be controlled by Blend value from modifier options. Needless to mention this value can be keyframed if our mesh goes crazy in particulary complex animations.

Meta bones remain not active until you link them to a bone and hit ON in ParaBones tab.
That's it, with this plugin every simple skinning should be completed in less than 30 minutes. Remember to always test it "in motion" as T-Pose never explains anything. Even at the earliest stage set a few poses of your character just in order to observe how does BonesPro handle different situations. In case of any problems feel free to contact me, till then - thanks for reading and good luck with your projects!


LEAVE A COMMENT


|

|

|

|

|
 Customer zone
 Your special offers
 Your orders
 Edit account
 Add project
 Liked projects
 View your artist profile
COMMENTS