Removing LUTs from Textures for better results
Remove the LUT from a specific texture in order to get perfect looking textures in your render.
Total: € 0
Continue Shopping
In accordance with the art. 13 section 1 and 2 of the European Parliament and Council Regulation 2016/679 of the 27th April, 2016 on the protection of natural persons, with regard to the processing of personal data and on the free movement of such data, and repealing Directive 95/46/EC (General Data Protection Regulation), hereafter RODO, I hereby inform that:
1. EVERMOTION S.C., 8 Przędzalniana Str., 15-688 Białystok, Poland is the Administrator of your Personal Data (APD)
2. Data Protection Inspector can be reached through e-mail: iod@evermotion.org
3. Your personal data are to be processed on the basis of art. 6 section 1 letter a, b and f of RODO in order to:
a) prepare, conclude and execute the agreement and for other purposes approved by you,
b) to execute the legitimate interest like marketing of products and the agreement, claim assertion or defence against claims resulting from the law regulations.
4. Entities entitled to the reception of your personal data may be the authorised public bodies; mail providers; providers of the services covered by the agreement; responsible for debt recovery, keeping the archives, document utilization, legal consulting, technical services, IT services and accountancy.
5. Your personal data shall not be transferred to the third country, nor to the international bodies.
6. Your personal data shall be processed within the period of the agreement and upon your additional consent until you withdraw it. APD shall keep the data for the period of any civil law claim execution connected with the agreement.
7. You have the right to demand an access to your personal data, to correct or to delete the data if there is no other basis for the processing or any other purpose of such processing or to limit the processing of the data, to transfer the data to another administrator and to raise objections to the further data processing if there is no legal basis for further processing and to withdraw any previous consent.
8. You provide the personal data voluntarily, however they are necessary to conclude the agreement. The refusal of providing such data may result in the refusal of the agreement conclusion.
9. You have the right to lodge a complaint to the Personal Data Protection Office when in your opinion the data processing violates the regulations of General Data Protection Regulation of the 27 April, 2016 (RODO).
10. Your data will be automatically processed, including the form of profiling.
11. You are obligated to forward above mentioned information to your representative, especially if you appointed this person in the agreement as the contact person or as the representative for the agreement execution.
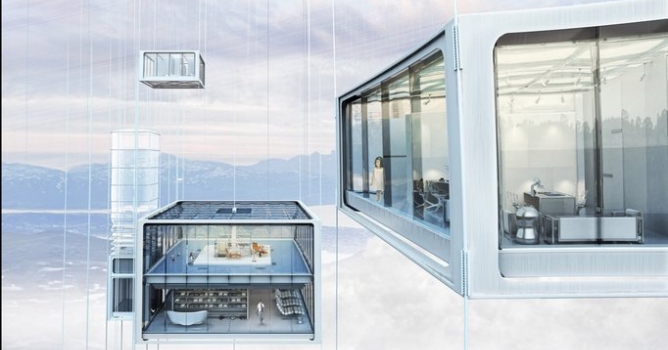

I was asked to prepare a making-of tutorial which will concern my Evermotion Challenge entry Stratosphere+ and I am more than glad and humble to do so.
Editorial note: Bartosz Domiczek has won the 1st Prize in Evermotion Challenge 2013 - Future Home Design.
It may turn out to be slightly strange since two views of one structure are in ultimate contrast to one another. It can seem that I describe two totally different projects (and in some points it is totally true) but all in all, it is just one building and I would like to mention about both of my approaches because it can present more useful information.
My Evermotion Challenge entry was based on my design of buoyant tower which soars in atmosphere due to the most basic physical principles. Since this tutorial is not about the design itself, I would only redirect you to my project site if you are interested.
However, I’d like to mention in this point that I find it really important to submit good design explanations for visuals concerning conceptual subjects. I don’t buy pictures which are merely good-looking but lack of common sense. This is why I thought it would be perfect for me to ground my visuals on that above-mentioned project due to the complicity of the research which preceded it and, therefore, level of details I could afford for without making up any fantastic stories (do not misunderstand me: I like fantastic stories but all these fantastic stories that can really come true in reality are what I truly love).
Ok, here we are. This is what springs from the research and some conclusions:
The designed buoyant tower is 13,5 km high, heterogeneous structure. It seems impossible to catch it in one frame.
I decided to hit into a contrast between dull, overcast weather of ground level and serene, vast, deep-blue ambience of upper sub-structures. I gathered some references of arctic landscapes and started shaping it up.
Click on image to enlarge
Modeling
There is much more modelling that can be seen in the pictures. I wanted 3d models for presentation of the entire structure so I had started from the whole I ended up among details. Everything is quite simple and it is 95% box modelling.
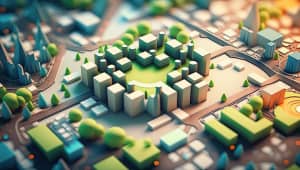
At first, I shaped the centre of Tromso. It was mainly to give buildings their volumes and roof shapes. I used the terrain from Google Earth and placed the buildings with huge help of reference plan, photos and Google Maps street view.
Click on image to enlarge
Afterwards, I gave a bit of detail for the area near my site of choice (I also shaped the buildings which are to be removed so as to present the entire process in one of diagrams).
Click on image to enlarge
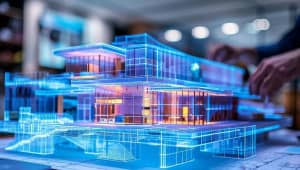
Then, I created the ground building. I had imported some .dwg plans from AutoCad and simply built the model up on them.
Click on image to enlarge
As for the roofing, I shaped several geometries of buoyant gas inflated ETFE pillows and arranged them as vray proxies. They are made of four deformed planes inside a frame and a reinforcing mesh is created with a lattice modifier.
Click on image to enlarge
Main buoyant elements are made in similar way. They consist of two-layer spheres with adjacent polyamides ropes (sweep modifier with offset) in PTFE tubes (shell modifier). Two spheres are connected by PTFE joints (arrayed with multiscatter).
Click on image to enlarge
Living modules are quite simple boxes with furnishing and utility segments.
Click on image to enlarge
Click on image to enlarge
I prepared several types of private (hotel rooms) and public (mostly spa&wellness as well as restaurant) modules and buoyant elevators. Inflatable containers above them were made by U-loft NURBS surface.
Click on image to enlarge
And here we are with modeling the structure. I won’t describe the elements which are not visible in the pictures but the methods are as simple as above mentioned.
Composition
Composition was probably the most awkward element of the project. As I wrote before: I was unable to fit everything I wanted into one frame. However, I certainly wanted to fit as much as I could. Thus, I decided to distort the perspective manually and create something similar to a fish-eye quarter (ie. straight down part of the image creates verticality and gives an insight into living structures and slightly curved upper part shows higher buoyant elements and gives an impression of space). To fill that guidelines with proper structures I rendered living modules and distorted them slightly using warp in Photoshop.
Click on image to enlarge
Then, I prepared buoyant block with buoyant elements arrayed in form of proxies. I rendered it in wider perspective.
Click on image to enlarge
I matte painted the background to match it with the rest of elements.
Click on image to enlarge
And filled it with all the prerendered elements, which I will describe in postproduction point.
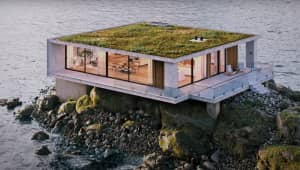
As for the ground level visualization, the composition was much more traditional. Down 1/3 of the image was to be dedicated to cold, dark water while the upper 2/3 was to present the building itself and further elements in the background. The frame is closed by concrete pillars of Tromsobrua from the right side.
I wanted to give some more action to the down part so as to make it equally absorbing as the building part (and thus get some kind of visual harmony). I decided to place a motorboat there and sculpt the water plane (push/pull) in accordance to its sham movement.
Click on image to enlarge
Then I chose some fragments of the water boarding with obstacles and shelled them so as to create some snowbanks. I smoothed the mesh and applied some noise modifier to them. The next point was adding some Evermotion birds and scattering some leaves onto the surface via multiscatter.
Click on image to enlarge
Materials
Materials used in scenes are really simple ones. In the first one I had to focus on plastics, which turned out to be more difficult, while in the second I could choose from the range of rather monolithic materials.
I wanted my ETFE envelopes to be quite transparent with light turning on wrinkles and with higher viewing angles. Instead of doing this from scratch, I took some old velvet material and kept on adjusting it until I received desired results.
Click on image to enlarge
As I mentioned, the rest of materials was quite typical. I used two versions of concrete for bridge pillars; blended according to the water level.
Click on image to enlarge
Click on image to enlarge
Click on image to enlarge
Click on image to enlarge
Most of the materials is quite inelegant and could be easily simplified but I often get disorganized during my work. Alas.
I created foam on the water with help of another render pass. Firstly, I downloaded some simple water texture from CGTextures and played with levels/curves in PS to get some decent black & white foam projection. Then, I applied it to the water via vraylight material slot (with all other elements blackened out) and thus received the foam mask I could later apply during postproduction.
Click on image to enlarge
Lighting and scene setup
Both scenes are generally lit with HDRI maps and many minor interior lights (mainly IES). Settings are really trivial since I prefer to spend more time during postproduction to adjust everything in that last phase of a project.
Click on image to enlarge
Click on image to enlarge
Postproduction
In order to arrange the scene in the sky, I prepared all the elements separately. I always render diffusion filter pass, raw reflection and refraction as well as wirecolor and zdepth. Then, I play with them and do some manual corrections to achieve desired results (mostly by trials and errors). I used final painted background in the scene to help with later merging.
Elements separately:
Click on image to enlarge
…and with pasted background:
Click on image to enlarge
Then, I did some extra painting, adjusting details, color and overall ambiance. I gladly use curves correction and add some extra overlay-blend mode layers.
Click on image to enlarge
Here is the similar process with reference to the ground-level visualization. I obtained several different passes:
Click on image to enlarge
Raw render with corrected brightness, contrast and the background added:
Click on image to enlarge
I added foam and water splashes later on. I also adjusted the interior appearance:
Click on image to enlarge
I usually prepare gradient map layer in order to uniform a tint of an image.
Click on image to enlarge
And the final version with gradient map overlaid and passers-by added. I also unnaturally darkened the sky so as to emphasize the building itself.
Click on image to enlarge
That’s it. I hope you find this tutorial useful in any way. It was fun & pleasure to prepare it for you. Thanks for reading!


LEAVE A COMMENT


|

|

|

|

|
 Customer zone
 Your special offers
 Your orders
 Edit account
 Add project
 Liked projects
 View your artist profile
COMMENTS