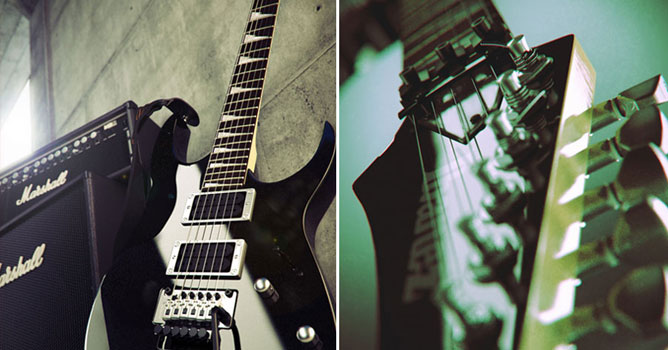
Making of Ibanez RG
This is an old project started about year ago and finished recently. I spent almost all my free time during a year with interruption form half a year to one month. I hadn't any concept, only some vision in mind. It's not a good way to start project without certain conception, but I used to. So I made many unused textures models and etc., but actually I doesn't worry about wasted time - anyway it gave me some expirience.
MODELING
It was important to me to make very accurate model, even if not will be visible in final, so I wasn't surprised when it realy happened. At the same time I was sure - any position of cameras cannot uncover parts with too little details, cause I haven't such.
The fist thing I did is have take photos of my own guitar for using its as references and source for textures. Than I draw small sketches of all small details and marked all necessary measurements.
The front view photo I took from Ibanez website, although its was not exact my guitar but enough alike. It was simpler then tring to take good, not distorted photo.
Of course it hasn't sense to talk about modeling process, even if it took most time. Modeling in Modo not to much differ from other similar software, but in my opinion it's faster and I just enjoy it.
Mapping also didn't have any issues. Only some object have certain unwrap, other have simple box or planar mapping or haven't any mapping.
some of textures:
Some of used materials:
Actually it's not first variant of environment. Also I had 3 unsuccessful attempts. As I said, it's not a good way to start project without certain conception.
All light sources is simple plane object with MaxwellMaterial emitter. I used place highlight tool in max to make nice reflected light source on object in certain spot. I don't used skylight and sun because it not affect final lighting but it slowdown render.
The part of the wall was subdivided for noise modifier, that affect very little so the wall wasn't too flat.
As you can see, the general image, (guitar with amplifier) don't make it possible to see all the details. So it was good idea to make additional renders, but in different environment - something like studio.
Most likely postprocessing was quickest and easier stage. I used only Curves for colorcorrection with settings like on image below. It makes green hue at all and some blue in shadows:
and also I used 'Filter>Distortion>Lens Correction' with set up Chromatic Abberation (+6 and -6) and Vignette. Postprocessing step by step:
Author: Alexander Nadein
Tags:
The finalists of Evermotion Challenge 2024 revealed!
Want your 3D textures to stand out? Discover how PBR adds depth and realism to any surface for impactful, photorealistic results in your projects!
Looking for the latest in interior trend 3D model? Discover trends in realistic 3D decor and elevate your designs! Find inspiration here.
Looking to improve property listings? Discover how real estate 3D models and property visualization 3D can enhance your real estate projects.
Curious how 3D models aid city planning? Discover how urban simulation can optimize layouts, transport, and zoning for efficient future cities.
Ready to bring your urban planning vision to life? Discover Evermotion’s cutting-edge 3D models for cities of the future today! Explore now!
Transform your architectural concepts into reality with 3D models. Ready to see your vision? Explore now!
Curious how 3D furniture models are reshaping interior design? Discover their role in planning, visualizing, and customizing spaces for clients.
You may also like...
Looking for the latest in interior trend 3D model? Discover trends in realistic 3D decor and elevate your designs! Find inspiration here.
×
LEAVE A COMMENT
COMMENTS