 INTRODUCTION
 The particularity of Glu3D its the ability of use liquid simulations with external particles using his
PWrapper plugin. This mean that we don´t use the internal calcules of Glu3D, but the "geometry creator" with standard particles systems.
The results of this mix it´s really interesting and in some cases perfectly valid replacing the real liquids simulation created by Glu3D. Nevertheless, for precise and real liquids simulations it´s better to use Glu3D.
Note: Glu3D it´s a advanced fluid system created by 3DAliens. You can download a demo version from
www.3daliens.com .
START-UPWe start from a very simple base scene, a ground plane and our classic teapot. Once suitably illuminated the scene (I`m choose Vray), we proceed to animate the teapot. For that, we use two modifiers:
BEND, for the side movements, and
STRETCH for the "chewing gum" movements :-)
The movements that we will realize will be rhythmic, as if it was dancing. In my case first I animated the Bend Modifier, and later, over this first animation, I have done the second movement. Here you feel free to animate the teapot as you like using different modifiers. The chances here are that the teapot moves. In my case, the animation is 200 frames length.
 PROCEDURE I: Dirt-o-teapot
Let´s go first to dirt our teapot. We don´t want to animate the dirting process, because the teapot remains dirty from the beggining. This will be useful too for simulating kind of mud over different surfaces, changing the materials. Here the imagination is the one that gives the orders.
The first is create a particle system. I choose in this case
Particle Flow, because it´s more powerful that the Standard particles systems, and it allow us the effect that we want to do, otherwise will be costly to do.
So, we create a new
Particle Flow event, and edit it so that generate the particles from the surface of the teapot, not moving and no creating newer particles. These are the settings from this particle system:

We moving by the Timeline, seeing that the particles still remain in the surface of the teapot, while this bend and strech. Perfect!
Now we create a
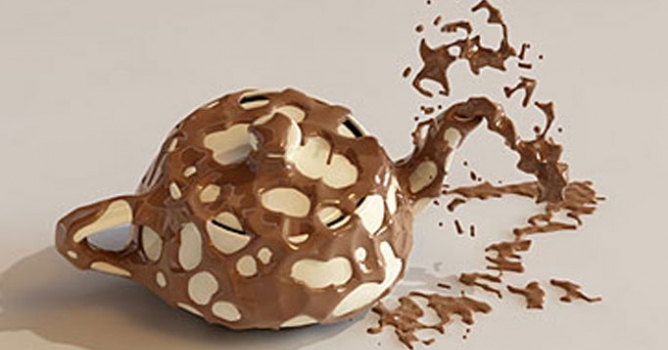
Pwrapper system, that is part of the Glu3D pack. The Pwrapper system allow us create a geometry with the liquid or mud look, without using the Glu3D system. The procedure of this is very easy, only create the Pwrapper system and in the setup we point to the particle system (Particle Flow), and adjust the creation parameters of the mesh melting, resolution, size and so on. Finally, we move trought the animation to see how the mesh created by Pwrapper is adapted with the movement of the teapot, set a "chocolate" look with the Material Editor and we are ready with our teapot:
 PROCEDURE II: The jet of liquid
Here comes the most complicated part of the tutorial, that is the jet of liquid. In this case, we don´t use Glu3D because the calculation it´s very intensive and in this case time is money :-). So, we use again Pwrapper, but before, we must to setup the particle system.
Instead of using Particle Flow, in this case we use a Standard particle system, PArray, that give us to use a geometry to emit particles. The reason of this is because the particles exit from the spout and we need this ovoid form.
So, first we create a Spline with the ovoid form of the spout, and position this into the spout, how you can see in the image. Convert to Editable Mesh:

Now we want to link this mesh with the spout movement. Here the standard link fails, becouse the mesh deformations and movements cannot allow it. So we use a trick:
We create a Dummy object, that will be the "link" between the mesh and the Teapot. Now we go to the
"motion" tab where change the
"position" controller to
ATTACHMENT. Select the teapot how controller object, activate the "Align to Surface" option, and push the "Set Position" button to select one of the interior faces of the spout, how you can see in this image:

At last, we link normally the mesh to the dummy object, and see that moves with the spout´s moves.
Note: Another better easy option will be closing the spout creating the necessary faces and then use these faces how particles emiteer, but I choose thir more complex setup because the versatility that offers in complex scenes
Now it´s time to create the particle system, that be
Parray. Also we create a
Gravity Space Warp for the fall of the particles, and a
planar deflector for the ground, and bind to the Parray, how you can see here:

With this we finish the second particle system, that is the jet of the spour. But for the final touch, we create a second
Pwrapper, that we assign to the Parray, creating the final choco-liquid aspect:
 RENDER AND POSTPRODUCTION
Ok, our scene is finished, so it´s time to render to a sequence files (BMP, TGA, etc). In this case, I choose a HD resolution of 1280*720 pixels. The result image its a crisp, better quality render that the common PAL or NTSC resolutions.
After the render finish, we make the movie using Premiere Pro. The final touch comes from adjusting a bit the colors, adding Specular bloom, noise and motion blur. Here you can use our own filters or techniques.
The result, this
VIDEO you can download in
DivX HD format:
 Best regards,
Antonio Casado
 Removing LUTs from Textures for better resultsRemove the LUT from a specific texture in order to get perfect looking textures in your render.
 Chaos Corona 12 ReleasedWhat new features landed in Corona 12?
 OCIO Color Management in 3ds Max 2024Color management is crucial for full control over your renders.
 A look at 3dsMax Video SequencerDo you know that you can edit your videos directly in 3ds Max? Renderram is showing some functionalities of 3ds Max's built in sequencer.
 FStorm Denoiser is here - First ImpressionsFirst look at new denoising tool in FStorm that will clean-up your renders.
 Unreal Engine 5.4: Nanite Tessellation in 10 MinutesThis tutorial takes you through creating a stunning desert scene, complete with realistic tire tracks, using Nanite for landscapes, Gaea for terrain sculpting, and an awesome slope masking auto material.
Customer zone
Your special offers
Your orders
Edit account
Add project
Liked projects
View your artist profile


COMMENTS