Search
Cart
Sign in
  • offerCustomer zone
  • offerYour orders
  • offerEdit account

  • offerAdd project
  • offerLiked projects
  • offerView your artist profile

  • Dark mode

We care about your privacy

We use cookies to provide you with the best possible experience. They also allow us to analyze user behavior in order to constantly improve the website for you. The consent is voluntary. You can withdraw it at any time or renew it in Cookie settings on the home page. Withdrawal of your consent does not affect the lawfulness of processing performed before the withdrawal. Privacy Protection Policy
Accept all
Accept selection
Reject all

3dsmax: Making of Angel

Nezz 2005-02-14 00:00 tutorial  > 3ds MAX  > modeling

I would like to present you a little making of about my project.


This work was created for one of challanges on www.max3d.pl

1. MODELING

I started from the head, next I modeled torso - I left hands for later. Few words about technics I used: at the start I made simple model using splines and 2 reference images (front and side) taken from some anatomic book. Next this spline cage was converted to Editable Poly (with Steps set to 0) and next I started adding detailes.


This same technics (starting with splines and adding details using Editable Poly) I used to create all other parts of the body. Armor was created by this same method. Using front viewport and already modeled character I draw splines, which were profile of parts of the armor. Next, using other viewports I added new splines, so finaly I gain simple 3D cage, that was converted to Editable Poly. Only armor on forearm was created from standard max object - tube. Dress - as far simple object was create using splines too - I prefer spline modeling than box modeling, because it is easier for me to, for example, fit dress to the body.


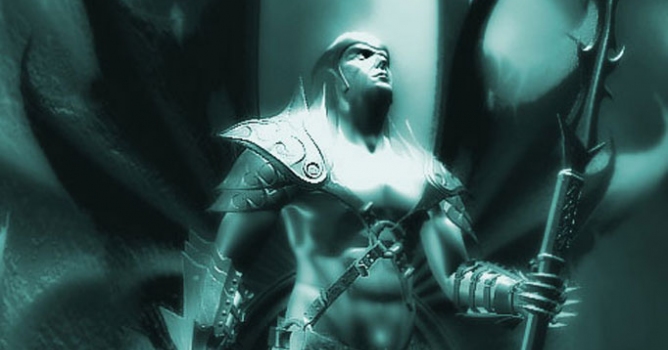
Adornments on shoulder-straps are seperate objects. How did I make them? When I had got finished model of shoulder-strap I draw new splines (in front viewport), that were contours of andornments. This flat object was fit to the shoulder-strap in perspective viewport, next using this splines I created full, complex cage of andornments.


Gloves. All objects of gloves were made using boxmodeling method. Fingers were smoothed by Smooth modifier - thanks to this I was able to create sharp edges fast and easy (this sime effect you can gain using meshsmooth modifier - just need to add high level of crease parameter to applicable edges). The rest of gloves' objects were smoothed using meshsmooth modifier.


Belts were created from boxes. I just converted it to Editable Poly and next extruded - using body model as a determinant of the belt shape - thanks to this my belts fit to the angel body. Next I started working on dress. This simple object was edited by moving some vertes "inside" - thanks to this I created foldings. Next I added Noise modifier - thanks to this dress looks much more realistic. Wings were made using splines. Please, see screens of wire to analyze their geometry.


Weapon is quite simple object. Adornments on handle were made by extruding splines. Blade was made frome splines, next converted to editable poly. Next I used chamfer tool to make sharper edges. Next I deleted some polygons in the center of the blade to create the hole. As you can see bottom blade is rescaled copy of upper blade.


2. LIGHTNING

Lightning is one of the most important things in this artwork, coz it create the mood of the work. Texture (I will write about them later) are on the second place.


I used 3 omni lights to light my object. Each of them had diffrent sets and colors.


Here you can see "clean" object (without textures).


3. TEXTURS, RENDERING & POSTPRODUCTION

Textures in this work are quite simple, I would say banal. There was no time, because of deadlines, so I used camera map mapping (except dress - cylindrical, and wings - spherical mapping). Since I used camera as a mapping projector everything looked good only in one, ,final frame. Textures in diffuse slote were set on 50%, bump was quite low to - thanks to this I gain nice effect of "paiting the scene with light". Effect of tear of dress and wings were made using opacity slot.


Upper image shows you texture of armor on the legs. All rest armor objects were textured similarly. From left: diffuse map, specular and bump.


Upper image shows you final belt textures and my background - it was painted in Painter - I created few simple stains, imitaited clouds.


Upper image shows texture of dress - it shows you how I made wings' textures too.

For final rendering I used Brazil R/S. Unfortunately I lost my settings, so I'm not able to show them. At the end I used Photoshop to work with brightness and contrast and, what is the most important, some blur - this gave me mistic mood.


Best Regards,
Maciej 'Nezz' Drabik


Author: Nezz
Tags:
You may also like...
Creating immersive environments with buildings 3d models – designing city blocks, suburbs and high-rises

Creating immersive environments with buildings 3d models – designing city blocks, suburbs and high-rises

Need realistic buildings for your 3D projects? Explore city blocks, suburbs, and high-rises with our detailed models. Use them to build scenes faster and make your work stand out. Choose the right type for your project and get started today.
×

LEAVE A COMMENT

You need to be logged in to leave a comment. Don't have account? Register now.