Search
Cart
Sign in
  • offerCustomer zone
  • offerYour orders
  • offerEdit account

  • offerAdd project
  • offerLiked projects
  • offerView your artist profile

  • Dark mode

We care about your privacy

We use cookies to provide you with the best possible experience. They also allow us to analyze user behavior in order to constantly improve the website for you. The consent is voluntary. You can withdraw it at any time or renew it in Cookie settings on the home page. Withdrawal of your consent does not affect the lawfulness of processing performed before the withdrawal. Privacy Protection Policy
Accept all
Accept selection
Reject all

Lighting 3D Characters for Storytelling

CG Boost 2020-05-26 10:06 tutorial  > Blender  > lighting

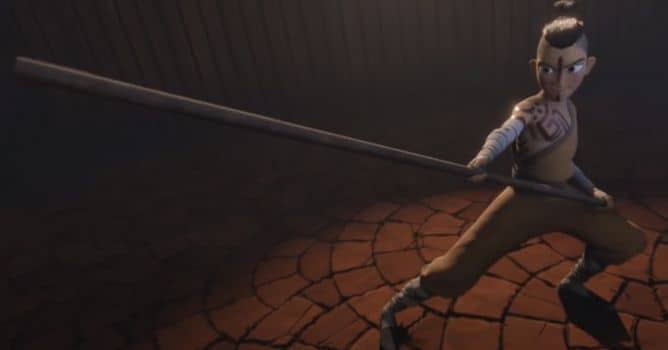
In this video Martin Klekner shares several character lighting tips that he learned throughout his career as a cinematic 3D artist.

From light placement, to adjusting its quality, quantity and color, you will learn practical workflows to make your character lighting more cinematic and help you in your storytelling needs. The Shaolin Monk "Su" 3D character model was created by Juan Hernández


Lighting terms

  • Key Light - The first and usually most important light in a lighting setup, highlight the form and dimension of the subject
  • Back Light - Hits your subject from behind, creates depth in your scene to prevent it from looking two-dimensional, divides subject from the background
  • Rim Light - Back light illuminating the subject from the side
  • Top Light - Highlights the top of the subject's head, sometimes called Hair light, it can create a halo effect
  • Fill Light - Fills the shadows created by the key light
  • Soft Light - With bigger light sources, the light quality and shadows get softer
  • Hard Light - With smaller light source, the light quality and shadows get harder
  • Lighting Ratio - Describes how much brighter the highlight side of your subject is, than the shadow side of your subject
  • Low Light Ratio - Low contrast between the light side and shadow side of your subject
  • High Light Ratio - High contrast between the light side and shadow side of your subject 
  • High Key Lighting - Lighting setup with a reduced light ratio, filling your scene with light
  • Low Key Lighting - Lighting setup with a high light ratio, filling the scene with shadows
  • Short / Reverse Lighting - Placing the Key either slightly behind or at an acute angle to the subject, rather than simply letting it fall square on the face of your character
  • Broad Lighting - The portion of the subject's face that is turned toward the camera is lit most brightly
  • Paramount Lighting - Paramount lighting is a lighting setup where a strong key light is placed directly in front of the subject with a slight downward angle
  • Loop Lighting - The light source is above and slightly to the side of the subject, creates a small "loop" nose shadow cast onto the cheek.
  • Split Lighting - Key light is lighting only one side of the subject, the other side of the subject is in shadow
  • Rembrand Lighting - Key Lights is placed far to the side, shadow from the nose connects with shadows on the side of the face, creating a small triangle of highlight on the cheekbone
  • Checkerboard Lighting - The background is light on the dark side of the subject, but dark behind the bright side of the subject, creating a checkerboard effect
  • Motivated Lighting - Motivated lighting is when the light in the scene imitates a natural source within the scene, you don't come up with nonsensical lights


Author: CG Boost Editor: Michał Franczak
Tags:
You may also like...
Creating the Ultimate Exterior Scenery: The Role of Detailed 3D Models in Real Estate

Creating the Ultimate Exterior Scenery: The Role of Detailed 3D Models in Real Estate

Looking to improve property listings? Discover how real estate 3D models and property visualization 3D can enhance your real estate projects.
×

LEAVE A COMMENT

You need to be logged in to leave a comment. Don't have account? Register now.