Evermotion Pass 10% Off - Get Instant Access to Thousands of 3D Assets

Check Plans

Information Clause

In accordance with the art. 13 section 1 and 2 of the European Parliament and Council Regulation 2016/679 of the 27th April, 2016 on the protection of natural persons, with regard to the processing of personal data and on the free movement of such data, and repealing Directive 95/46/EC (General Data Protection Regulation), hereafter RODO, I hereby inform that:

1. EVERMOTION S.C., 8 Przędzalniana Str., 15-688 Białystok, Poland is the Administrator of your Personal Data (APD)

2. Data Protection Inspector can be reached through e-mail: iod@evermotion.org

3. Your personal data are to be processed on the basis of art. 6 section 1 letter a, b and f of RODO in order to:
a) prepare, conclude and execute the agreement and for other purposes approved by you,
b) to execute the legitimate interest like marketing of products and the agreement, claim assertion or defence against claims resulting from the law regulations.

4. Entities entitled to the reception of your personal data may be the authorised public bodies; mail providers; providers of the services covered by the agreement; responsible for debt recovery, keeping the archives, document utilization, legal consulting, technical services, IT services and accountancy.

5. Your personal data shall not be transferred to the third country, nor to the international bodies.

6. Your personal data shall be processed within the period of the agreement and upon your additional consent until you withdraw it. APD shall keep the data for the period of any civil law claim execution connected with the agreement.

7. You have the right to demand an access to your personal data, to correct or to delete the data if there is no other basis for the processing or any other purpose of such processing or to limit the processing of the data, to transfer the data to another administrator and to raise objections to the further data processing if there is no legal basis for further processing and to withdraw any previous consent.

8. You provide the personal data voluntarily, however they are necessary to conclude the agreement. The refusal of providing such data may result in the refusal of the agreement conclusion.

9. You have the right to lodge a complaint to the Personal Data Protection Office when in your opinion the data processing violates the regulations of General Data Protection Regulation of the 27 April, 2016 (RODO).

10. Your data will be automatically processed, including the form of profiling.
11. You are obligated to forward above mentioned information to your representative, especially if you appointed this person in the agreement as the contact person or as the representative for the agreement execution.

OK

Materials Parameters in Blueprints - Tip of the Week

Michal Franczak 2019-10-09 11:39 tutorial  > Unreal Engine  > modeling

Unreal Engine 4 Tutorial.

Sometimes you may want to control material parameter in blueprint. It gives many advantages - you can control material parameter in sequence editor, or change it when you will approach certain area, change color of a wall with some input trigger (like gamepad or keyboard stroke). In this tip we will look at the part of creating material parameter and setting its value in blueprint. It's quite easy.

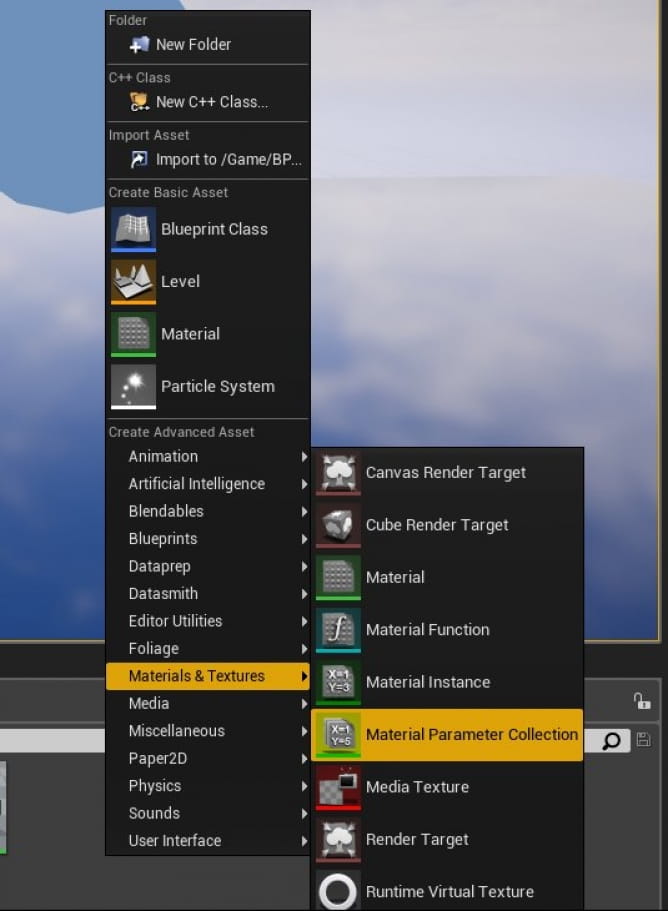
First, create Material Parameter Collection - it is kind of container for material parameters. 
nr_02019_Untitled


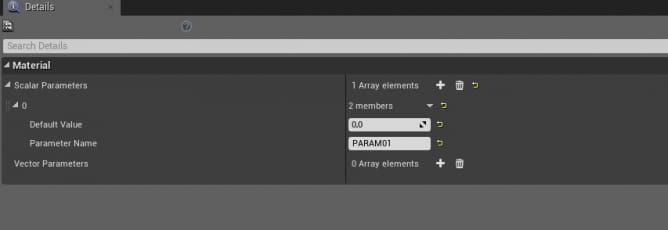
Then, open Material Parameter Collection and create your variables. You can create scalar variable for controlling single values (like aplha, masks, roughness amount, metallic amount) or vector variables for controlling colors.
 

nr_02032_Untitled

Here I have created Scalar Parameter with default value "0" and I gave it a name "PARAM01".


Now we can assign this parameter to some material property. Let's create new material and open node editor.
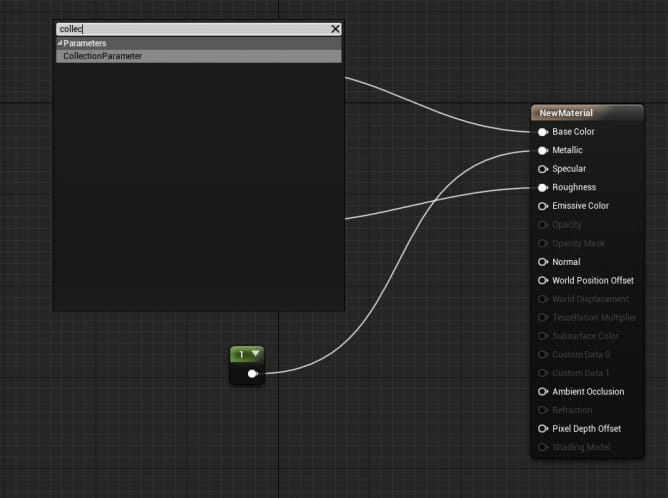
 

nr_02021_Untitled

In node editor find "Collection Parameter" and add it.
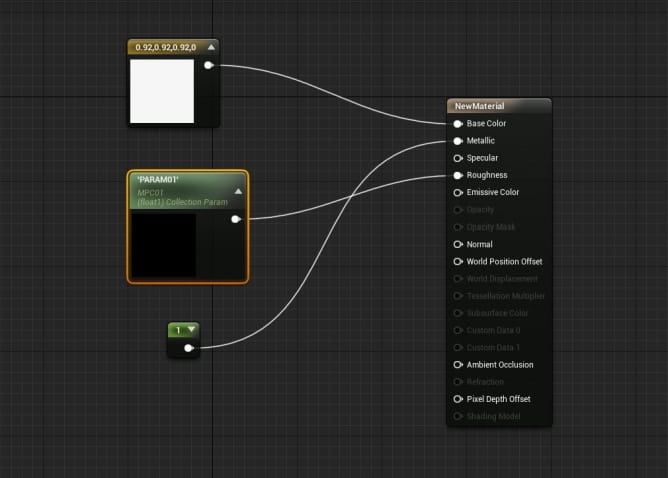
 

nr_02033_Untitled

We created material with some base color, metallic value of 1 and roughness assigned to Collection Parameter "PARAM01".


Now let's change the value of this parameter. We can do it in blueprint or in sequencer.
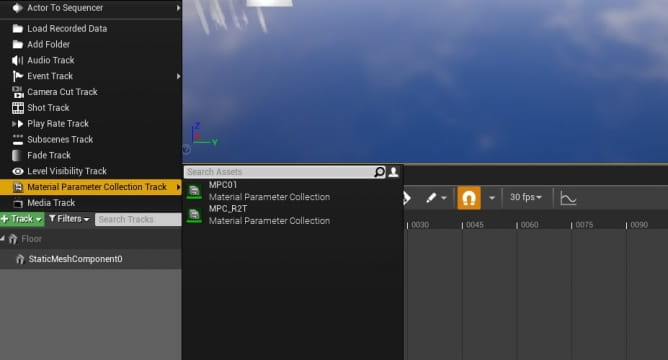
nr_02023_Untitled

To control this parameter in sequencer, create a new sequence and press green "Track" button. Then choose "Material Parameter Collection Track" > choose material parameter collection that you created. In our case it is collection named "MPC01".


nr_02024_Untitled

Choose "Parameter" > "PARAM01" from the list.


If you want to control parameter by blueprint, create new blueprint class > Actor and open it.
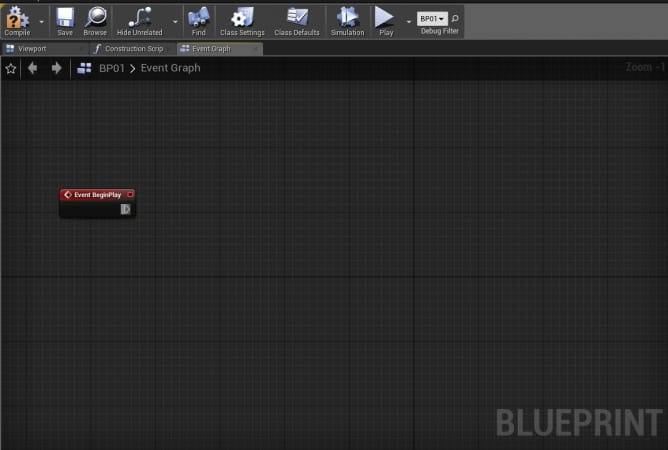
 

nr_02029_Untitled
 

On the top of Blueprint window you will find three tabs: "Viewport, Construction Script" and "Event Graph". We are interested in the third one. Click on "Event Graph" and let's start adding nodes. you can do it similar to material editor - by pressing right mouse button in editor window. Our first node will be "EventBeginPlay". This node launches the script after we press "Play" button in main editor window. 
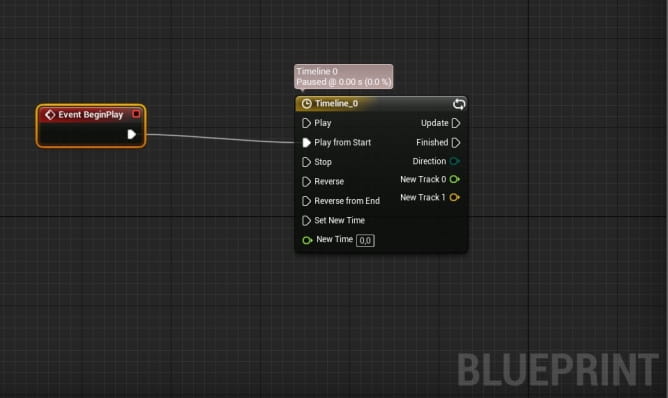
 

nr_02030_Untitled

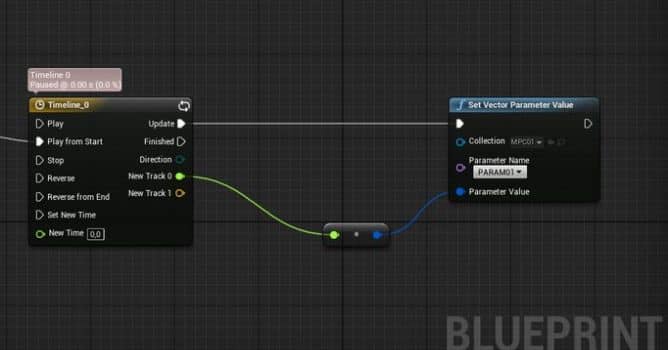
Our second node is "Timeline". We use timeline when we want to change some value in time. I want to change my material parameter value over time, so the timeline is the node I want. We connect EventBeginPlay with "Play from Start". This way each time when we press "Play" script will start from the very beginning of timeline. If we would plug it to "Start", with each press of "Play" we would start from some timeline moment.
 

nr_02034_Untitled

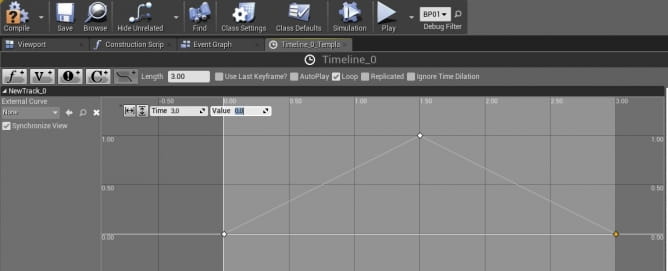
By doubleclicking Timeline node we open Timeline editor. We can create a new curve by rightclicking and creating points. Curve can be linear or bezier, it depends of shape of points we will choose. I created triangle linear wave. On the top you can see length: 3.00 seconds. I also checked "Loop", so timeline will play indefinitely after launching script, changing our value from 0 to 1 and back. Note that our track has the name "New Track_0".
 

nr_02035_Untitled


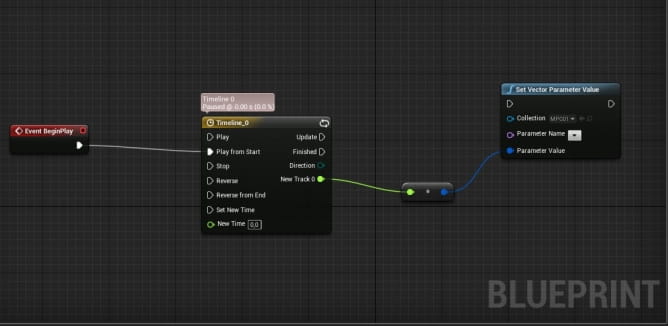
Our last node is "Set Vector Parameter Value" which is used to target our parameter in material. You can see "Collection" box, where we can choose MPC01 collection and Parameter name "PARAM01".
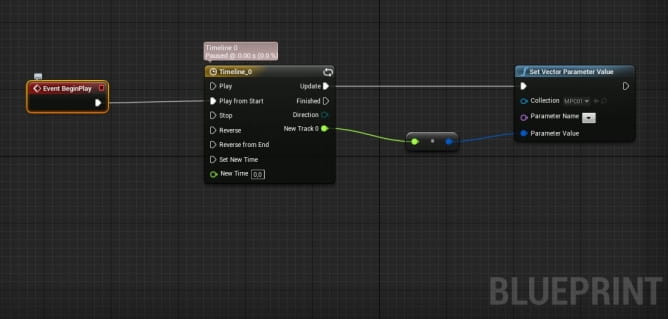
 

nr_02036_Untitled

Last but not least - connect white triangle from Timeline to "Set Vector Parameter Value" node. Triangles in blueprints are for updating events. They generally control the flow of the script, order of operations. You can save the script and drag and drop your blueprint to viewport. Without dragging it will not work.


monkey.gif

The result: after pressing "Play" our monkey changes roughness in 3 seconds intervals.


Author: Michal Franczak Editor: Michał Franczak
Tags:
You may also like...
3D modeling in landscape architecture: Designing green spaces and public spaces

3D modeling in landscape architecture: Designing green spaces and public spaces

In landscape architecture, digital tools enhance precision and creativity. 3D modeling has become an essential tool for architects and designers to visualize and refine their projects with unprecedented accuracy and detail.
×

LEAVE A COMMENT

You need to be logged in to leave a comment. Don't have account? Register now.