Hi!
This week we will learn how to use Vertex Painting to make some water puddles on a pavement.
Click on image to enlarge

Fo the purpose of this tip, I created just a simple rectangular box. I tesselated it quite a bit and imported to Substance Painter 2. I wanted some bumpty pavement material so I downloaded Stone with Sidewalk material from
Substance Source Library. I exported textures in 2K with two sets: Unreal Engine packed and "Document channels + AO". I needed this second preset, because I wanted to have additional height map, it will be useful later.
Click on image to enlarge

I imported my box to Unreal as FBX. As you can see, the mesh is pretty dense, it will be great for painting, because the strokes will be more precise. It will cost a lot of processing power though, so I recommend to tesselate with moderation - it's a bit of overkill here.
Click on image to enlarge

I plugged textures exported from Substance Painter (Unreal Engine packed set) to new material. I also made small function for controlling tiling of the texture. I used scalar parameter muliplied with TextureCoordinates and put it in each texture UV slot. This way I will be able to change tiling whenever I will want to.
Click on image to enlarge

The water has a different color than bricks, so we need to use color space that varies between pavement texture and a water color. We use LERP for this (just imagine it as a gradient between parameters). We control the mix with our Vertex Color. We just need one channel for that. In this case we use red. To add LERP node, press "L" and left click anywhere on the free space of Material Panel. To add "Vertex color", right click and type "Vertex Color" in a search box.
Click on image to enlarge

We place our LERP function between base color texture and base color sample slot. Now, if we will paint with red color, we will get white color over our pavement. We could use even different texture if we would like to.
Click on image to enlarge

I saved and closed the material and created material instance. The instance is now assigned to a box. And it became completely white. The reason of that is simple - by default, new object has 1 in each vertex color value (which means it's already "full covered with water". We need to erase this color -> let's fill it with 0 value in red channel. What will happen?
Click on image to enlarge

By painting with "0" (black) value in red channel we reveal original color of pavement material.
Click on image to enlarge

We painted all mesh with black in red channel, so now we have our "original state" of the material back.
Click on image to enlarge

The liquid should also have a different roughness than the stone, so we insert another LERP function that will vary between stone roughness and liquid roughness basing on red channel vertex paint. We use 0 as a default value of new parameter.
Click on image to enlarge

As you can see, our white liquid became more glossy / less rough.
Click on image to enlarge

Another LERP goes into Normal slot. We vary between original Normal map that we exported from Substance Painter and a solid 100% blue color from Unreal Engine 3 Vector node. To add this node you need to press "3" and left click anywhere in material panel.
Click on image to enlarge

After saving our material, we get rid of stone bump over liquid.
Click on image to enlarge

Let's change liquid color in material instance.
Click on image to enlarge

Liquid is more blue, but still 100% opaque, we need to fix this.
Click on image to enlarge

First, let's add another LERP in AO slot, so we don't get AO artifacts over our liquid.
Click on image to enlarge

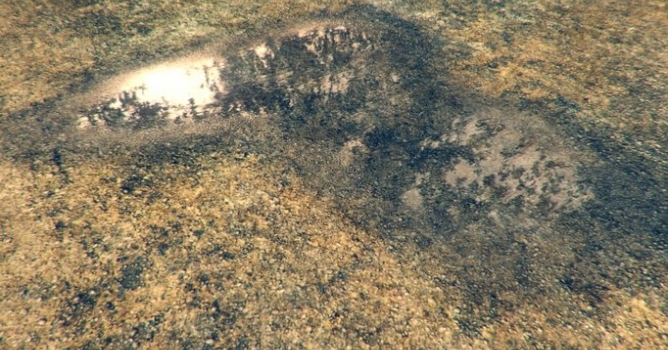
Now, we can import our height map to Unreal, but first we need to tweak it a bit. I used levels to increase contrast of the map. It will be usefull to simulate liquid in the space between stones.
Click on image to enlarge

If we substract our map from Vertex Color we get more liquid in the black areas and less in the white areas. Which means - more liquid in lower areas, pockets and scratches.
Click on image to enlarge

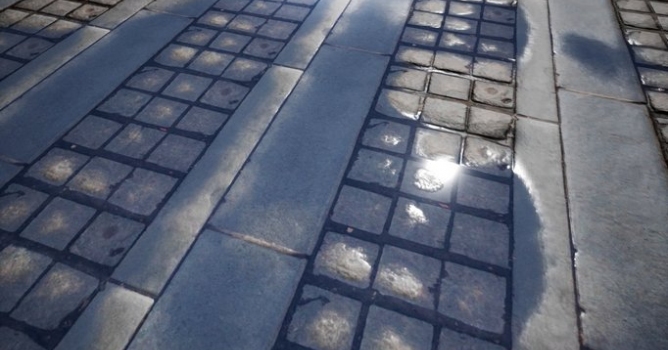
The result is wet pavement.
Click on image to enlarge

Just for fun, let's crank up the levels and reimport the map.
Click on image to enlarge

The result is much more prominent, but still - we don't have a puddle, only some wet stones.
Click on image to enlarge

First, let's use our UV texture coordinates on this map...
Click on image to enlarge

Now by dividing our "substract" node by scalar parameter and clamping the result between 0 and 1 we can get our liquid offset (LiquidLevel node on the image).
Click on image to enlarge

The result of increased LiquidLevel - much more liquid! And we can bring even more by increasing LiquidLevel value in material instance.
Click on image to enlarge

The final touch: if we multiply our liquid level by scalar parameter, we can change the opacity of the water. We don't want to change roughness, normal or AO values, just the color. So we place Multiply slot between our vertex Painting node group (which ends with Clamp node) and LERP node that controls base color.
Click on image to enlarge

The result is transparent water. We can go further from here with painting displacement, but it's just a simple tip, so we are ok for now. Have fun!


 Customer zone
 Your orders
 Edit account
 Add project
 Liked projects
 View your artist profile
COMMENTS