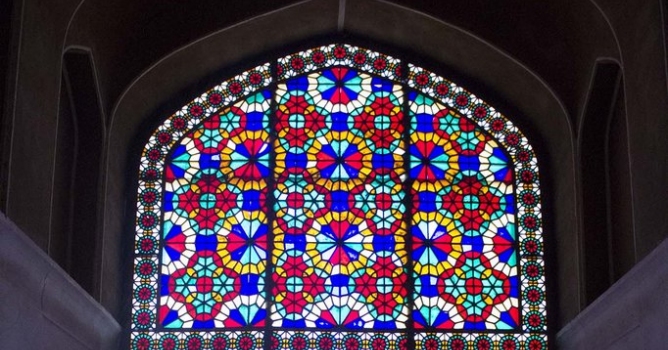
Click on image to enlarge
The reference photo and technical info credit to Sima Rastegari. you can find more photos of this place in her instagram:
sima.rastegari
Click on image to enlarge
I convert the reference photo to black and white just to make sure you can clearly see 3d objects on the scene. First step is to create frames and the first frame is the outer dome frame. Create a Circle shape in Front view.
Click on image to enlarge
Step 2: Convert it to Editable Spline. we just need one fourth of this circle so remove the other segments same as below photo.
Click on image to enlarge
Step 3: Change the mode of the top vertex to Corner to make it looks sharp. Later we may need to convert it to Bezier Corner to adjust its curvature.
Click on image to enlarge
Click on image to enlarge
Step 4: We need to add another vertex. Use Refine button and add a new vertex as shown in the below photo.
Click on image to enlarge
Step 5: With help of bezier handles try to make it same as the dome shape of the referece photo.
Click on image to enlarge
Step 6: I added another vertex and moved it down.
Click on image to enlarge
Step 7: In Editable Spline parameters, checkEnable in Renderer and Enable in Viewport. Then use the Rectangular mode and change the value of Length and Width.
Click on image to enlarge
Step 8:Use Symmetry modifier to complete this object.
Click on image to enlarge
Step 9: To create the inner dome frame, you can just resize the outer frame and change its Rectangular values.
Click on image to enlarge
Step 10: To make sure that frames do not look so flat, we need to chamfer all visible edges. First convert them to Edibale Poly and then use Chamfer. Just as a tip, always duplicate your original objects before converting them to Eiditable Poly. Hide them. you may need to use them again to create another similar object.
Click on image to enlarge
Step 11: I made other frames as you can see in below photo with Box object.
Click on image to enlarge
Step 12: To create the frame of colored glasses, First you need to understand its geometric shape. Then find a piece that simply with duplication and refletion can produce the rest of the object.
Click on image to enlarge
Step 13: Create a Plane. Convert it to Editable Poly
Click on image to enlarge
Step 14: Use Cut and create segments on the frame of the window. Here we do not need to care about quad shape of the faces. We just have to make sure that all segments are on the frame of the window. .
Click on image to enlarge
Step 15: There is one round frame at top right corner. To create that, First I added 2 extra segments, Move their vertices to make it looks round. Then removed the segments. 2 vertices remain there.
Click on image to enlarge
Click on image to enlarge
Step 16: Before duplicating this piece, we need to set ID for similar colors in colored glass. Remember here we are creating both frame and colored glass. Select the faces with similar color. In Editable Poly parameters set different number for each of them in Set ID field.
Click on image to enlarge
Step 17: Use Multi/Sub-Object material and apply different color for each ID. Better to use similar color as original colored glass.
Click on image to enlarge
Step 18: Now use Symmetry modifier, move its Mirror sub-gizmo and reflect the Plane to the left, right, top and bottom.
Click on image to enlarge
Step 19: Add another Symmetry modifier and duplicate whole shape. You need to add several Symmetry modifier to complete this window. If it goes out of frame, just convert it to Editable Poly and remove extra faces. then again add Symmetry modifier. .
Click on image to enlarge
Step 20: Here is the final result for this window. Next we will create its frame.
Click on image to enlarge
Step 21: Select all segments except the border of the window. So all inner segments need to be selected.
Click on image to enlarge
Step 22: In the Editable Poly modifier, click on Create Shape From Selection button. from Create Shape dialog choose Linear type and hit OK. We just created a spline shape.
Click on image to enlarge
Step 23: Select this new spline shape and in the Editable Spline parameters, checkEnable in Renderer and Enable in Viewport. Use the Rectangular mode and change the value of Length and Width. I change Angle to 45. So we finished the first window.
Click on image to enlarge
Step 24: I doublicated the first window which is 2 seperated object, colored glass and frame. there are another glasses around this window which you can use the same technique to create them. the final result should be same as below photo.
Click on image to enlarge
Click on image to enlarge
Step 25: Use same technigue to create colored glass of the main window at top. The only question here is how to remove the extra faces at the corner of window.
Click on image to enlarge
Step 26: The best way is to use Boolean. Select colored glass object. Click on Pick Operand B and click on the frame object.
Click on image to enlarge
Step 27: Because we already applied material to this object so it will give option to remain our material. Choose Match Material IDs to Material and hit OK.
Click on image to enlarge
Step 28: Hide the frame object. you will see there is gap between the main object and extra faces.
Click on image to enlarge
Step 29: Select the extra faces and delete them.
Click on image to enlarge
Step 30: Now you can create frames same as the way we use in the previous steps.
Click on image to enlarge
Step 31: Last object is the glass between inner and outer of the dome. used the same technique to create colored glasses. Here the only question is how to bend this object.
Click on image to enlarge
Step 32: First, use Bend modifier to bend the top faces.
Click on image to enlarge
Step 33: Then use the Editable Poly modifier, select the faces that need to be relocated between frames. At end add Symmetry modifier.
Click on image to enlarge
Step 34: Here is the final resul of this tutorial.


 Customer zone
 Your orders
 Edit account
 Add project
 Liked projects
 View your artist profile
COMMENTS