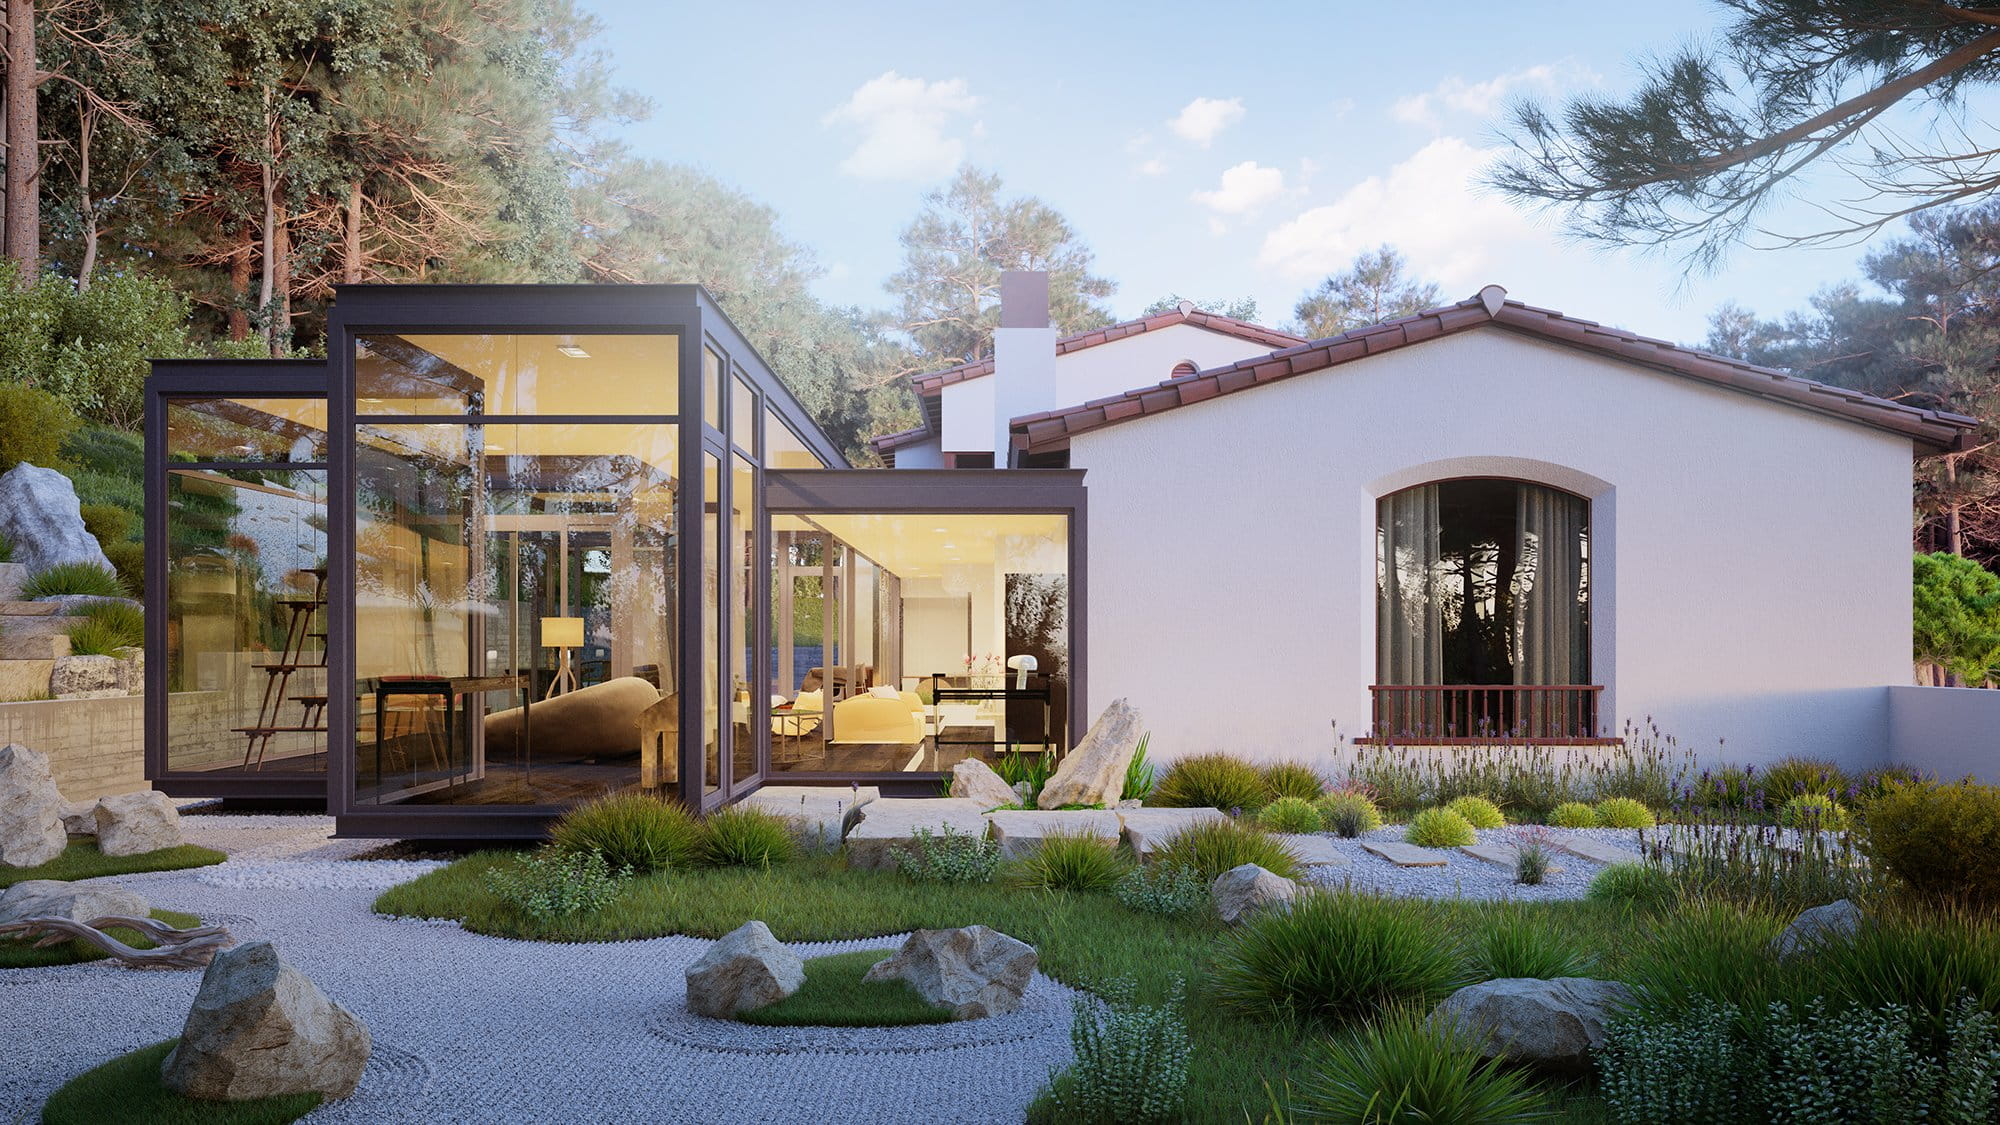
Click on image to enlarge
Final image after post-production.
Click on image to enlarge
The building is an architectural monument with historical value. This is an existing building and is located in California, USA.
Click on image to enlarge
We have been provided with detailed pictures of the buildings, landscape and CAD drawings.
Click on image to enlarge
We have been provided with detailed pictures of the buildings, landscape and CAD drawings.
Click on image to enlarge
The architect of this project is Gari Camaisa. You can see on the drawing an additional glass and metal volume with the function of recreation area. This contemporary part was added to the existing building.
Click on image to enlarge
Stage 1: Creating a detailed model of the existing building.
Click on image to enlarge
Stage 1: Creating a detailed model of the existing building.
Click on image to enlarge
Stage 2: Modeling new additional glass and metal volume with the function of recreation area.
Click on image to enlarge
Stage 3: Creating the environment and landscape in accordance with the references.
Click on image to enlarge
Landscape reference 1.
Click on image to enlarge
Landscape reference 2.
Click on image to enlarge
Landscape reference 3.
Click on image to enlarge
Creating the landscape and plants.
Click on image to enlarge
Creating the landscape and plants.
Click on image to enlarge
Creating the landscape and plants.
Click on image to enlarge
Creating the landscape and plants.
Click on image to enlarge
Creating the landscape and plants.
Click on image to enlarge
Creating the landscape and plants.
Click on image to enlarge
Creating the landscape and plants. First MultiScatter was used for creating the hillocks on the landscape slopes. Then it was converted to mesh and we added second MultiScatter to place the grass on top of it.
Stage 4: Modeling the furniture for the new glass volume of the building.
Click on image to enlarge
Stage 4: Modeling the furniture for the new glass volume of the building.
Click on image to enlarge
Modeling the furniture for the new glass volume of the building - references.
Click on image to enlarge
Furniture modeling.
Click on image to enlarge
Furniture modeling.
Click on image to enlarge
Furniture modeling.
Click on image to enlarge
Furniture modeling.
Click on image to enlarge
Furniture modeling.
Click on image to enlarge
Stage 5: For the lighting we used the standard VRayHDRI.
Click on image to enlarge
Stage 6: texturing. Facade material.
Click on image to enlarge
Grass material.
Click on image to enlarge
Floor material.
Click on image to enlarge
Furniture material.
Click on image to enlarge
Furniture material 2.
Click on image to enlarge
Stage 7: Preparing for the rendering process. For further post production processes, we used the following render-elements: ZDepth, CMasking_Mask, Refract, Reflect.
Click on image to enlarge
Rendering.
Click on image to enlarge
Stage 8. Post Production. First, we chose a suitable sky for the background and then we set the desired exposure level. The render the raw render was fixed by Levels + Curves. Note. An important part of post production is the creation of the atmosphere with pre-rendering using the ZDepth mask. Then we eliminated the rendering artifacts and did color correction using Color Balance tool.
Click on image to enlarge
Final image after post-production.
See Rstyle Visual Communications Studio Portfolio.
Do you want to make a tutorial for evermotion? Contact us!


 Customer zone
 Your orders
 Edit account
 Add project
 Liked projects
 View your artist profile
COMMENTS