How To Make Your CGI Walls More Realistic
Realistic walls with noise modifier.
Total: € 0
Continue Shopping
In accordance with the art. 13 section 1 and 2 of the European Parliament and Council Regulation 2016/679 of the 27th April, 2016 on the protection of natural persons, with regard to the processing of personal data and on the free movement of such data, and repealing Directive 95/46/EC (General Data Protection Regulation), hereafter RODO, I hereby inform that:
1. EVERMOTION S.C., 8 Przędzalniana Str., 15-688 Białystok, Poland is the Administrator of your Personal Data (APD)
2. Data Protection Inspector can be reached through e-mail: iod@evermotion.org
3. Your personal data are to be processed on the basis of art. 6 section 1 letter a, b and f of RODO in order to:
a) prepare, conclude and execute the agreement and for other purposes approved by you,
b) to execute the legitimate interest like marketing of products and the agreement, claim assertion or defence against claims resulting from the law regulations.
4. Entities entitled to the reception of your personal data may be the authorised public bodies; mail providers; providers of the services covered by the agreement; responsible for debt recovery, keeping the archives, document utilization, legal consulting, technical services, IT services and accountancy.
5. Your personal data shall not be transferred to the third country, nor to the international bodies.
6. Your personal data shall be processed within the period of the agreement and upon your additional consent until you withdraw it. APD shall keep the data for the period of any civil law claim execution connected with the agreement.
7. You have the right to demand an access to your personal data, to correct or to delete the data if there is no other basis for the processing or any other purpose of such processing or to limit the processing of the data, to transfer the data to another administrator and to raise objections to the further data processing if there is no legal basis for further processing and to withdraw any previous consent.
8. You provide the personal data voluntarily, however they are necessary to conclude the agreement. The refusal of providing such data may result in the refusal of the agreement conclusion.
9. You have the right to lodge a complaint to the Personal Data Protection Office when in your opinion the data processing violates the regulations of General Data Protection Regulation of the 27 April, 2016 (RODO).
10. Your data will be automatically processed, including the form of profiling.
11. You are obligated to forward above mentioned information to your representative, especially if you appointed this person in the agreement as the contact person or as the representative for the agreement execution.
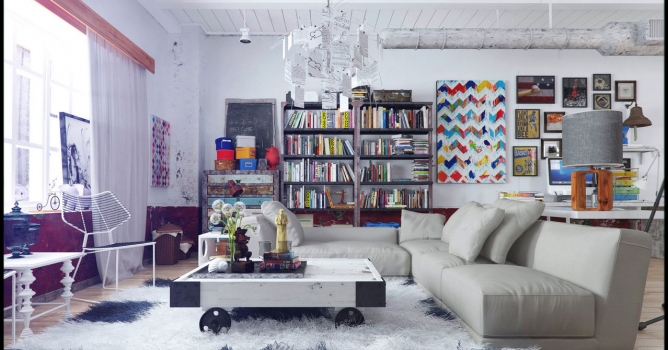

A foreword from Evermotion: Romi Valentino, also known as Romi3D prepared "Making of interior, 1str floor" tutorial for Evermotion users. This work was awarded with frontpage publication. You can see the whole gallery on Evermotion Forum: Interior, 1st floor by Romi3D. We asked Romi for sharing his approach to this scene and he agreed. So... enjoy this tutorial! :)

Hi all!
This is my latest "making of". I wanna thank for Evermotion for giving me a chance to share it with you. Alright then, here we go! The most important for me as a designer and 3d artist is a good concept, I often gather images that resemble the mood of the project I am working on, it is fast and it lets you to better understanding what you are going to do and how is it going to look.

Making this artwork I colaborated with Gaston Carrio. He is one of the top abstract painting artist in Houston. For more info and price about yellow abstract painting that I am using in this bedroom, you can visit this link : https://artbyarchitect.com/art/paintings/abstract-art-transcendent-archetypes-121314/ This painting is protected by copyright and I got a permission from Gaston to use it.
When I decided that I have enough informations and know the style and color that I wanna apply in my work, I started modeling in 3ds max. Before I model any objects I create walls, floor and ceiling, because they have the biggest impact on the overall mood of a scene. I unwrap wall objects, so I can apply textures, add some cracks, wallpaper and put some painting on the wall. You must keep learning and experiment, there is no way you can achieve good results instantly.


Floor material
When the wall and floor were ready, I added some lighting to the scene.
To create a good mood with lighting, you also need to experiment, to find proper intensity, color and position. I use simple V-Ray light, no secrets, no plugins, just a lot of experiments with settings and referencing with images that I gathered before.


I also modeled manually the old working desk chair, the old bookshelf and other furniture. Then unwrapped them one by one. Material that I use comes from cgtrextures.com and textureking.com. To make material more realistic you need to learn from real world. Below there is a small portion of objects that I created.


As I emphasised in some of my other tutorials, I don't often render many elements, I only use what I need for compositing. Of course, that depends of artists approach, just don't forget output as a TIF for more depth of color.


Postproccesing
I use Photoshop, Magic Bullet and After Effects as my primary tools for postproduction. In PS I mix and blend all render elements with soft light filter. Before that, make sure that your RGB image is set to 16 bit and apply gamma exposure (image>adjust>exposure-turn gamma correction to 0,8 or 1.00 depend of your needs). Then play with brightness and contrast.


I blend GI, shadows and total lighting render elements with soft light filter, then I turn down the opacity (to 16%) to achieve balance of this the element and RGB image.

I applied masking to reflect render element and blend it with softlight, then turned down opacity to 15%.

If I have zdepth element in my scene, I edit it in After Effects using frischluft plugin. This plugin has a powerful control of iris and depth.

Sometimes I use Magic Bullet suite to lift the gamma in the dark areas. You can learn basics of Magic Bullet here and color grading here. The last (mybe not important) is adding a lens correction and a black border.

Ok, thats all :) Here are the final renders:


About me: https://romi3d.wix.com/3dart and https://www.facebook.com/Romi3dart
Skype: Romi3D
(Looking for permanent job oversease EU, Canada or USA + willing to be relocated)
I hope this is useful for you. Best regards :)
Romi3d


LEAVE A COMMENT


|

|

|

|

|
 Customer zone
 Your special offers
 Your orders
 Edit account
 Add project
 Liked projects
 View your artist profile
COMMENTS