How To Make Your CGI Walls More Realistic
Realistic walls with noise modifier.
Total: € 0
Continue Shopping
In accordance with the art. 13 section 1 and 2 of the European Parliament and Council Regulation 2016/679 of the 27th April, 2016 on the protection of natural persons, with regard to the processing of personal data and on the free movement of such data, and repealing Directive 95/46/EC (General Data Protection Regulation), hereafter RODO, I hereby inform that:
1. EVERMOTION S.C., 8 Przędzalniana Str., 15-688 Białystok, Poland is the Administrator of your Personal Data (APD)
2. Data Protection Inspector can be reached through e-mail: iod@evermotion.org
3. Your personal data are to be processed on the basis of art. 6 section 1 letter a, b and f of RODO in order to:
a) prepare, conclude and execute the agreement and for other purposes approved by you,
b) to execute the legitimate interest like marketing of products and the agreement, claim assertion or defence against claims resulting from the law regulations.
4. Entities entitled to the reception of your personal data may be the authorised public bodies; mail providers; providers of the services covered by the agreement; responsible for debt recovery, keeping the archives, document utilization, legal consulting, technical services, IT services and accountancy.
5. Your personal data shall not be transferred to the third country, nor to the international bodies.
6. Your personal data shall be processed within the period of the agreement and upon your additional consent until you withdraw it. APD shall keep the data for the period of any civil law claim execution connected with the agreement.
7. You have the right to demand an access to your personal data, to correct or to delete the data if there is no other basis for the processing or any other purpose of such processing or to limit the processing of the data, to transfer the data to another administrator and to raise objections to the further data processing if there is no legal basis for further processing and to withdraw any previous consent.
8. You provide the personal data voluntarily, however they are necessary to conclude the agreement. The refusal of providing such data may result in the refusal of the agreement conclusion.
9. You have the right to lodge a complaint to the Personal Data Protection Office when in your opinion the data processing violates the regulations of General Data Protection Regulation of the 27 April, 2016 (RODO).
10. Your data will be automatically processed, including the form of profiling.
11. You are obligated to forward above mentioned information to your representative, especially if you appointed this person in the agreement as the contact person or as the representative for the agreement execution.
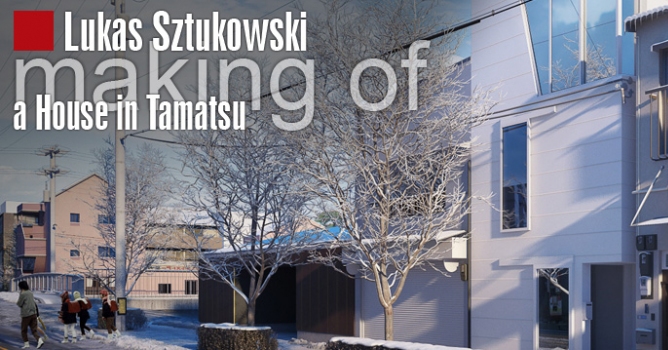


The plan was to make a couple of renderings based on a photograph I found on the internet. It was kind of a challenge, because I was planning on creating renderings from the same camera position but with different light setups and learn some new things by the way.
My main tool for creating the scene was 3dsmax and Vray as the render engine. I’m very familiar with it and I get good results very fast.
Modeling
First, I've blocked out the scene using just simple boxes. I found a picture showing the surrounding area that helped me with placing the buildings in the right place.
After blocking out I begun to set up the camera. The pictures had no exif information so It took a couple of minutes to get the camera match the photograph.
Next step was adding details to the buildings. Based on what I saw on the pictures I've painstakingly modeled the details. I did not used any plugins just good old poly modeling and 3ds tools.
Some pictures of Japan I've found on the internet helped me with getting the right amount of detail in my scene.
I planned to start with the spring time render therefore I needed some nice looking trees.
For modeling trees I've used Onyx Tree Storm. It is a very useful tool and the results are very photo-realistic. 
The cool thing about onyx is that you can choose what part of the tree you want to parameterize so it is possible to make a 3mln trees even on a small laptop but not necessary render it :)
Leaf material is a simple 2 sided material and a cool looking texture.
I've added some leafs on the ground to add some more detail to the scene.
Next step was the winter scene, I've deleted the leafs from trees and started to add snow to simulate a snowfall.
For snow on the trees I've selected them from above with ignore back facing turned on and then duplicating the selection. Next adding shell to the duplicated mesh and meshsmooth for smooth result.
Same thing with rooftops and balconies ect.
Most important thing in the winter scene was realistic snow on the ground.
I've created a simple smoke procedural texture which I've used as displacement and a gradient ramp in diffuse slot to simulate a gradient between dirty and more clean snow.
Also painted the snow on the road using free tire brushes found on the internet and some default brushes from Photoshop.
Snow material:
Scene setup
The scenes have a simple light setups. Sun with VrayDomelight and hdri as the texture to emit diffuse light. In the night scene I've used standard omni lights for the interiors and the artificial lighting above the street.
For the final renders I use following render passes : VrayExtraTex with vraydirt for Ambient Occlusion, VrayRawLighting for more contrast, VrayRawGI for lighting up the scene, VrayRawReflection for additional reflection, VrayRawShadow for lighting up some areas.
I use Photoshop as my retouch/post production tool. After importing passes I adjust them to get the expected result.
Thanks for reading! Hope you've found this useful.
Also I would like to greet all my friends at work in DesignRaum in Winterthur Switzerland where I live and work.
Visit Lukas Sztukowski website - Lucas3d.net


LEAVE A COMMENT


|

|

|

|

|
 Customer zone
 Your special offers
 Your orders
 Edit account
 Add project
 Liked projects
 View your artist profile
COMMENTS