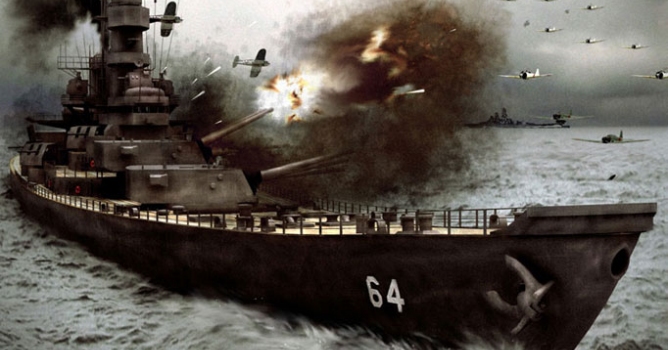
It is good to make some brainstorm before modeling process and re-think whole scene. Thanks to this you will know how your final image should looks like and this will help you to safe a lot of time in modeling and texturing processes. In my case, I decided to use concret angel from the front, so I didn't have to model a stern and its details. And as you can see on the image, my stern is basic as hell, but it does not make my render poor at all.

Hull of the ship is quite easy to model. With some blueprints of photo references put to the scene there should be no problems with modeling. IMHO only anchor's hole could make some problems. I solved it by extruding single polygon into the hull and at the end I added meshsmooth modifier x2 to make it more smooth. Since I didn't want to smooth whole hull (to save some polygons) I turned smoothing groups on and deselected some parts of hull.

Cannon's construction is very simple. Turret was created from primitive box by moving some vertex to gain correct shape. All details was made in low poly and are basic objects.

"Collar" was create from cylinder with high number of segments. I add FDD 3x3x3 modifier on it and form its shape to get as close to original from photos as possible. Next, in editmesh I scaled some of vertext to get effect of folds.

There is not much to say about quarter-deck. My only advisie is hard work:) More details - better effect. At the beggining it is better to make all biggest main objects and next start to add all details. In my case i was using box modeling methode almost all the time.

Handrails were created from a deck. In editmesh mode, I selected appropriate edges and next I created a spline from them - with hard corners of course. Thanks to this I gained correct shape of handrails that fitted to the deck. At the end I copied new spline two more times and added some thickness to it.

Tower of radar was built using boxmodeling and splines. All objects are low poly and the most important in this case is to create the most ideal copy from reference photos.

As all we know the most importans are details, so at the end it is good to make some stuff like you can see on the image.

Here you can see some more details - they are very good to make our objet more realistic, coz they are very easy and fast to model, but look very good on final image.
Water was created using some photo found on the web. This tachnics has got one main problem - it is hard to map our water and do not deform it too much. to make it I built scene like you can see on the image:

Whole scene is made from 2 plane surfaces - one is our sky and second is for a water. there is no problems with the sky - we just have to map correct sky image and fit it to the horizon. But making water is much complicated. Here you can see photo I used for my water:

When you try to map it on simple plane you will see that it is deformeted and we can say a lot about it, but not that it looks like a real water. So, to solve this problem I created simple plane, for example with 15x2 segments - it is important to have as less vertical segments as possible. Next, using FDD 2x2x2 modifier I scaled it to fit it to the camera - so, near the camera it was much more tight. Next I added unwrap modifier and started to position wire of the plane in unwrap edit mode. I scaled only horizontal lines to fit them to the photo of water.

It is important to use tesle modifier to get more detailes of water. So I selected few lines - nearest to the camera and added them more segments (tesle modifier). Next I selected another few segments and make this same operation - but number of segments this time was bigger. Why? Coz I need high poly wire only at the front of the camera. At the end I got effect that you can see below:

This method has got a lot of advantages. As you can see it looks quite real, and this is the most important. What more, this kind of water will not kill your processor during rendering process, like liquid plugins:) We do not have to create good looking water shader - what isn't so easy and what is the most important - this methode is cheap, since liqid plugins are quite expensive. I added some noise modifier at the end and this increased realism a lot - all shadows look much better.
Since all planes are on the 2nd plan I didn't have to model them in high poly. They have to make some action and dynamism.

All planes were created with box - fuselage and wings were made using boxmodeling methode. I decided to make only main parts of planes, coz detailes would not be seen in final image. The most detailed wire has got Corsair, coz it is the neares to the camera.


Postproduction is very important in this scene. Whole smoke, explosions, waves, fire and some details of hull were made in Photoshop on rendered image. Smoke and explosions are made in Afterburn demo. Since I have some problems with time I decided to make it in 2 parts - I rendered two images - with smoke and without it. Next I used render without smoke as a mask in PS.


Here you can see all steps that I made in Photoshop:

Best Regards,
Michal'KoMic'Korotko
Customer zone
Your special offers
Your orders
Edit account
Add project
Liked projects
View your artist profile


COMMENTS