First, the idea a rough sketch.
Then I trace the outline
Then I color fill the drawing. This will be the color direction of the Illustration.
I made this tutorial into 3 parts, first is creation of Jamukha, second is the flying saucer and third is the background.
PART 1: ILLUSTRATING JAMUKHA
*Before applying any effects on the object be sure to make a copy of the original drawing in separate layers, this is handy whenever you will need to use the same shape again
First thing I remove the black outline from the drawing. Then I start my drawing with the eyes, which I do normally in all my portrait drawings. For this one I choose the Mesh tool or shortcut key press "u". Apply white highlight to both eyes as shown.
I applied radial gradient of black to blue for the iris.
Add black pupil.
And finally a specular highlight of white circle, now eyes are done.
PART 1: ILLUSTRATING JAMUKHA - Continue
I created a dark pink to light pink gradient for the eyebugs. Optionally you can save the gradient by dragging the colorfill onto the swatch window.
Fleshing out the face and tummy. I prepared color palettes that will be used for the highlight, shade and dark shade of the gradient mesh. Press "u" to activate gradient mesh. I then color the nodes of the mesh on the left side with the highlightcolor, midtones are on the right, and darker tones on the corners. Below is the result of mesh coloring. This technique is very easy to use but requires a lot of memory so as much as possible I refrain from using it.
I applied mesh on the eye mask.
I pasted it below the eyebugs, this'll give depth and slight meanness to his rather boring face.
Quick tip: to place shape over or under another shape, cut the object you want to paste or CTRL+X, choose the object or group of object, then press CTRL+B to paste on below the object or group of object, CTRL+F to paste on top of the object or group of object.
PART 1: ILLUSTRATING JAMUKHA - Continue
Making the warts pattern. I created a circle shape and add the white to pink radial gradient.
Reshaped the circle as seen below and spread it randomly. Select the shapes and drag it to the swatch window. This will automatically add to the pattern swatches.
From my preserved drawing I copied the face and tummy and applied the new warts pattern. I then set the shape Transparency to "Multiply". Below is the blending result.
Creating a custom brush. Typically whenever I make an illustration in Adobe Illustrator I also customize my brushes. Here's a simple way to do it. I've created a elliptical shape with black colorfill. Then press F5 to activate the Brushes window.
Now drag and drop the ellipse on to the Brushes window. Set to "New Art Brush" on the option window, then hit "OK".
PART 1: ILLUSTRATING JAMUKHA - Continue
Another window will pop-up. On the Brush option window set coloration to "Tints". What this one do is that you can choose any color for the outline of the brush. Set to none color will just be in black or the default color of the brush.
I drew the lines on the faces. The ellipse brush gives me a thick and thin lines as shown in the image.
I drew a new shape and place it under the mouth and teeth. This will separate the head from the stomach. I added gradient fill and set the dark pink gradient Transparency to Color Burn and opacity to 73%.
Coloring the body. I did exactly the same process asI did with the face and tummy, only now I change the color of the body to a bit reddish pink. Basically I am trying to acchieve a jellylike or candle like substance making him wobbly looking character, a result of long distance space travel, hence he needs milk to streghten his bones.
I added a darker color on his coiled tail.
PART 1: ILLUSTRATING JAMUKHA - Continue
Same process again, but now with softer and vanishing edges on the patterns.
Here's how I created a vanishing edge for the warts pattern. I copied the shape of the base object and set the warts pattern. I made another copy of the same object and paste on top of the warts pattern, then this time I colorfill with black and white gradient. I selected both the warts pattern and the black and white gradient object. See image below.
In the Transparency window, on the top right corner I clicked the arrow and it unhides an option. While the pattern and gradient together are selected I choose "Make Opacity Mask".
Resulting image below, is that the black side of the gradient are masked while the white part are being shown.
I combined the masked pattern with the base object and now I have a nice effect of jelly looking surface. Without the gradient masking the patterns are looking too solid.
PART 1: ILLUSTRATING JAMUKHA - Continue
Black hand, I copied the original drawing and cut the hands as shown and apply a gradient color, set the shape Transparency to "Multiply".
I applied the same principle I used with the body but just change the color of the horn. Below is kinda like a subsurface scattering effect a term they use in 3D renderings.
Applied gradient mesh on the spikes.
Also gradient mesh for the shoulder pad.
The bones too.
PART 1: ILLUSTRATING JAMUKHA - Continue
Glass of milk is gradient mesh too.
Only the teeth are regular gradient.
And to finalize the effect a hard edge shadows. I set the color filled object to multiply and opacity to 40% just soft color shadow.
Last but not the least a white colorfill shape....the milk mustache. Got Milk?
PART 2: ILLUSTRATING THE FLYING SAUCER
I decided to make the haul in metalic blue color using mesh gradient.
Same process for the saucer buttom area with the blue highlights on the middle to reflect beam light.
Adding lights at the mid section, for copy array I selected the Iight then hold ALT+SHIFT drag and release. After the first copy is made I press CTRL+D to make a copy array.
Adding line at the buttom most part, I draw five lines then press "w" for blend tool. Blend lines from first line to the last and set 4 for spacing then press ok.
Blend tool created rows of lines according to the shapes.
PART 2: ILLUSTRATING THE FLYING SAUCER - Continue
I added a saucer hood.
I used mesh gradient and added highlight on top area.and black on the bottom.
I added 13 circular holes on the hood and then press alt+ctrl+m to create envelope mesh. I then input 2 for the rows and 1 for the columns. This produces a control nodes where I reshaped the group of holes to fit the hood shape.
I created the jelly-like steering wheel using mesh gradient. For the switch board I use the basic color gradient.
I use a fish bowl for reference for the glass dome. This were created using mesh gradient. Proper placement of the highlight, midtones and shade were the key element in achieving the glass surface. I created outer dome by enlarging the inner dome and applying white to black gradient. See gradient mesh below.
PART 2: ILLUSTRATING THE FLYING SAUCER - Continue
Antenae light were created using blend tool then setting the transparency to "screen" with white outerglow.. Glow effect is located in Effects/stylized/outer glow.
In creating the retractable cable arm I made a segment then drag and drop it onto the Brushes Window. I set the New Brush option to "New Pattern Brush". Set the coloration to "none".
Below I tried to apply the "Cable" brush to the curve.
Since I have created the cable brush it's ready for the retractable saucer cable arm
PART 2: ILLUSTRATING THE FLYING SAUCER - Continue
I then applied the cable brush to the outline, below is the result. For the Saucer hole I used normal gradient fill.
Preparing the cow, I removed the outline and prepared the color palette.
Again gradient mesh using my preset color palette. Gradient mesh will be effective if you know where to place the highlight and shades as in the cow illustrartion.
Light beam were created using Blend tool..
After I created addtitional outer beam shape I press "w" for the blend tool. I then selected input 30 for the specified steps. Finally added an outer glow in white color. I wanted the cow to have a silhouette of blue so I use the blue gradien color fill as in the image shown.
Nearly complete, next and final stage is the background.
PART 3: ILLUSTRATING THE BACKGROUND
Instead of making it a blue night sky I made it into hues of gray for mystical effect. Here below I set the color palette of the background. I use gradient mesh on the sky with black zenith, horizon blue and gray ground fog.
I added some grassy ground by using wrinkle tool from the tool bar. See below the effects of the distortion.
I added of black to white gradient and then set the transparency to "Soft Light" and opacity to 50%.
The clouds are a little tricky, I wanted it to have the samecolor as the background so I color pick the background color and apply the gradient mesh using my preset cloud color palette.
Below is the result of the blending of subtle clouds on to the sky.
PART 3: ILLUSTRATING THE BACKGROUND
Creating the stars, I made a white circle shape object then on the tool bar I choose Effect/Stylize/Outer Glow. On the outer glow option I choose Mode to "Screen". After the shape was set I drag it to the Symbol window and rename it stars.
On the tool bar I choose Symbol Spray or Shortcut "s". I sprayed it randomly on the zenith sky. I made the stars in random sizes by click and holding the Symbol Spray button this will unhide few more options and I choose Symbol Sizer Tool. Selecting the stars and spraying with Symbol Sizer Tool will make the stars sizes big and holding ALT key will make it small.
Here below is the final stars using the Symbol Spray, with this the illustration is complete.
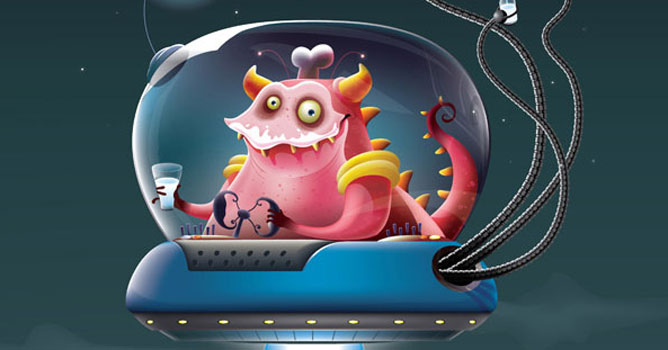
Here is the final illustration, Jamukha, Got Milk?
Thank you very much guys for reading my tutorials, I hope you do pick-up some tips and techniques in using Adobe Illustrator in this article. For more digital painting tutorial please bookmark my website
https://www.rodnymella.com Guys and gals, if you want to try the vector art please drop me a message and I will send you the raw AI file for you to try.
To view larger image with finer details please visit my Gallery. Sign in my Guestbook, if you have any question regarding this tutorial leave your message by clicking the Tutorial Message button and I will answer all your questions!
Cheers!
Rodny Mella
www.rodnymella.com


 Customer zone
 Your special offers
 Your orders
 Edit account
 Add project
 Liked projects
 View your artist profile
COMMENTS