Evermotion Pass 10% Off - Get Instant Access to Thousands of 3D Assets

Check Plans

Information Clause

In accordance with the art. 13 section 1 and 2 of the European Parliament and Council Regulation 2016/679 of the 27th April, 2016 on the protection of natural persons, with regard to the processing of personal data and on the free movement of such data, and repealing Directive 95/46/EC (General Data Protection Regulation), hereafter RODO, I hereby inform that:

1. EVERMOTION S.C., 8 Przędzalniana Str., 15-688 Białystok, Poland is the Administrator of your Personal Data (APD)

2. Data Protection Inspector can be reached through e-mail: iod@evermotion.org

3. Your personal data are to be processed on the basis of art. 6 section 1 letter a, b and f of RODO in order to:
a) prepare, conclude and execute the agreement and for other purposes approved by you,
b) to execute the legitimate interest like marketing of products and the agreement, claim assertion or defence against claims resulting from the law regulations.

4. Entities entitled to the reception of your personal data may be the authorised public bodies; mail providers; providers of the services covered by the agreement; responsible for debt recovery, keeping the archives, document utilization, legal consulting, technical services, IT services and accountancy.

5. Your personal data shall not be transferred to the third country, nor to the international bodies.

6. Your personal data shall be processed within the period of the agreement and upon your additional consent until you withdraw it. APD shall keep the data for the period of any civil law claim execution connected with the agreement.

7. You have the right to demand an access to your personal data, to correct or to delete the data if there is no other basis for the processing or any other purpose of such processing or to limit the processing of the data, to transfer the data to another administrator and to raise objections to the further data processing if there is no legal basis for further processing and to withdraw any previous consent.

8. You provide the personal data voluntarily, however they are necessary to conclude the agreement. The refusal of providing such data may result in the refusal of the agreement conclusion.

9. You have the right to lodge a complaint to the Personal Data Protection Office when in your opinion the data processing violates the regulations of General Data Protection Regulation of the 27 April, 2016 (RODO).

10. Your data will be automatically processed, including the form of profiling.
11. You are obligated to forward above mentioned information to your representative, especially if you appointed this person in the agreement as the contact person or as the representative for the agreement execution.

OK

Making of PV-3 Jet

Pavel Romsy 2008-06-30 00:00 tutorial  > 3ds MAX  > modeling

This project was made to learn blueprint modeling and unwraping (I had never done this before). In this making of I'm going to show all parts of my work and also I'm going to point on mistakes that I have made. I hope that my making of will be useful for those who wants to start with this as well and will help them to avoid of making the same mistakes.

I used this software and plugins:
---------------------------------
*VIZ2008 - scene
*Brazil r/s V2 pro beta - rendering
*Texporter - VIZ doesn't have feature to save unwraped wire image (I didn't find it:) so this plugin was handy.
*Photoshop - texture painting and postproduction

Some info about the jet which I created:
---------------------------------------
This aircraft is being developed for Indian army as LCA (Light combat aircraft) since 1983. Its main goal is to replace old MIG 21. In present is done prototype PV-3.
In some details is similar with Mirage 2000. Aircraft is very small and it belongs among the smallest and the lightest in the world.

SCENE SETUP

At first I had to find some good blueprint reference. There was a little problem with this aircraft as it isn't very famous. I found only one version of blueprint on google, unfortunately not much detailed.


Here is an example of which I consider as a great reference if you want to make a quality aircraft model with all details :)
 

I loaded blueprints into photoshop and with rulers checked if the dimensions of top, side and front views coresponds. I dont't have screenshot of this from HAL Tejas project but on image below there is example from another project which I'm making.
 

I inverted colours on whole image (there is also good to add some contrast). I like to have black background and white lines which helps me later with the opacity trick in scene. Then I cut each view into separate images: top, side and front with ~ coresponding image rosolutions and saved them. I created box in VIZ with matching proportions to the reference images, converted it into editable mesh and deleted 3 sides. I assigned its own Material ID (1,2,3) to each of resting sides. Then I applied multi/Sub-object material on this box. Sub-Material settings are showed on the image below (self ilumination set to full white, speculars off and previously prepared reference images in the opacity slot). This makes visible only the lines of drawed aircraft and they are independend on the scene lighting.


*/TIP: there is also a lot of tools and scripts for crating bluprint planes in the viewport e.g. imagePlaneMaker.ms -- By Neil Blevins/*


SCENE SETUP - CONTINUE
 
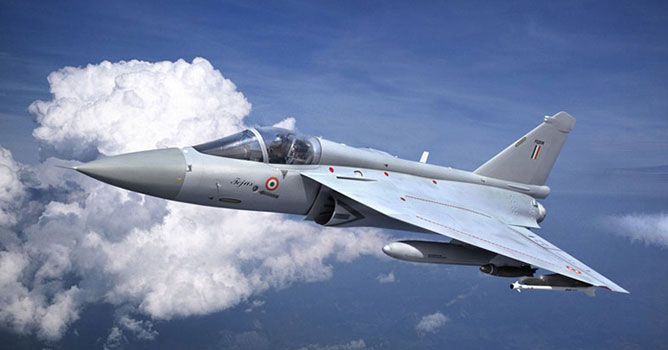
I have downloaded some photos of real aircraft to have some additional reference.

IT is good for begginers to go through some tutorials and pages about this problematics before modeling starting.
some links on sites which can help you:
* www.military-meshes.com - a lot of usefull stuff on forum
* www.colacola.se - Anders Lejczak: great site with very good aircraft tutorial which helped me a lot.
* https://home.wanadoo.nl/r.j.o/skyraider/index.htm - Sky rider's tutorials

And finaly, I can really recommend to consult your work with more experienced friends and people arround you. For example, when I went to a pub with friends I took some mesh prints of my model and friends showed me where are mistakes or where improve topology.


My thanks to:
Temüjin - (Tomáš Müller) www.temujin.cz
JohnBruk - (Jan Brukner) www.johnbruk.com


I have chosen fuselage part under a cockpit as my starting point. Then I continued extruding and adjusting mesh to fit blueprints. I modeled only half of plane and then used mirror modifier. And in the end applied turbosmooth modifier. Some details like pitot tube are made as separate objects. Ailerons/elevators and rudder are made as separate too in case of my intention to animate the jet in future.


I haven't time to model some parts so:
1. Pilot - by the courtesy of Oddon Milich
2. Pylons, rockets, bombs and fuel tanks are used by by the courtesy of Anders Lejczak (www.colacola.se). Outer pylons are of my made because I had to match them to real ones on Hal Tejas.

My first unwrap isn't ideal.
Fuselage is mapped cylindrically, remaining parts (wings..) simply with planar mapping.
On the picture bellow there are red marked error areas. When you'll do your own model be aware of making mistakes like:


1. overlaping parachute (I fixed this one because the error was markable in final scene)
2. fuselage top details - I had to map them separately
3. overlaping outer/inner cockpit
4. air intake/ fuselage overlaping
5. distorted fuselage - non spherical details
6. distorted nose


I have used Texporter plugin for exporting the unwraped wire image from VIz.

For texture painting I helped with mirage texture from Anders Lejczak's web page. This was my base test texture. I repainted it whole later. See image below how it changed. In the end I used reference photos and cut details like flags, signs and put them into separate layer above the basic paint of plane. Bump map was painted to ~ copy the panels directions. Main aircraft texture is made in 4k resolution.


SCENE SETUP - CONTINUE
 
Weapons, ejection seat, pylons, engine and other details has it's own materials with textures. I have also funny mood so I painted on them some little jokes like red flower and go arrow on the rocket. From camera view it looks like relevants signs :)


Lighting is done in Brazil r/s V2.


I was trying to keep lighting as simple as possible. Sun is simulated by direct parallel light with soft edge shadows. Skylight is done by domelight with spherically maped texture of clouds.

All my light and render settings are showed on the picture bellow. There is also an example of material (main plane texture). There could be seen that I have used *.psd file in diffuse (color) slot. This is not ideal, because this file is usually very big (in case of high resolution and lot of layers). I used it because I was still tweaking and repainting some parts of texture and making fast test renders how it looks until I was satisfied with the result.


I made a several composition setups and variants:

First one:


I tryied also a low fly over runway but I don't like it.


I chose this one as a final version (wingman tests)...


... and moved into photoshop. I was trying to use nondestructive adjustmens. They are showed on the seccond image bellow.
Background and contrail on the bottom. Above are adjustment layers with it's masks. I like to use brightnes/contrast and curves adjustments a lot.

*/ TIP: with aircraft renders there is a big problem with hi-res photos above the clouds. My recommend is tell all of your friends to take photos when they travel by a plane on holidays :) /*


Final images:


I hope this making of will help you with starting of your own works and also keep you away from my mistakes:) It's my first writing so excuse me please if I have forgoten on something. Feel free to ask and I will answer your questions.

*/TIP: don't worry if you make any mistakes in your work, take it as an learning lesson. You see how many mistakes I have made and the result is still lookable. You'll fix it up next time =) /*


AUTHORS INFO
Author: Pavel Romsy
Country: Czech Republic
www: https://www.romsy.cz


Author: Pavel Romsy
Tags:
You may also like...
3D modeling in landscape architecture: Designing green spaces and public spaces

3D modeling in landscape architecture: Designing green spaces and public spaces

In landscape architecture, digital tools enhance precision and creativity. 3D modeling has become an essential tool for architects and designers to visualize and refine their projects with unprecedented accuracy and detail.
×

LEAVE A COMMENT

You need to be logged in to leave a comment. Don't have account? Register now.

xeon_max 05:01:14  |  29-08-2009
awesome man ill try it
immjg 18:07:07  |  18-04-2011
Lovely
hoppie 17:34:17  |  18-05-2011
hi, great work by the way very photorealistic :) i was wondering if the cut up blueprints used in this are still around if so pleas could you email them to tom@swwebservices.co.uk much would be appreciated, thanks keep up the great work