We add new 3D SCANS every week

Shop Now
Search
Cart
Sign in
  • offerCustomer zone
  • offerYour orders
  • offerEdit account

  • offerAdd project
  • offerLiked projects
  • offerView your artist profile

  • Dark mode

We care about your privacy

We use cookies to provide you with the best possible experience. They also allow us to analyze user behavior in order to constantly improve the website for you. The consent is voluntary. You can withdraw it at any time or renew it in Cookie settings on the home page. Withdrawal of your consent does not affect the lawfulness of processing performed before the withdrawal. Privacy Protection Policy
Accept all
Accept selection
Reject all

Making of The Showstopper

Neville Dsouza 2008-02-04 00:00 tutorial  > Photoshop  > digital paiting

Hello everyone, you all must've met celine and got to know about her life in the fashion world. Now, let's go deeper as to how she was created!

RESEARCH

I start by collecting lots of reference images. This will give me an idea about the entire scene.


CONCEPT
Once i've decided what i want, i create the concept sketch. This covers the story & basic style of the character, but without the rough color pass.


BASIC SHADING
I proceed with the main model, tracing out the shapes with the pen tool and then shading them with the dodge and burn tool in order to get soft highlights and darker tones.


COLORS, REFLECTION AND GLOSS

Now I show You how to create a basic reflections on picture. Please follow these steps:


Here's the summary
a) My color process changes / varies with different projects, it all depends on the approach, in this piece i decided to first work on grey tones and then later overlay the colors in a different layer with the help of blending modes. Here, the 'multiply' blending mode works best. although you can experiment with the other modes to get more results ;)
b) For the reflections, which is obviously not accurate but then again to 'mimic' the effect, this can be pretty fun to do :) use the HDR file of your choice to get the best results, you can go without desaturating the file and see how the colors mix or you can retain the actual base color and just use the 'linear dodge' blending mode to get the little specs of reflection on the surface.
c) Keep in mind that, toward the end of the project, there will be changes for it to look much better than it was earlier. Sometimes certain elements will have to go just to bring the whole image together. So, just be flexible and go with the flow. Believe me, it works!
d) I was deeply inspired by the 'StarCraft' cinematic from Blizzard entertainment. I kept playing the video over and over again, carefully observing the paint, reflections and dirt, not to forget the lighting. I even saved specific screenshots for reference which proved to be extremely helpful! this was the target! this was what i had to accomplish but without the use of any 3d software.

moving on...

I now continue with the other parts of the model, following the same technique.


HER FACE
As you can see, the face on the right (more of an oriental look) is a little bit more appealing than the face on the left. I felt it was a good idea not to add the lips, nose, eyebrows etc. It look's better this way ;)


The warp treatment for the face and forearm...


Next, i used the Liquify tool to get the reflections to 'bend' or flow across those tricky face contours (otherwise not possible with the 'WARP' tool). Direction is very important here, you can end up doing this for hours! :) but, well worth it! also keep in mind about the 'brush pressure' , increasing it's value will distort the image very quickly! ... slow down ... keep the value at a minimum level, you'll get pretty cool, interesting warps.


And here it is, after the Liquify treatment!


color pass screenshot along with reflections...

Celine :)...


BACKGROUND

Reference images for the background setup, followed by the flat color block and final grey shading with the runway light effects. coloring is yet to be done ;)


CROWD
Proceeding with the other robots gazing at Celine!
I stuck with the same technique for the color process, only this time, the little robots won't have any reflections.


Followed by eye glows, a little bit of bounce light and floor reflection.


PEEPING BIGBOT
Though i didn't have any reference image, i quickly sketched out a simple concept keeping in mind about the overall style. So, here he is...the next one to join the bandwagon! :) ... as shown, concept sketch > overlay > grey shading > colors.


JEALOUS MODEL
Creating this robot wasn't difficult at all, i found a fine reference image... yup! she's from grey's anatomy ;) though i can't seem to remember her name, bummer... :(


FASHION SHOW TITLE AND COMPANY SPONSORS
I had to be very selective about the title...again, in regard to the overall style. As for the company sponsors, their names actually do convey different messages ;) in other words, they're all part of the story.


MORE LIGHTING AND FLOOR REFLECTIONS

This is how it all looks like ;)...i relied on the reference image, mainly for the model's reflection on the floor. Very helpful indeed!...


BACKGROUND COLOR AND DETAILS

Somehow i wasn't satisfied with the background's monochromatic look :( plus lack of design detail. These color falloffs and robot outlines did just the trick! ;) not to mention the extra lighting.


ADDITIONAL ROBOT DETAILS

I finally added some more details for all the robots! :) the extra gloss was necessary, especially when i decided not to add any reflections for the robot crowd.


POSE FASHION WEEK 2007

Background complete! ... however, since there will be a depth of field treatment, most of the details will be lost :( ... i bet you all must be thinking ; all that for nothing?!! ... let's put it this way > some sacrifices have to be made ;) it's either this or that :) i had to bring Celine forward and not let her dissolve right into the background.


DEPTH MAP

Have a look at this page from www.dofpro.com; you'll most certainly get a basic idea about the depth map i created.
https://www.dofpro.com/photogallery.htm


Here are the settings for Depth of field generator pro...


Working on a resolution of 2744 x 3750 proved to be pretty hard and fun the same time :) ... it did take a while for the depth of field effect, but it was worth it all the way! ;)


DIRT AND EXTRA DETAILS
These are examples of the many types of dirt, grunge and splatter brushes i used for Celine's de-glamorized look :) all credit goes to spiritcoda and garfcore splatter pack for this fine collection!


As you can see, i prefer using 'multiply' blending mode, with a creamish ivory color. This darkens/burns the brush sample over the surface.


After the all the brush work...


FINAL IMAGE
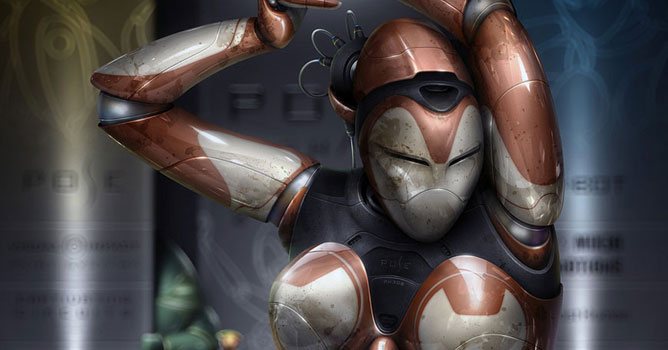
Bringing it all together! i present to you 'The showstopper'


Author: Neville Dsouza
Tags:
You may also like...
Enhancing realism in 3D designs: Tips for using models of children, men, and women

Enhancing realism in 3D designs: Tips for using models of children, men, and women

When crafting a 3D environment, realism breathes life into your scenes, making them more relatable and engaging.
×

LEAVE A COMMENT

You need to be logged in to leave a comment. Don't have account? Register now.

DenLaw 18:22:41  |  23-01-2010
Absolutely STUNNING!
ash_jinn_kn 20:32:59  |  21-04-2010
I like the end image very much, and have question - How long did it took you to create the final version?
imranmidas 11:45:06  |  28-09-2010
Excellent Work..........Great!
AbdulDesign 16:43:31  |  23-11-2011
Gracias por este trabajo...Excelente muy creativo...