Search
Cart
Sign in
  • offerCustomer zone
  • offerYour orders
  • offerEdit account

  • offerAdd project
  • offerLiked projects
  • offerView your artist profile

  • Dark mode

We care about your privacy

We use cookies to provide you with the best possible experience. They also allow us to analyze user behavior in order to constantly improve the website for you. The consent is voluntary. You can withdraw it at any time or renew it in Cookie settings on the home page. Withdrawal of your consent does not affect the lawfulness of processing performed before the withdrawal. Privacy Protection Policy
Accept all
Accept selection
Reject all

Car modeling tips

Sjon 2007-01-02 00:00 tutorial  > 3ds MAX  > modeling

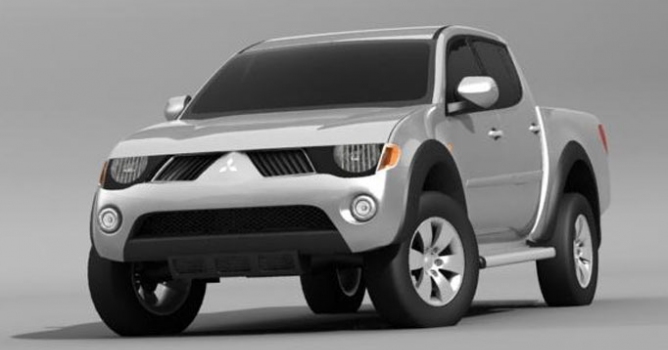
In this tutorial, I want to show how you can create some details in your model. I will show that technik on two examples, most important thinks I want share here is using extrude and chamfer to create really good looking smooth shape.

1. First make a simple shape of your model (in this tutorial it is a car). Create a low polygon (LP) wire.


2. Prepare shapes to create details in the model. In this tutorial those are the door line and the lights.


3. Add to your low polygon wire a new modifier - TurboSmooth interations set on 2. Right click on TurboSmooth, and choose Collapse All. In the next window choose "yes". We now have Editable Mesh.


4. Right click on editable mesh and choose Editable Poly. Now turn the polygons on.


5. Select polygons around the shape, and attach them to a new object. We detach polygons from the old object and attach them to a new one because we will use Boolean operation. Often Boolean operation destroys the wire if it’s too complicated (some edges may be lost).


6. Leave the new object and the new shape. Select the object and choose Boolean operation.


7. Now change Boolean object to Editable Poly like before. The next step is Cleaning Mesh.


8. When you clean mesh, unhide all objects. Select "car body" and attach the Boolean object. Now turn on verticles and select all (ctrl+a), then weld verticles. Weld Threshold should be very small (0,01cm).


9. Our boolean shape was an ellipse. Now we must create a nice circle. Select polygons according to the the picture, and delete them.


10. Now we must know how much verticles is in our ellipse. I have 28 verticles. Create a simple cylinder in front view. Change the cylinder with Editable Poly and delete all polygons. Leave only the end cap. Move this cap to the correct place.


11. Select "car body" and attach the cap cylinder. Now choose the border and select like on the picture. Click Bridge.


12. Now select edges and use Extrude. If it is necessary clean up mesh. Next add chamfer.


13. Now choose polygons and select half of the model. Delete those polygons. Add two new modifiers to your list: symmetry and smooth.


14. When we add smooth our model looks nice, even when we are very close. But it is important that we can still add modifier like TurboSmooth to make the mesh extremely smooth.


15. Now we will create door lines. The technique is the same. First select polygons around the shape, attach them to a new object.


16. Choose a new object and go to Boolean option. Pick operand B, and click on the shape.


17. Change Boolean object to Editable Poly and clean mesh.


18. Select the door line and chamfer set on 0,2 cm.


19. Clean mesh again. To clean mesh you can use a few options: weld verticles, target weld (for verticles), collapse (for verticles).


20. Now select polygons and extrude set on -0,5 cm.


21. Select the line. Then extrude and clean mesh.


22. Go back to the edges and now just click chamfer set on 0,2 cm.


3. 23. Unhide all objects, and select "car body". Attach Boolean object, select all verticles and weld set on 0,01 cm. Go up to the modifier list to smooth, and observe the result. We have now beautiful door lines.


Remember not to use only chamfer to create those details. Here you can see my models created in this technique.


Sjon received Evermotion CD for free. You can also write tutorial / making of ... and win one of our CD's:


Author: Sjon
Tags:
You may also like...
3D Textures That Pop: Using PBR to Add Depth and Realism to Any Surface

3D Textures That Pop: Using PBR to Add Depth and Realism to Any Surface

Want your 3D textures to stand out? Discover how PBR adds depth and realism to any surface for impactful, photorealistic results in your projects!
×

LEAVE A COMMENT

You need to be logged in to leave a comment. Don't have account? Register now.

mayabaloch 01:09:27  |  29-12-2010
nice