Search
Cart
Sign in
  • offerCustomer zone
  • offerYour special offers
  • offerYour orders
  • offerEdit account

  • offerAdd project
  • offerLiked projects
  • offerView your artist profile

  • Dark mode

Information Clause

In accordance with the art. 13 section 1 and 2 of the European Parliament and Council Regulation 2016/679 of the 27th April, 2016 on the protection of natural persons, with regard to the processing of personal data and on the free movement of such data, and repealing Directive 95/46/EC (General Data Protection Regulation), hereafter RODO, I hereby inform that:

1. EVERMOTION S.C., 8 Przędzalniana Str., 15-688 Białystok, Poland is the Administrator of your Personal Data (APD)

2. Data Protection Inspector can be reached through e-mail: iod@evermotion.org

3. Your personal data are to be processed on the basis of art. 6 section 1 letter a, b and f of RODO in order to:
a) prepare, conclude and execute the agreement and for other purposes approved by you,
b) to execute the legitimate interest like marketing of products and the agreement, claim assertion or defence against claims resulting from the law regulations.

4. Entities entitled to the reception of your personal data may be the authorised public bodies; mail providers; providers of the services covered by the agreement; responsible for debt recovery, keeping the archives, document utilization, legal consulting, technical services, IT services and accountancy.

5. Your personal data shall not be transferred to the third country, nor to the international bodies.

6. Your personal data shall be processed within the period of the agreement and upon your additional consent until you withdraw it. APD shall keep the data for the period of any civil law claim execution connected with the agreement.

7. You have the right to demand an access to your personal data, to correct or to delete the data if there is no other basis for the processing or any other purpose of such processing or to limit the processing of the data, to transfer the data to another administrator and to raise objections to the further data processing if there is no legal basis for further processing and to withdraw any previous consent.

8. You provide the personal data voluntarily, however they are necessary to conclude the agreement. The refusal of providing such data may result in the refusal of the agreement conclusion.

9. You have the right to lodge a complaint to the Personal Data Protection Office when in your opinion the data processing violates the regulations of General Data Protection Regulation of the 27 April, 2016 (RODO).

10. Your data will be automatically processed, including the form of profiling.
11. You are obligated to forward above mentioned information to your representative, especially if you appointed this person in the agreement as the contact person or as the representative for the agreement execution.

OK

Water Dripping

streaker 2007-01-15 00:00 tutorial  > 3ds MAX  > particles

Water Dripping in 3ds max using Particle Flow

Hi, in this tutorial I'll show you how to create rain or water dripping effect in 3ds max using build in particle system Particle Flow.

This tutorial require basic skills of using 3ds max and Particle Flow. This isn't step by step tutorial, I just present you how my flow works.

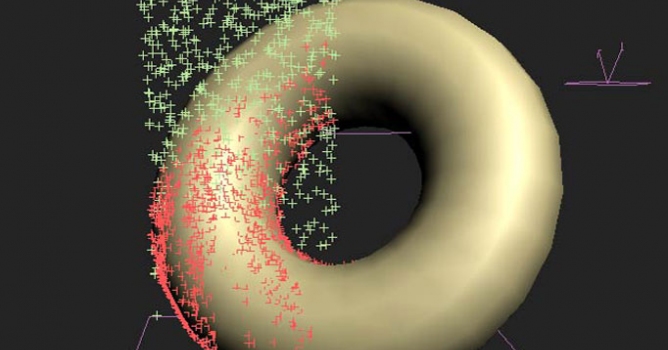
You can easily create this effect using Lock/Bond operator whitch is part of 'Particle Flow Tools Box' plugin from Orbaz Technologies. I very like that operator - it's easy to use, fast, have many options. You can download demo from THIS SITE. If you installed it, go to Particle View, drop on desktop Preset Flow and chose Water Dripping. In your scene show simple example of using Lock/Bond operator - particle hit torus, sliding on it and then falling down to the ground.


Only disadvantage is that Box#1 cost 195$ and let say that you want spend this money to something else - if you do - just read this tutorial, where I create very similar effect without any plugins.

For this purpose I adopt sample scene from PF Box#1. Below is quick overview of my scene.


And this is my finished flow:


Don't be scary, it just look complicated :)

So, let we start analyzing that:

'Just for convenience'
This event I created just for convenience :) I needed connect Collision04 to the flow beginning, but I cant do this to 'first event' after 'Render event' (I don't know why, PF just don't allow to do this). So I used simplest test (Age test) to send particles to another event. Althought this you can use Send Out test.


'Water Source'
Force01 - just for give particles speed (As you see, I don't use speed operator) Collision01 - Particles that hit Torus are sending to another event (Set Speed: Stop, it doesn't going to look unnatural, because in next event we add proper speed to particles) Collisions05 - That for particles that miss Torus (see 'Spawned event' below)

'On Surface -> Drop'
In this event I sticking particles to surface using Speed By Surface operator combined with Gravity force (Gravity force particles to moving pointed down).

Two important things in Speed By Surface is set speed to 'Control Speed Continuously' and Direction to 'Parallel To Surface'


Here is very important thing that I have to mention. Order of Force (Gravity) and Speed By Surface Operator. As you probably aware, PF analyzing flow from up to down. So if 'Force' is on top of 'Speed by Surface' all is ok - first PF add Gravity force pointed downward, then correct this to surface, but if we change order of this two operator, PF first give particle speed parallel to surface and then apply Gravity force - particle go through the surface of Torus.

Ok, we have particles sticked to surface, but how they know when to stop moving on surface and fall down to the ground. For this I used deflectors (Deflector_drop01 and 02 - see scene overview). When particle hit Deflector_drop01 it is stopped (set Speed: Stop in Collision operator like before - because we add speed to particles in next event) and sending to another event (see 'Spawned event' below), but if they hit Deflector_drop02 they are sending to flow beginning (because they still can hit Torus).

'Spawned event'
This is just finish of animation - when particles ended moving on Torus or missing it - they falling down (Falling on the ground) hitting Deflector-Ground and spawning (Spawned) and when spawned particles hitting Deflector-Ground again they are killed.

And one more important thing at the end:
If your particles are a little above surface or behave weird try do decrease Integration steep (you find this in Command Panel under System Management rollout). I my case 1/8 frame look good.


This is just simple example, but if you understand how it works, you can easily use this technique in more complicated scenes.

If after finishing this tutorial you still have some problems to achieve satisfactory results WRITE TO ME and I will send you my finished scene (3ds max9 only)


Author: streaker
Tags:
You may also like...
Best free and paid 3d animal models: which to choose for your project?

Best free and paid 3d animal models: which to choose for your project?

When embarking on a new 3D modeling project, selecting the right animal models is more than just a technical decision; it’s about bringing your vision to life while staying within your project's scope and budget.
×

LEAVE A COMMENT

You need to be logged in to leave a comment. Don't have account? Register now.

caohan1988 08:18:33  |  19-11-2013
nice job! i hope that it will be creat a video tutors for us !