Search
Cart
Sign in
  • offerCustomer zone
  • offerYour orders
  • offerEdit account

  • offerAdd project
  • offerLiked projects
  • offerView your artist profile

  • Dark mode

We care about your privacy

We use cookies to provide you with the best possible experience. They also allow us to analyze user behavior in order to constantly improve the website for you. The consent is voluntary. You can withdraw it at any time or renew it in Cookie settings on the home page. Withdrawal of your consent does not affect the lawfulness of processing performed before the withdrawal. Privacy Protection Policy
Accept all
Accept selection
Reject all

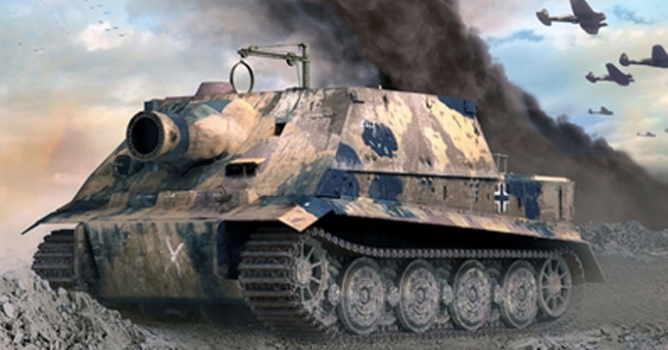
Making of Sturmtiger

Pionier 2005-09-15 00:00 tutorial  > Making of  > modeling

Welcome everyone! This is my first time with making-of, so I hope it will be helpful and understandable. And of course I beg you to forgive me all mistakes I will make :) I created this artwork for Alienware Evermotion Challenge. It wont be a step by step tutorial, I will be talking about whole creation process generally.


References

I always try to find as many information as possible about objects I want to make before I start modeling process (in this case it was Sturmtiger tank). Usually it takes me a lot of time, but this time isn't lost - it lets me to know objects better and shows me all the smallest details - you know, I hate moments in the middle of the project when I have no idea how some things should looks like. More than that, I love militarism, so it is a great pleasure form me:) When I have got all needed stuff (more than 85 MB this time:) I start to model.


Modeling

During modeling process I was using basic objects (typical max primitives) that I converted to editable poly to make needed deformations. Elements like wheels or gantry at the back of tank was made from splines. As you can see all objects are quite simple, so the key to the success were blueprints, that I used for every single elements of my object. They helped me to get correct shape of models and made my work much more faster.


When I work with tanks I always start modeling from wheels and tracks. To create wheels I draw shape using spline and then add loft modifier to it.


Tracks are my favourite stage during modeling process. First I make one simple segment, that is copied next and placed in correct shape of tracks using side blueprints. Basic segment is made from box object that was converted to editable poly and modified to get correct object.


Texturing

After modeling process I could started texturing. As probably all you know before adding textures to the object we have to map it. In that case I didn't have to use any complex technics - just simply planar (whole body) and cylidrical (barrel) mapping. The main aim in that case was to create ugly and dirty textures - this is characteristic for war vehicles. Using photos of old army cars and tanks I started to play in photoshop. Since examples are much more better than writing I show my textures on the front of the tank (right picture). To make my textures much more realistic I have to add dirt, bruises and some paintings (left picture).


This is how my final textures look and render with postwork.


Lighting and Rendering

Since I'm quite lame in 3d lighting I didn't use any special setups - simply and nice:) Below you can find render without any materials.


I used one Brazil Light and one Sklylight. All setup you can find below.


Lighting and Rendering

Since my computer is good only for teapots' renders:) I usually make render in layers and put them together on photoshop. In this work I also decide to make background and environment in 2d.


To make sky and ground exactly like I want I had to use many different photos and painted by hand images.


Of course at the end I had to play a little with levels, brightness, contrast and all this stuff what graphics do all the time.


Best Regards
Pionier
 
 
Author: Pionier
Tags:
You may also like...
3D Textures That Pop: Using PBR to Add Depth and Realism to Any Surface

3D Textures That Pop: Using PBR to Add Depth and Realism to Any Surface

Want your 3D textures to stand out? Discover how PBR adds depth and realism to any surface for impactful, photorealistic results in your projects!
×

LEAVE A COMMENT

You need to be logged in to leave a comment. Don't have account? Register now.

motogp 03:33:43  |  20-06-2009
That is an excellent tutorial. It helps alot in knowing how to model something ^^ Thanks alot =D and great result btw!
Strunger 03:17:28  |  09-11-2009
Is it possible to get realistic render like yours with Blender?