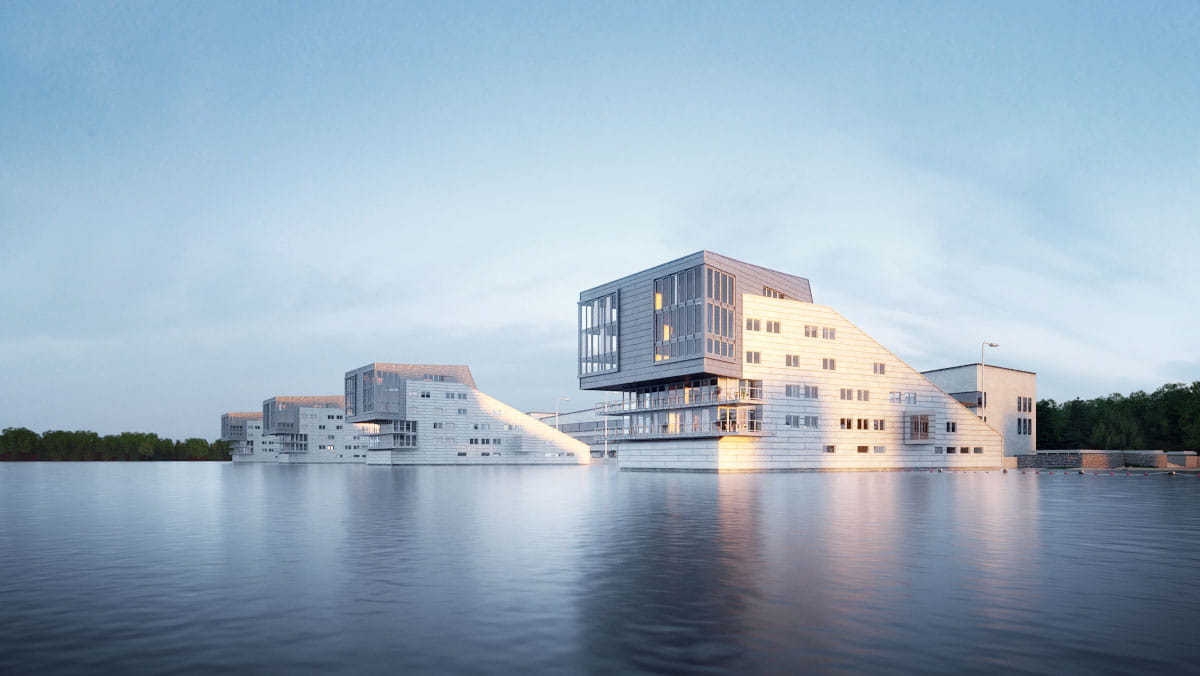
Top image: Archexteriors vol. 20 by Evermotion
Some time ago, we published Michal’s extensive guide on optimizing scenes for rendering through Geometry and Textures. This next part is a long-overdue continuation of the textures segment and touches on more techniques that can be employed to optimize textures when preparing a scene for rendering, whether locally or on a render farm. At GarageFarm.NET we always place an emphasis on running tests for scenes before rendering at full resolution or at the entire frame range. Doing so helps you not only anticipate render time more accurately but also enables you to apply optimization in whichever part of your scene would be most feasible. We hope this series helps in raising your awareness in the options available. Happy reading!
In the previous part of the optimizing textures guide, we talked about the theory behind digital images like bit depth, compression and color models. These factors have a decisive impact on the size of a texture on a hard drive and RAM.
We know that the texture's size in computer's RAM follows this formula:
Raw image size = Horizontal resolution x Vertical resolution (in pixels) x Number of channels x Color depth (Number of bits per channel)
In this part, we will show you practical optimization techniques and tricks which will allow you to apply the theory to your everyday CG workflow.
Optimizing textures - How to batch resize texture resolutions in Photoshop
Photoshop offers a handy tool called Image Processor. It accepts almost all of the file formats supported by Photoshop as the input. Unfortunately, it's restricted to just three image formats as the output right now: JPG, PSD, and TIFF. The tool also doesn’t have an option to rename file names while re-scaling. We will describe some workarounds and alternative methods for this problem as well.
- To use Image Processor choose File → Scripts → Image Processor.
There is no need to open images in Photoshop first before using this tool. You can do it, but with a significant number of images it can slow down your computer and Photoshop performance.
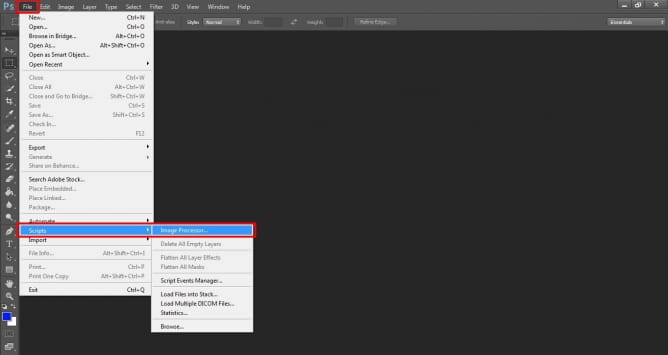
After choosing Image Processor, you will see this dialog:

Select images to process
- Use Open Images - Image Processor will process images that are already opened in Photoshop (not recommended).
- Select Folder - Image Processor will process images from a selected folder.
- Include All subfolders - When this option is turned on, the tool will process images from sub-folders of the chosen folder as well. When it's turned off, it will process only the images from the root of a selected folder.
- Open the first image to apply settings - This option allows the application to apply color profile options. It's not useful where re-scaling textures is concerned.
Select location to save processed images
- Save in the same location - The processed files will be saved in the same folder as source files. Photoshop will create a folder for them named as the type of the output file (i.e., JPG, PSD).
- Select folder - The processed files will be saved in the selected folder.
- Keep folder structure - Active when “Select folder” option is turned on. The processed files will be saved in the same folder structure as the source files.
File Type - these options let you choose the type and resolution of output files.
- Resize to fit - The images will be resized to fit dimensions set in pixels, keeping the proportions. For example, if you work on an image in 6000 x 5000 px and set the option to 2000 x 3000, the image will be resized to 2000 x 1667 to fit the lower setting and keep the image proportions at the same time).
- Save as JPEG - Quality - Sets the JPEG image quality between 0 and 12.
- Save as PSD - Maximize Compatibility - Saves a composite version of a layered image within the target file for compatibility with applications that can't read layered images.
- Save as TIFF - LZW Compression - Saves the TIFF file using the LZW compression scheme.
Preferences
- Run action - Lets you run action as a part of the resizing process.
Load (Save) - Lets you save and load Image Processor settings as an XML file.
Run - Runs Image Processor.
How to batch resize texture resolutions in Gimp
Gimp is a free alternative to Photoshop. It has a great plugin called “David’s Batch Processor” which allows batch resizing images. It is similar to Photoshop's Image Processor, but it supports all the popular file formats and allows you to resize and rename files in one batch.
For Windows, just download the zip file with the installer, unpack it and place “dbp.exe” file in GIMP’s plugins path (for example Computer\C:\Program Files\GIMP 2\lib\gimp\2.0\plug-ins)
To batch re-scale multiple images:
- Run GIMP
- Run the plugin through Filters → Batch Process
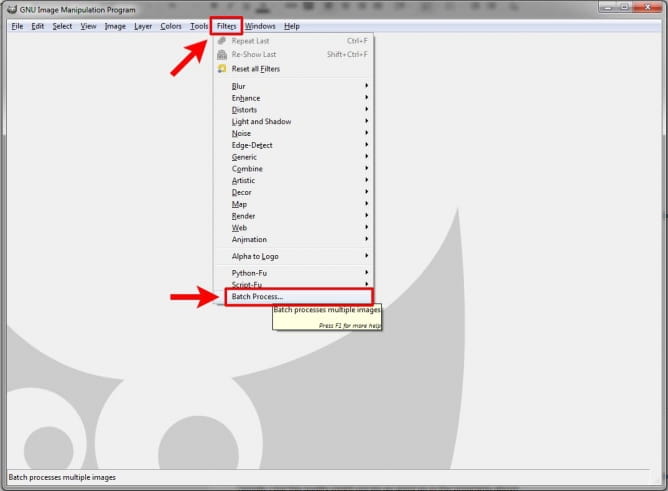
- You will see a popup window with these options:
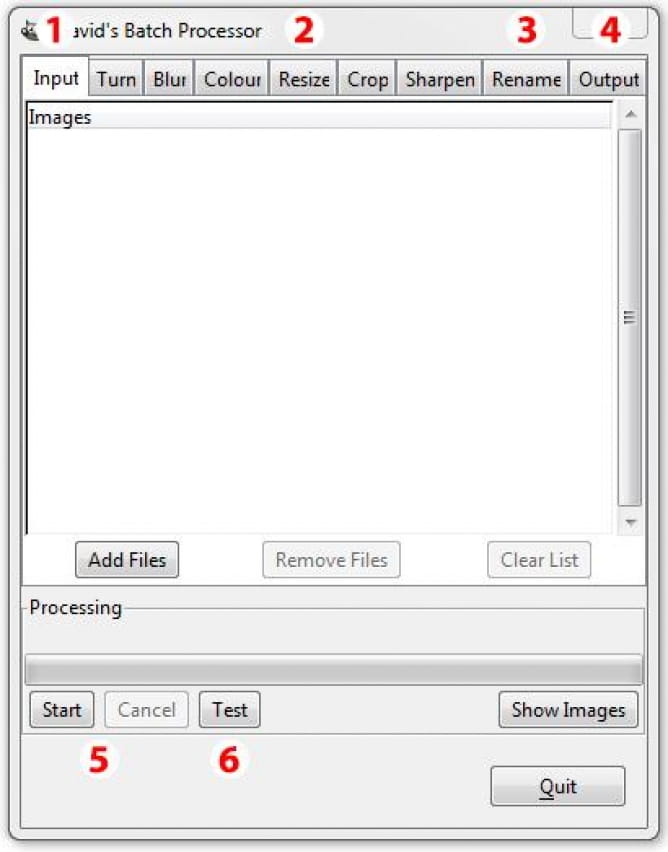
Input - The input page is used to choose images to process.
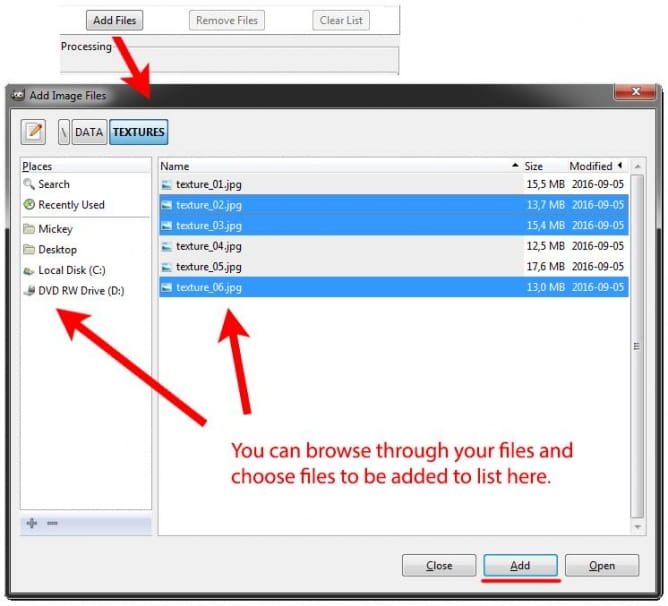
- Add Files option will open a window where you can browse and add files to the list of processed images. You can use Ctrl and Shift keys in conjunction with mouse clicks to select multiple images to be added to the list.
- Remove files - Allows you to remove files from the list.
- Clear list - Clears all the files from the list.
Resize - Allows you to batch resize images.
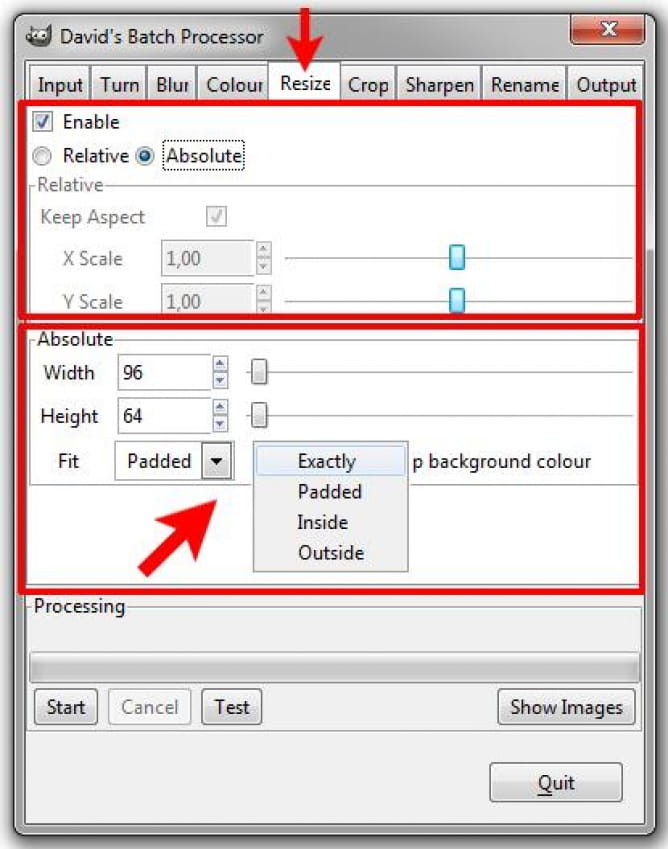
- Relative - Allows setting output size of the image as a multiplication of the original resolution in X and Y dimensions. 1,00 is 100% and keeps original resolution; 0,50 is 50% etc.
- Keep Aspect - It will preserve the Aspect Ratio of the resized image.
- Absolute - Allows setting the output size of the image or constraints for its dimensions in absolute values (pixels) set by Width/Height option.
- Fit - You can choose the way the output image’s dimensions will be set:
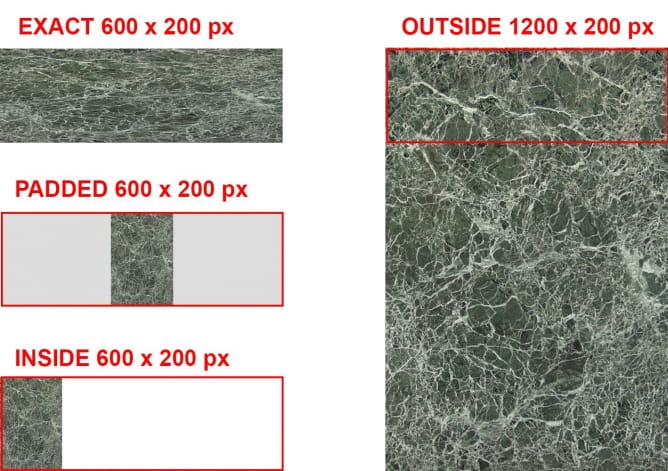
- Exactly - Source image will be resized precisely to the set dimensions and its aspect ratio will be changed if necessary.
- Pad - It will fit the processed image into the target size and add Gimp current background color to fill the margins.
- Inside - The source image will be resized to the largest image which fits the Inside values.
- Outside - The source image will be resized to the smallest image which fits the Outside values.
Differences between Exact, Padded, Inside and Outside resizing
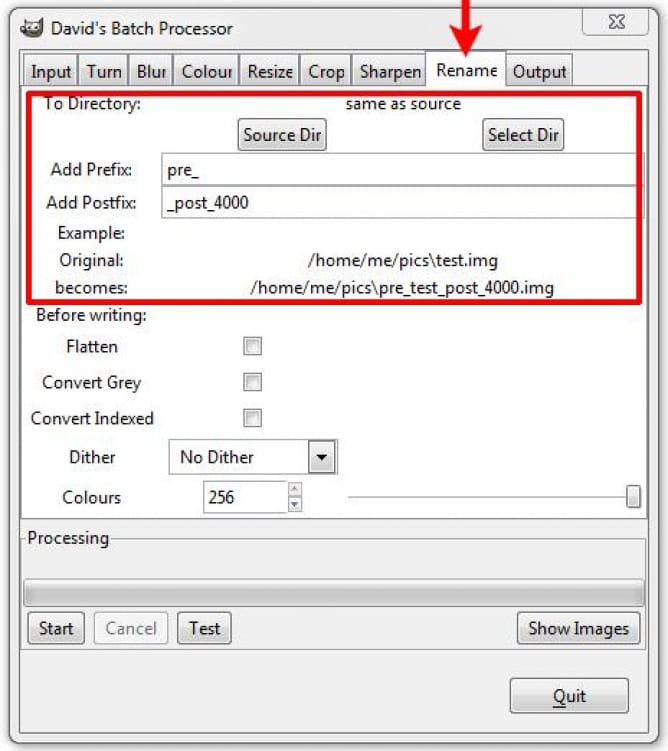
Rename - These options let you batch rename processed images
The processor will not overwrite an existing file. The output file must be renamed, have its extension changed, or be put into a different directory.
- Source Dir - Processed images will save in the same folder as original files. When you choose this option, you can see "same as source" text next to "To Directory:."
- Select Dir - This option lets you select the output folder for the processed images. When you choose it, you will see the path to the output folder next to "To Directory:."
- Add Prefix - Lets you add a prefix to the name of the processed file
- Add Postfix - Lets you add a prefix to the name of the processed file
- Original - Example of the output file name after Prefix and Postfix options are applied
- Flatten, Convert grey, Convert Indexed - Additional options, not related to renaming and batch resizing images.
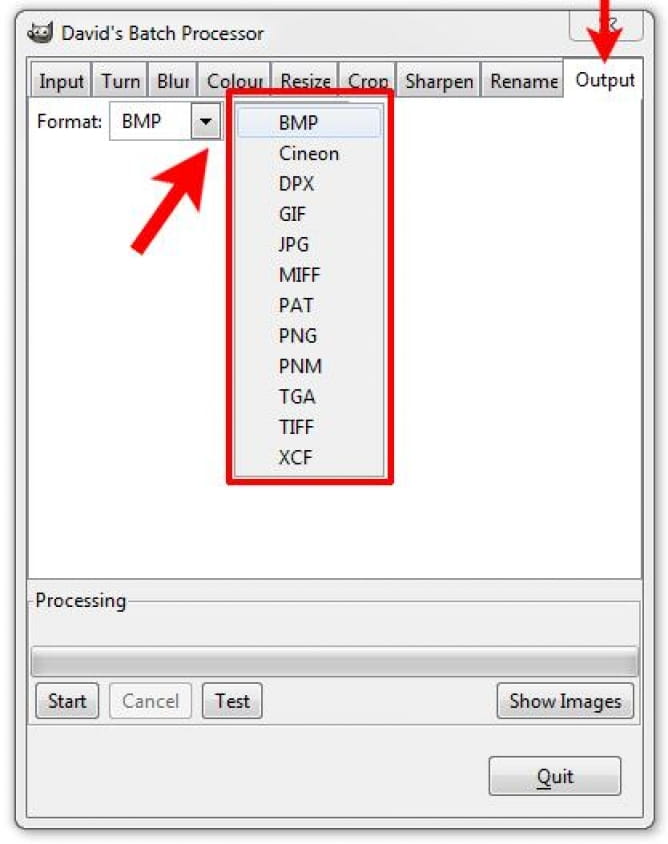
Output - This option lets you choose an output format, and it's settings for processed images. It supports all the popular formats used for textures.
Start, Cancel - starts and cancels batch processing
Test (Show Images) - Runs a preview of processing the first image from the list. You can see the effect of all the adjustments applied from the left to the right of the options window.
Turn, Blur, Colour, Crop, Sharpen - Other options you can apply during the batch process. We won't describe them in detail here because they are usually not necessary when resizing textures. If you would like to learn more about options we didn't mention, you can check them on this website: http://members.ozemail.com.au/~hodsond/dbp.html
You can also resize your textures using free online batch image re-scalers, (just type ‘batch image re-scaling' in Google) but the quality might not be as good as in the programs above.
Optimizing opacity maps
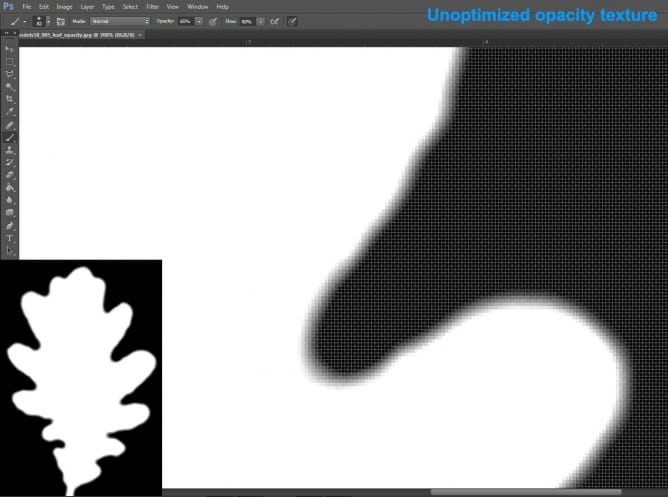
In 3ds Max, you can cut out a shape in your model, using opacity maps (texture). The way they work is simple - the black part of the texture will be transparent, the white part will be opaque, and the shades of grey will be semi-transparent. Opacity maps are handy, for example, if you want to create leaves on a tree. You can create a plane and apply such a map to it, and the shape of the leaf will be cut out from the model during the rendering.
The flaw of this method is that models with opacity maps applied on them tend to render very long. Below, we will give you some methods of optimizing opacity maps to get shorter render times.
First Method - white and black pixels - When the rendering engine calculates opacity, it takes shades of grey as semitransparent and adjusts the level of the transparency to the lightness of the given pixel of the texture. It is much faster for a render engine to calculate pixels which are just white or black than the grey ones. You can create such a map using the following steps:
- Open your opacity map in Photoshop or other image editor and save as a 2-bit png image.
- Set number of colors to 2, and Dither to 0%
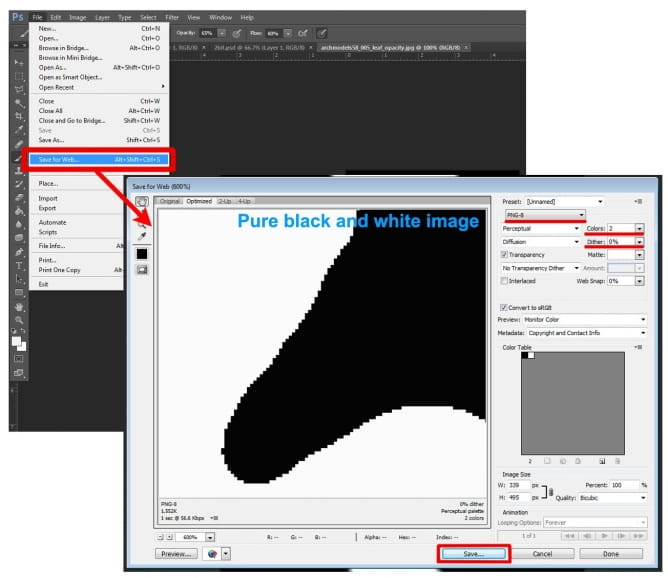
This way you automatically create much smaller white and black textures.
You can also manually turn up image contrast to the maximum value, using the levels or contrast option in the image editor, but saving it in 2-colors png will give you 100% certainty that there are only two colors: pure black and pure white (RGB 0 and 255).
Second Method - blur and filtering - 3ds Max blurs and filters textures by default to ensure that no pixels will be visible on rendered materials. If you use black and white opacity map, the edges will be blurred by that process and lengthen the rendering time.
To avoid that, you can turn off blurring and filtering of the map in texture editor.
- Set blur to 0.01 (minimum value)
- Set Filtering to “None”
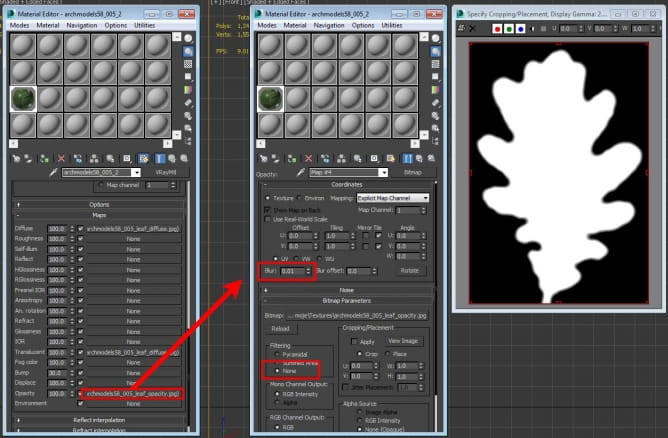
The test below illustrates the effect of rendering a couple of trees before and after optimization of opacity maps.
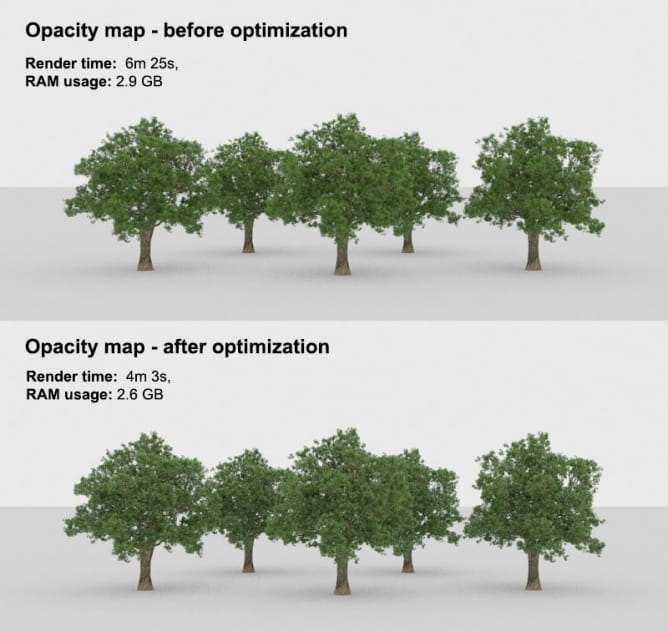
This method will create opacity maps which will have pixelated edges. In most cases, this is not a problem, because during the rendering process most of the render engines apply an anti-aliasing filter which smoothens all the jagged edges.
In close up shots, however, the pixels of opacity maps may be visible. In those cases, use higher resolution map and turn up the level of blurring in texture settings which will give you the desired effect.
NOTE: Some render engines have their dedicated map slots which are used to create transparency. For example, in V-Ray, it's called "Refract."
Those shaders’ settings (texture slots) are designed to work with the given render engine and will give you much shorter render times. You can use the opacity maps optimized with the method above to get the best results - just apply an optimized texture in the right map slot for the given render engine, and turn off all the filtering options in texture settings.
Displacement effects offered by different render engines can create excellent results but usually need a lot of RAM and make the rendering process longer.
NOTE: The displacement which is not visible in the scene will also be calculated to be visible in reflections. Try to reduce the surface of the displacement only to the part which will be visible in the shot. Also, if the object is far away from the camera, or it has very fine details, you can use bump instead of displacement.
Procedural Maps
Procedural textures are created by a mathematical algorithm, unlike bitmaps which are ready digital images with a fixed resolution. Their advantage in optimizing rendering of the scene is that they don’t need much RAM, no space on the hard drive, and render pretty fast. Similar to the vector maps they are scalable without pixels visible in close-ups. Most of them can also be animated. Read more about 3ds Max procedural maps.
Vector Maps
Since version 2014, 3ds Max has supported maps saved as vector graphics. You can use them by loading a vector image to the VectorMap in a similar way to a Bitmap. The Vector map supports a variety of industry-standard vector-graphic formats, like AI (Adobe Illustrator), PDF, PAT, SVG, and SVGZ.
The most significant advantage of this texture format is that no matter how far away or close to the texture the camera is, they are always sharp. Thanks to that you don't need to use high-resolution raster maps which require significant amounts of RAM and space on your drive. Vector maps work the best for posterized and simple images like logos, artworks or cartoon textures. In case of cartoons, they give a possibility of animating a texture, and you don't need to worry that you will see pixels on color edges in any shot.
You can create vector textures based on raster images in programs like Photoshop or Inkscape. There are many free online converters online too, but not all of them work correctly. The software which is very simple and can help you create vector maps is Vector Magic. It has both web and desktop versions.
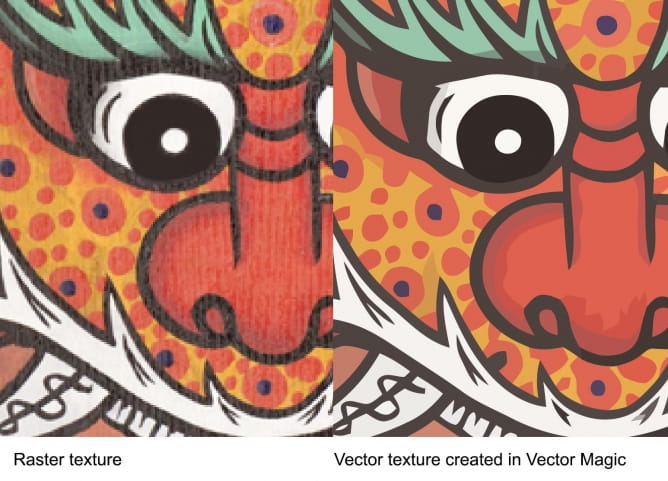
NOTE: Some third party render engines can have issues with rendering that kind of maps.
If you would like to read more about vector maps in 3ds Max, here is a link to a more detailed source:
https://knowledge.autodesk.com/support/3ds-max/learn-explore/caas/CloudHelp/cloudhelp/2016/ENU/3DSMax/files/GUID-6C868265-792B-4553-B633-575D1895C611-htm.html
Bitmap pager
3ds Max Bitmap Pager is a tool not used much anymore, but since we are talking about textures, it is worth mentioning. It is a tool which was very useful on 32bit systems, which restricted RAM usage to around 3 GB. Today's 64 bit systems don't have this barrier, so lack of RAM for rendering big images and heavy textures happens less often.
Bitmap pager allows the system to divide big textures, a big number of textures or big resolution rendered image which won't fit into memory into smaller pieces, (pages) and to save them temporarily on a hard drive. Because Pager operates by swapping memory to disk, it can lengthen the rendering process a lot. That’s why the Bitmap Pager UI has been completely removed from the Customize→Preferences tab. It is also turned off by default.
If you want to check if this option is turned off, or you want to turn it on, you can do this in:
Rendering → Render Setup → Common → Bitmap Performance and Memory Options
You can turn Bitmap Paging on in the Setup options.
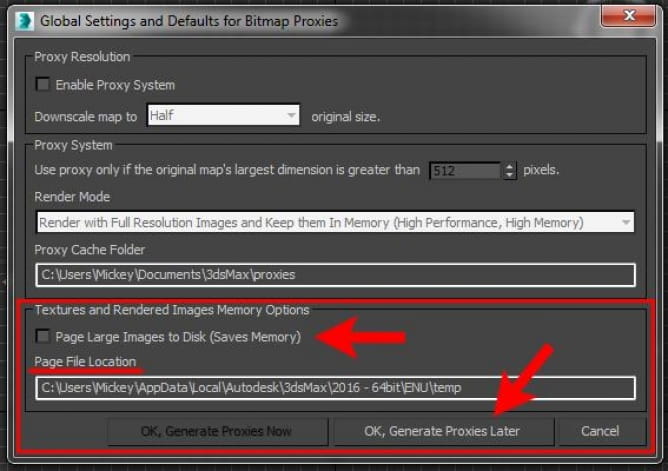
- Page Large Images to Disk (Saves Memory) use this switch to turn on Bitmap Pager
- Page File Location - it shows the path to a folder where temporary paging files will be stored. It is good to set up on a drive with fast read and save speed. You can only check the existing path here.
- OK, Generate Proxies Later - saves the settings and closes Settings window
- If you would like to change the path, you can do it in the Configure system Paths window. It is located in Customize → Configure System Paths → system → Page File
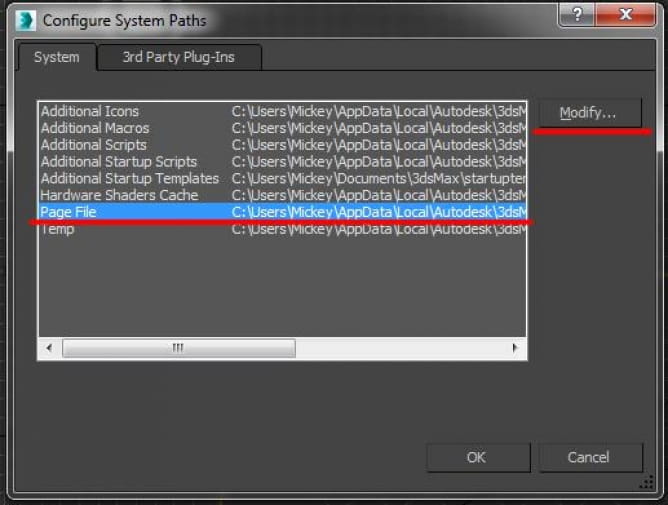
You can also check if the option is turned on and turn it off in Asset Tracking tool (shift + t) → Bitmap Performance and Memory → Enable Bitmap Paging. The option can be ticked on or off there.
NOTE: Please note that Bitmap Pager can let you render scenes which otherwise would be impossible to render without optimization, but it can slow down the rendering process. Your scene can render even two times longer.
NOTE: In case of using external render farms which usually use network drives this option can create errors in rendering and extend render times.
Read more about bitmap pager.
Summary - optimizing textures can reduce the amount of RAM which your scene needs to render, and in some cases also reduce the render time.
Using compressed file formats will reduce the disk space needed by your project and amount of time required to upload it to nodes and open in a 3d application in network rendering. However, the compression itself doesn't change the amount of RAM needed to render the scene.
It is good to reduce the resolution, the number of channels and bit depth of textures only to be enough to get the quality of a rendered image which you need. You can use automated tools in image editing software to prepare your textures that way.
In case of transparency/opacity effects, it is better to use the shader options provided by the render engine than to use Opacity slot in materials settings and to use the texture with as low bit depth as possible and turn off filtering.
Procedural maps are very fast and don't take HDD space, so it is good to use them when it is possible. They are also very easily adjustable. When it comes to vector maps, in case of cartoon style and simple graphic signs they can save you from using big resolution raster textures.
All tests were run on 3ds Max 2016 and Vray 3.40.03.
Useful links:
Credits:
This guide has been created by Michał Moś and edited with the help of the team at GarageFarm.NET. We derived most of the knowledge used in this guide from own experience as well as from the Autodesk Knowledge Network. Textures used in the tests are from www.textures.com
https://michalmos.carbonmade.com
https://garagefarm.net/
 How To Make Your CGI Walls More RealisticRealistic walls with noise modifier.
 Removing LUTs from Textures for better resultsRemove the LUT from a specific texture in order to get perfect looking textures in your render.
 Chaos Corona 12 ReleasedWhat new features landed in Corona 12?
 OCIO Color Management in 3ds Max 2024Color management is crucial for full control over your renders.
 A look at 3dsMax Video SequencerDo you know that you can edit your videos directly in 3ds Max? Renderram is showing some functionalities of 3ds Max's built in sequencer.
 FStorm Denoiser is here - First ImpressionsFirst look at new denoising tool in FStorm that will clean-up your renders.
Customer zone
Your special offers
Your orders
Edit account
Add project
Liked projects
View your artist profile




COMMENTS