How To Make Your CGI Walls More Realistic
Realistic walls with noise modifier.
Total: € 0
Continue Shopping


You are reading this tutoral thans to our cooperation with GarageFarm.NET. a render farm that can save your time spent on rendering with the power of 100.000 CUDA cores and 6000 CPU cores. It supports major apps used by the industry - 3dsMax, Maya, Modo, LightWave & more, with broad range of plugins available and custom installations upon request.
1. Introduction
In the previous part of the guide, we talked about optimizing geometry. In this section, we will focus on textures.
Textures are one of the assets which, like geometry, may need a lot of a computer's RAM, and to a lesser degree, their size and resolution can have an influence on rendering time.
The overall space textures can take on a hard drive can be bigger than the scene's filesize. Because of that, when rendering on render farms, large texture files can slow down the speed of uploading your project on nodes and opening your scene in a 3d application which can result in higher rendering time and consequently, cost.
We split this guide into two parts.
In this first one, we will talk about the theory behind digital images. This knowledge is substantial for every CG artist. It is a roadmap which helps you choose different image formats, bit depths, and color models. With this knowledge, you get more creative freedom and tools for troubleshooting all kind of technical issues which are bread and butter for every professional 3D artist.
3ds Max supports texturing using several types of textures:
2. Raster textures
Nowadays the most commonly used textures in 3d graphics are raster textures, created based on photographs or painted in programs like Photoshop or Gimp. They are saved on a hard drive as files in various formats like JPG, PNG, TIFF and many others. What does the raster texture “weight” depend on?
We can describe the size of the raster texture with the below formula:
The examples below show a calculation of the raw size for texture with a resolution of 2000x2000px in RGBA (4 channels) mode with 8 bits/channel.
It can be a PNG file with an Alpha channel for instance.
And below, 800x800px in RGB with 8 bits/channel:
Now let’s take a closer look at the elements of raster textures which influence their size.
2.1 Channels and color models.
Let's talk about the difference between channels and color models and how those concepts are connected.
A color model is a way in which digital data represents a color of a pixel.
For example: the RGB color model describes all possible colors by a combination of shades of three primary colors: Red (R), Green (G) and B (Blue). Every one of those colors is saved in a different greyscale channel on the image.
The RGB color model is natural for displaying digital images on screens like computer monitors, or TV screens since the colors visible on those devices are composed of three basic colors – red, green and blue.

A closeup of a monitor screen - Red, Green and Blue phosphor dots
A different example of a color model is CMYK. It stands for Cyan (C), Magenta (M), Yellow (Y) and Key or blacK (K).
This color model depicts every possible color as a subtractive mixture of the above colors each saved in a separate channel. The CMYK color model is natural for representing colors obtained in the printing process since most printing processes create all colors by mixing cyan, magenta, yellow and black inks.

A closeup of a color print - Cyan, Magenta, Yellow and Black paint dots
There are many more color models, which serve different purposes, like Lab (Lightness, a-component, b-component), HSV (Hue, Saturation, Value), HSL (Hue, Saturation, Lightness), greyscale, and others.
NOTE: Additionally, some image formats like PNG, TIFF or PSD (Photoshop format), have the possibility of containing a fourth channel, called Alpha, which is a map of the transparency of the image. This mode is called RGBA.
NOTE: There is another mode of managing colors of digital images, called “Indexed Color” and it is used by GIF, PNG-8, and several other image formats. This color mode usually contains 256 colors picked from a 24-bit RGB palette of 16.7 million colors. Thanks to limiting the image colors to 256, every pixel needs only 8 bits, plus 768 additional bytes (256×3) to store the palette map itself.
You can read more about various color models here:
3ds Max supports textures in RGB (8, 16, 32 bit per channel), greyscale (8 and 16 bit), Bitmap (Monochrome 1 bit – only black and white color – in PNG and TIFF format) and Indexed color (8 bit). This support varies depending on a given image format (like PNG or JPG).
NOTE: You can load a CMYK JPEG file into 3ds Max, but the colors will be shifted. Also, CMYK mode images are bigger because, in addition to C, M, Y colors, they save K (black) value in an additional channel.
TIP: If you are using greyscale maps for Bump, Displacement, Reflection, Refraction you can save them in greyscale mode. 8bit greyscale images will use only one channel to save it as 256 shades of grey and will take only 33% of RAM and HDD space of the same image saved in RGB.
2.2 Bit depth
Bit depth describes how many bits are used to code color of a pixel.
For example, a 1-bit image can be only two-color (like black and white) since 1 bit can be used to describe two states - the pixel being black or white.
A 2-bit image gives 4 combinations of states so that you can encode 4 colors in an image with such big depth.
An 8-bit image gives 256 possible combinations.
An 8 bit per channel RGB image will use 3 channels (Red, Green, and Blue), each coded with 8 bits per pixel. It gives 256x256x256= 16,777,216 of combinations of those three primary colors. It is more colors than the human eye can distinguish and it is called "True Color."
8 bit per channel image vs. 24-bit image
An image’s bit depth is commonly used to describe two different meanings, which can sometimes be confusing.
You can call an RGB image 8-bit, when every channel of it is coded in 8 bits, or call it 24-bit because one pixel of the image needs 24 bits to code all three channels.
An 8 bits per channel RGBA image (like PNG with Alpha channel) can be called a 32-bit image (4 x 8 bit).
16 bits per channel RGB image can be called a 48-bit image (3 x 16-bit channel).
Because of the range of possible colors, an 8 bit, 3-channel image (24-bit image) is today’s standard color space for digital images displayed on screens like a computer monitor.
Most of the textures, pictures found on the internet, and also JPG pictures which come from simple digital cameras are saved in this bit depth.
16-bit and 32-bit textures
16-bit textures contain much more information than 8-bit textures.
While 8-bit texture encodes 28 = 256 shades of grey per channel, which gives almost 17 million colors, a 16-bit texture encodes 665536 shades of grey per channel, which offers 281 trillions of possible colors.
32-bit images can contain ~4 billion shades per channel which give an “infinite number” of colors.
If an 8 bit/channel image can contain more colors than human eye might distinguish, you may ask: What is the point of using a 16 bit/channel image?
16 bit/channel images are very often used as a render output format or as a working format for editing photographs, videos, and computer graphics. That is because during editing an image in post-production (applying filters, changing the contrast) some of the image's information is lost. 16-bit images have enough of information to preserve details and gradients without visible loss of data and effects like banding. After the editing process is finished the final images are saved in 8-bit depth which is enough to display them on a computer screen.
You can read more about banding effect here: https://en.wikipedia.org/wiki/Colour_banding
NOTE: You can find professional 10 bits/channel screens on the market. They are used for video post-production work like color grading and hence, need to be able to display more colors than a typical 8 bit/channel monitor.
Nowadays, in most cases, 8-bit texture depth is enough to avoid banding in 3d rendering. You would need to work with textures with very fine detail and render them to very high resolutions to see the benefit of using 16-bit textures. Also in every scene, on top of the texture itself, render engines apply direct lighting, global illumination and final antialiasing which hide the texture's imperfections. So unless you are sure you need bigger bit depth, always use 8-bit textures.
TIP: You may want to use 16- bit or even 32-bit textures for displacement maps or maps used for controlling effects or blending. That can help to avoid visible steps in the surface of displaced model or banding effect in gradients. However, just changing the image from 8bit to 16 bit will not create any additional steps in gradients (unless you'd prepare such texture with tools like blurring, or create them in software like Zbrush).
NOTE: Some products on the 3d graphics market like Chaos Group’s VRayscans, Allegorithmic Substance or Quixel Megascans can support 16-bit textures. The reason for that is similar to editing professional photographs as 16-bit RAWs - it gives more flexibility and saves an image from being damaged in the editing process. Very often displacement maps are prepared as 16-bit images.
Integer vs. Floating Point Images
In the case of 16 bit/channel and 32 bit/channel, another variation comes into play.
Some images are encoded using Integer numbers and some use Floating Point encoding.
For example, a 16 bit/channel Integer texture (like TIFF) will encode 281 trillion of colors from pure black to pure white, with 281 trillion of shades between them.
On the other hand, 16 bit/channel Floating Point textures (like half-float EXR) or 32 bit/channel Floating Point textures can encode much bigger values, and even negative ones.
For that reason, 16 bit/channel and 32 bit/channel textures are very useful for creating environment lighting. They can cover the whole illuminance range between dark shadow and a very bright light source, like the Sun ("super white"), instead of just depicting shade values between white and black.
NOTE: CG artists often use 16 and 32 bit/channel images in 3d rendering as output bit depth, because of the large quantity of information they can contain (like significant differences in luminosity of pixels of the rendered image and even additional information like render passes).
2.3 Resolution
The resolution of a texture is one of the most critical factors of the amount of RAM the scene needs to render. To a lesser degree, it also affects the rendering time. Sometimes using lower resolution textures can even cause the scene to render longer.
The following formula is used to calculate the raw size of an image:
Horizontal resolution x vertical resolution x number of bits per channel x number of channels = image size (in bits)
For example, a 2048 x 2048 resolution RGBA image has a raw size of 16,384 KB:
Horizontal resolution (2048) x vertical resolution (2048) x number of bits per channel (8) x number of channels (4) = image size (134,217,728 bits)
134,217,728 / 8 (1 byte = 8 bits) = 16,777,216 bytes ~ 16 MB.
Saving this image in a compressed format (for example, as a JPEG file), will reduce the file size, but 16,384 KB of memory will still be required to read the file in 3ds Max.
The tests below will show you the difference in the need for resources of textures in various resolutions.

We rendered this image in 2800x2100px resolution, with default settings for V-Ray 3.60.03.
The test was run with all textures set to 8000x8000px, 4000x4000px and 1000x1000px resolution. Texture format is JPEG.

We ran the below test with those options turned off:

When all options that can smooth the low-resolution texture are turned off, the rendering time drops with the texture resolution.
Using lower resolution textures will help you optimize the need of RAM, but the change in render time depends on the distance of the texture from the camera, and blurring/anti-aliasing settings of your scene. In this case, sometimes you may need to trade off some extra rendering time for smaller RAM usage.
2.4 COMPRESSION
There are two ways of compressing images regarding reducing the volume of data while saving the information
Lossless compression - In the case of lossless compression, the compressing algorithm will compress the image data but will save all the information (details) of the image.
It allows you to save images multiple times, or convert them back and forth between uncompressed and compressed formats without losing the quality of the image
Examples: DEFLATE (.PNG), LZW (.GIF, .TIFF), RLE, ZIP (.TIFF)
Lossy compression – Lossy compression algorithms use approximation and partial data discarding to reduce the volume of files significantly.
The lossy compression can reduce the size of your textures a lot, but you need to take into consideration the loss of quality and details. Also, every time you resave the image compressed this way, the loss of quality increases.
Examples: JPEG
NOTE: In 3ds Max textures are loaded into memory as uncompressed images, so using compressed file formats will not reduce the memory demands that an image places on a scene.
However, it will reduce the project size on an HDD which has an impact on loading time on nodes in distributed rendering and opening it in a 3d application. As a result, the costs of rendering on commercial render farms are lower.
2.5 METADATA
The images which you use as textures can very often contain additional information like the author’s name, camera model and many others. It’s called metadata.
The most popular metadata formats today are IPTC-IIM, IPTC Core and Extension, PLUS, XMP, Exif and Dublin Core.
The Metadata of a texture file is discarded during rendering, so it doesn't add to the amount of memory needed to render a scene.
Because it’s mostly plain text, it adds very little to a texture’s size on a hard drive too. With today’s metadata standards, it usually takes several or tens of Kilobytes, which is only a small fraction of the size of a texture on a hard drive.
However, if you want to remove metadata from your texture files, you can do it in Photoshop or GIMP.
Photomechanic and many online free metadata removing applications also give the possibility of batch removing metadata from images.
3. Optimizing textures
In case of optimizing textures, the idea is very similar to optimizing geometry. You should use the smallest textures which have enough quality to achieve the result you want.
3.1 How to check how much of computer resources your textures need?
Some Render engines have a global switch allowing you to turn off using maps during rendering. That is an excellent way to check the influence of your maps on rendering speed, but it won’t clear maps from memory.
The only way is to remove maps from their paths in materials temporarily.
LOCAL PATHS - For 3ds Max all maps used in a scene which are placed in the same folder as the scene (or a subfolder) are visible and will load into memory. If you are working this way just temporarily move your textures one folder up and your scene won't find them. You will instantly see a drop in memory usage of 3ds max process in Task Manager (Win) or Activity Monitor (Mac).
ABSOLUTE PATHS - If you are working with maps scattered around your drives, then you can temporarily strip them in Asset tracker (SHIFT + T). Just mark the texture with SHIFT key in Asset Tracker windows > click on the Paths option in the Asset Tracker’s options bar > Click on “Strips path” option.

Adapt texture resolution and filtering to the final resolution of the image and visibility of the texture in your scene.
Usually, a texture takes up only a part of the whole rendered image. Below you can see an example of how a big part of the resolution of the image is taken up by textures depending on their distance to the camera.
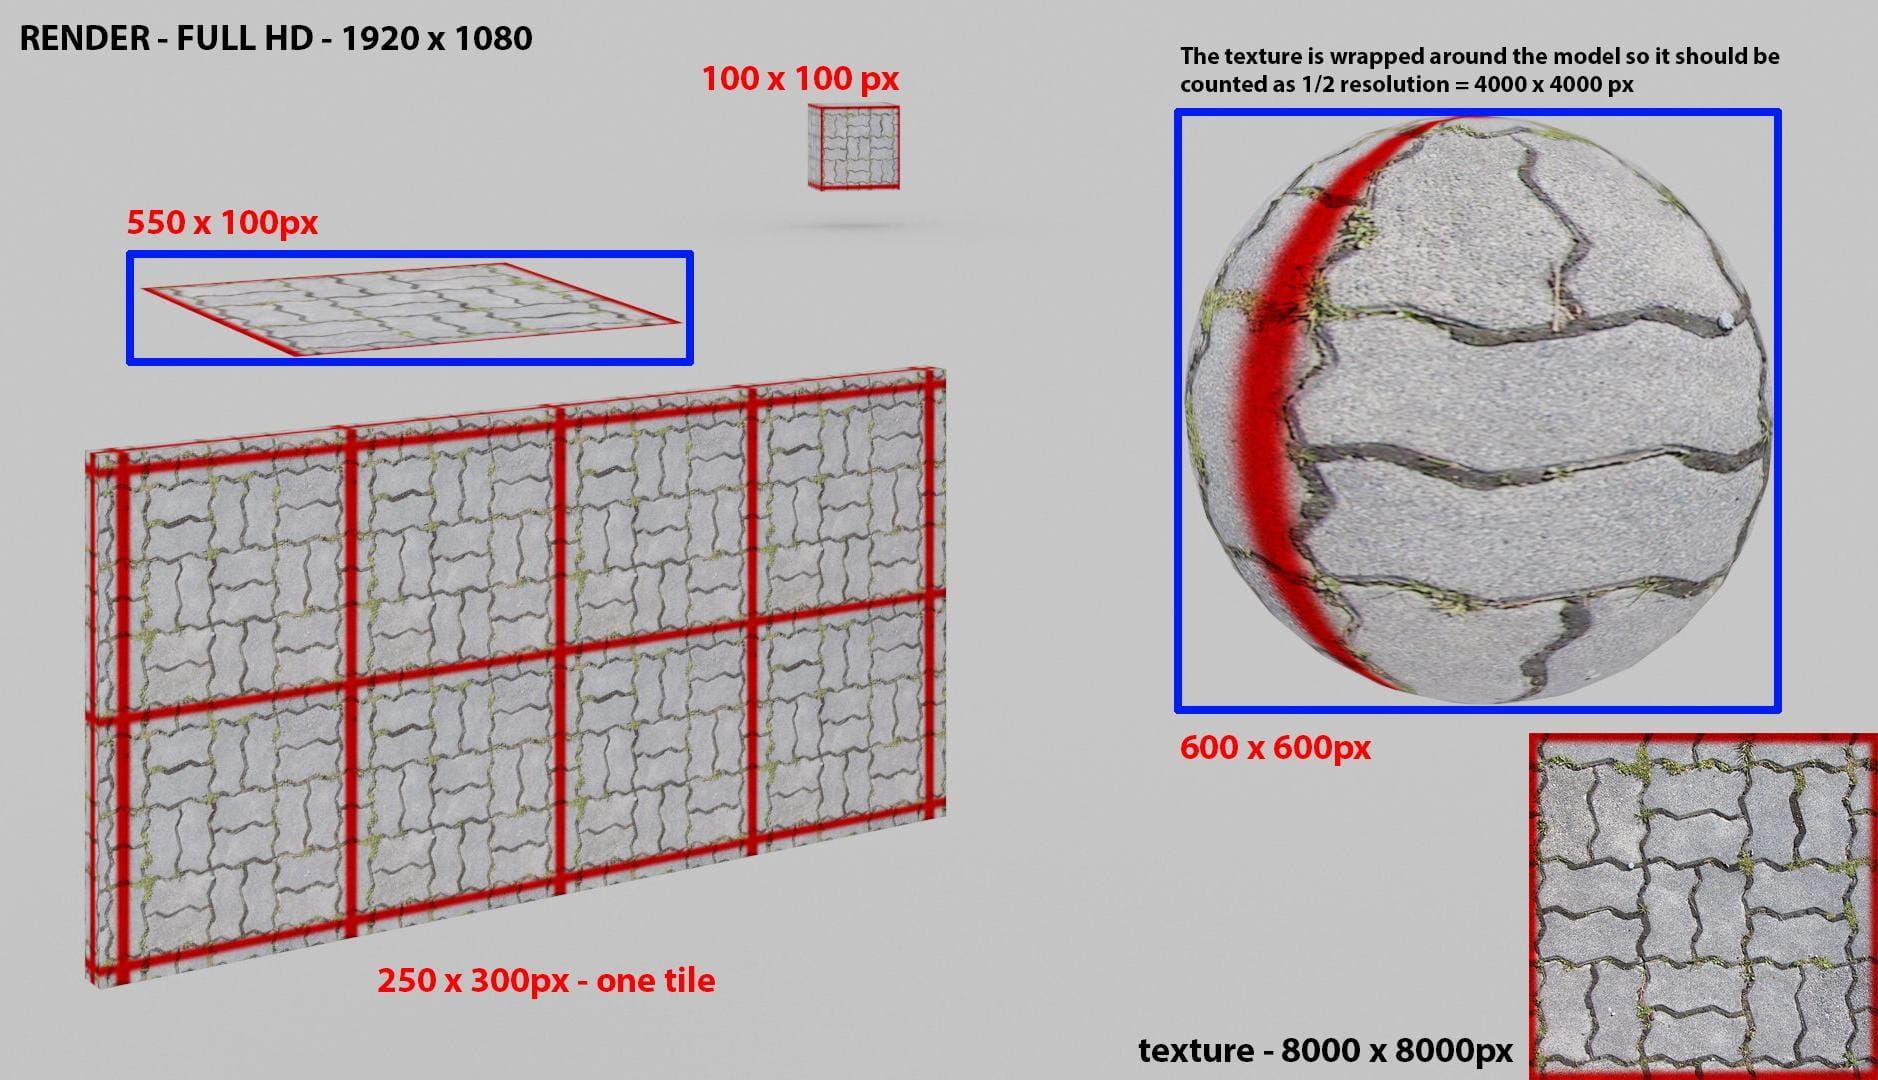
The test image resolution is 1920 x 1080 ( Full HD ).
It is enough to keep the resolution of a texture in a way that 2-3 pixels of the texture are represented as 1 pixel of the rendered image. You can keep it even lower, but the pixels might become visible on a given render. To some degree, it is possible to avoid this effect by setting filters and antialiasing in the render engine’s options.
If a surface with a texture applied is going to be 300x300px big on the rendered image, you can limit your texture resolution to around 600x600px; there is no need to to use 5000x5000px texture in this case.
In case your texture is going to be wrapped around a round object like the ball above, it should be kept around 3 - 5 times bigger than the resolution of the final image.
3.2 Use render Passes to assess the quality of textures in rendering.
It is often difficult to assess the quality of a texture on the rendered image because it is combined with other render elements like direct lighting or GI which can be noisy, or the part of the image is in the shade.
In this case, it is good to additionally render a Diffuse Texture pass to check the quality of rendered textures.
Most render engines offer rendering of such passes; they can also be called render elements or AOVs. In V-Ray, it’s called the VrayDiffuseFilter pass.
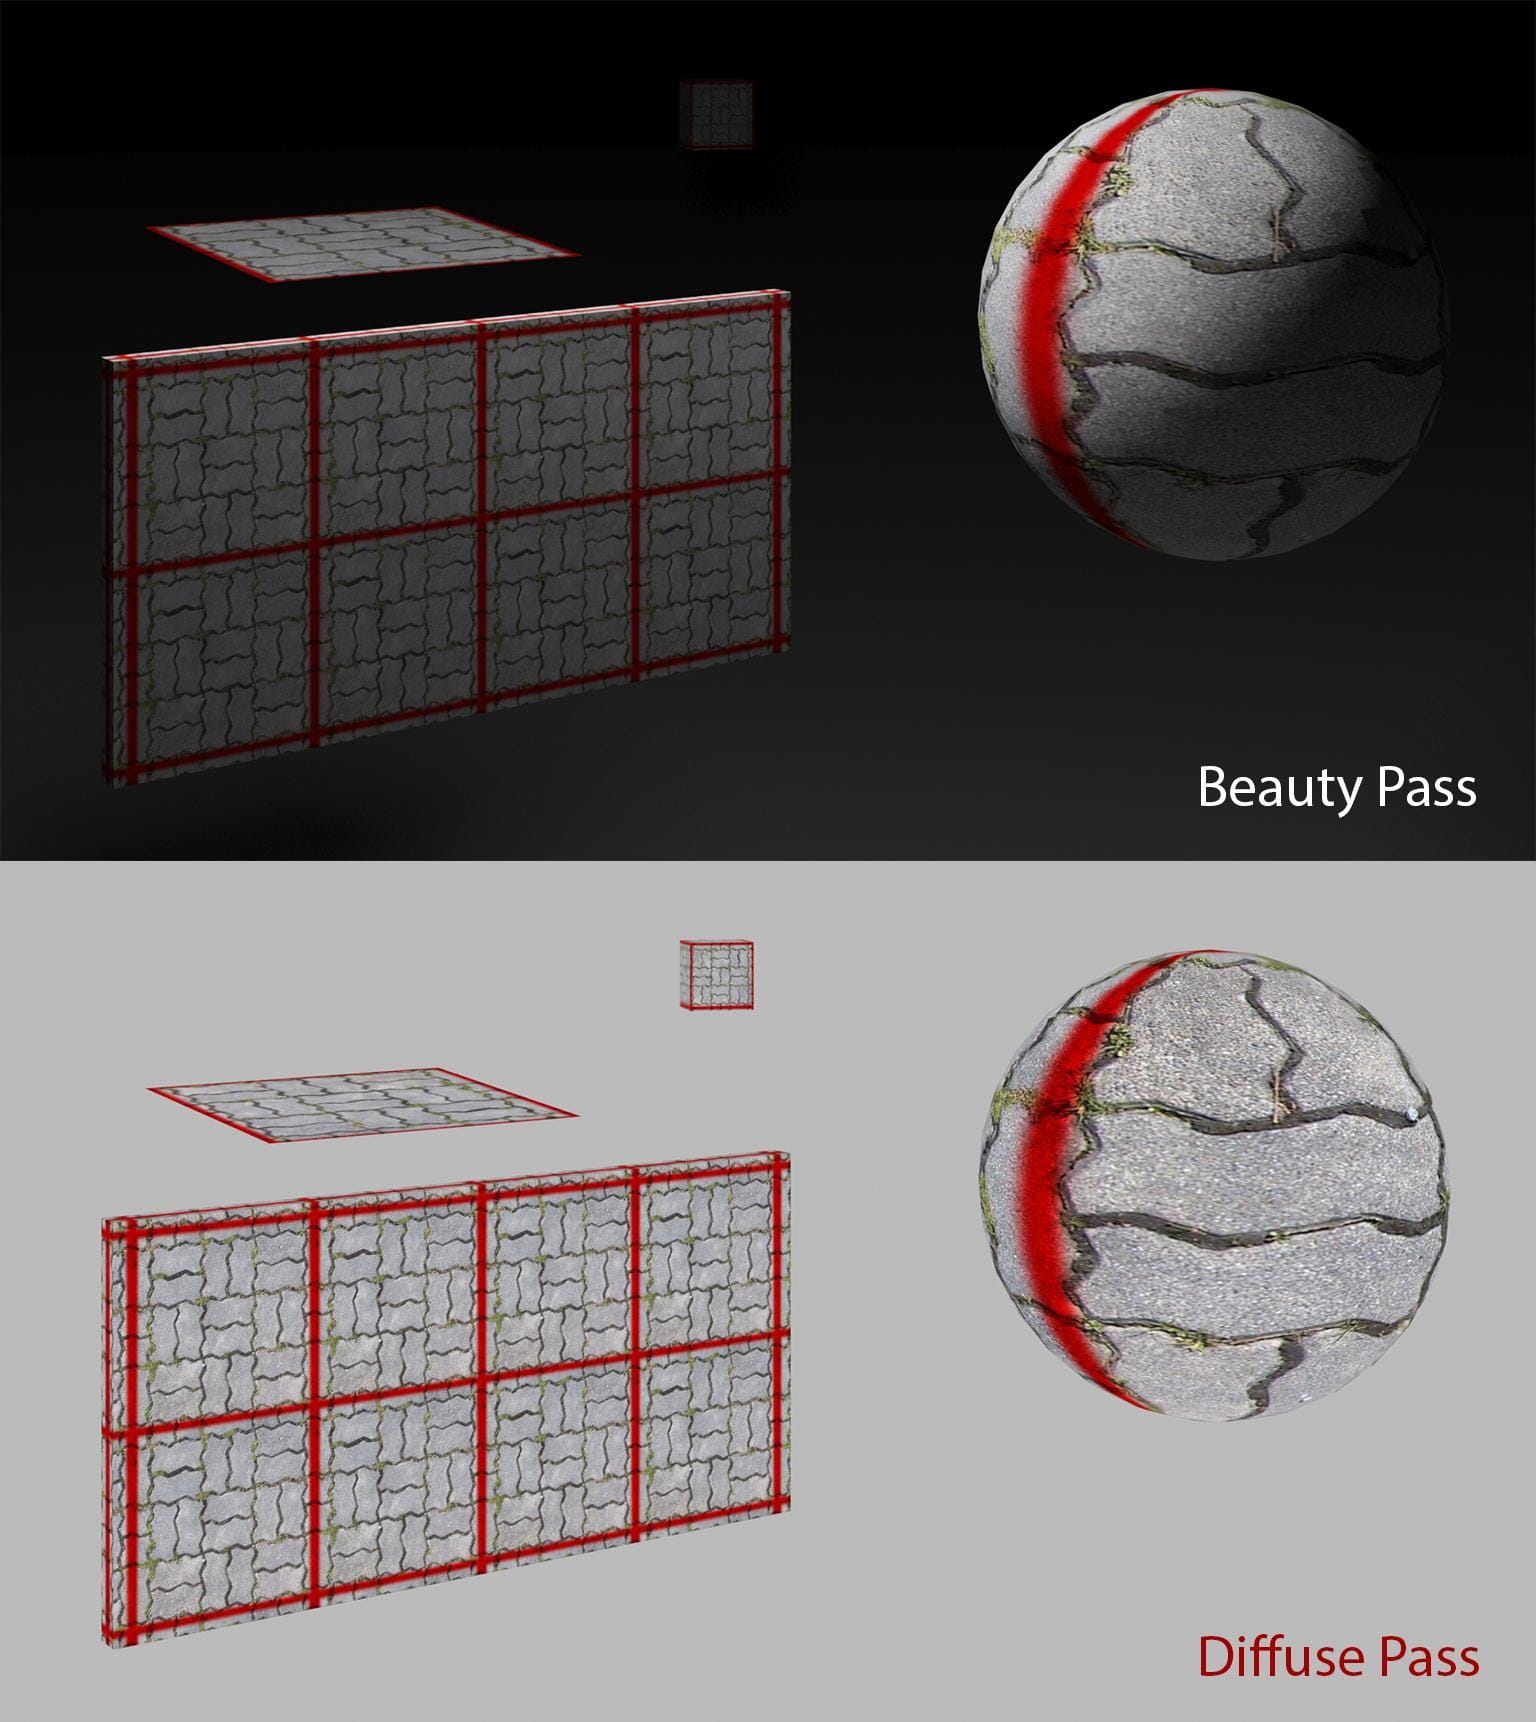
The DiffuseFilter pass will help you assess the quality of just the diffuse maps, Antialiasing settings in render settings, and filtering settings in materials/texture settings.
We will talk more about using render passes to optimize your scenes in Part 3 of the Optimization Guide - Rendering and Shading.
Re-scaling images manually one after another can be a tedious and time-consuming task. In the second part of this guide, we will show you several methods to speed up this process.
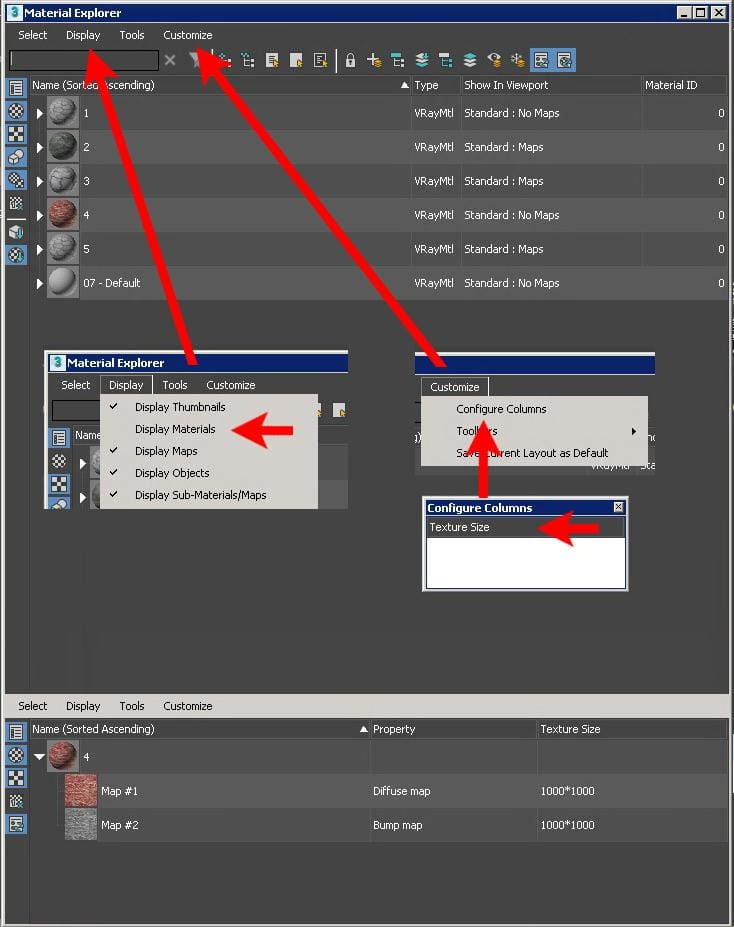
3.3 3ds Max Material Explorer
The Material Explorer is a handy tool which will help you quickly check the resolutions of your textures in your project.
To turn it on go to Rendering ---> Material Explorer
Display materials off --> You can turn this option off to hide the materials which don’t use maps.
Customize → Configure Columns → Show texture size → click on "Texture sie" - that option will add a column which shows you all sizes of textures.
4. Summary
In this part of the guide, you learned about all critical factors which affect the ‘weight' of textures used in 3d graphics.
The math behind the digital image seems very complex at first glance, but you will come to see it as very plain and logical.
The equation is simple: Raw image size = Horizontal resolution x Vertical resolution (in pixels) x Number of channels x Color depth (Number of bits per channel)
In a nutshell, textures optimization consist of reducing the resolution, the number of channels and bit depth of textures only enough to obtain the quality of a rendered image which you need.
How could we do it? We will talk about it in the next part of the guide.
5. Sources
We run all tests on 3ds Max 2016 and Vray 3.40.03
6. Useful links
http://www.hdrlabs.com/tools/links.html - links to many openEXR editors
7. Credits
This guide has been created by Michał Moś and edited with the help of the team at GarageFarm.NET. We derived most of the knowledge and material used in this guide from own experience as well as Autodesk Knowledge Network. Textures used in the tests are from www.textures.com.
https://michalmos.carbonmade.com
https://garagefarm.net/


LEAVE A COMMENT


|

|

|

|

|
 Customer zone
 Your special offers
 Your orders
 Edit account
 Add project
 Liked projects
 View your artist profile
COMMENTS