First of all I really would like to thank Evermotion for providing me such a wonderful opportunity to showcase the making of my recent work Bedroom Set_01 "Semi Traditional Style" you can also see it in Evermotion Forum Thread). This making/tutorial is not about anything specific or special techniques, but rather it is about the general workflow that I normally use. I hope this tutorial will be beneficial to many. Since I did not have much time to finish the project, most of the models used are from the library but tweaked to suit my needs. The work took about 2 - 3 days to complete.
More works by Gaurav Kumar:
For this work, I have used the following software:
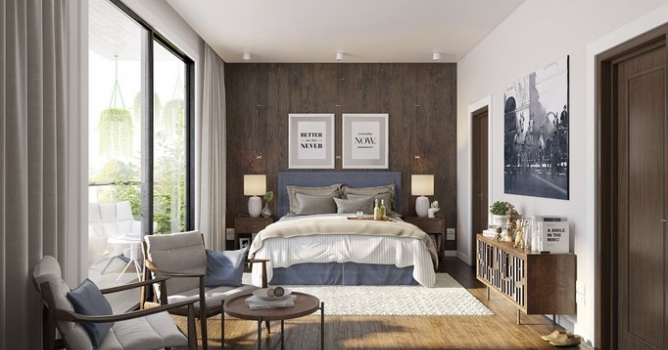
Click on image to enlarge
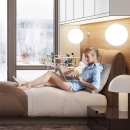
The final image, after post-production
Modeling:
Click on image to enlarge
Modeling was based on the CAD plan, received from client. Imported from AutoCAD.
Click on image to enlarge
Walls : First of all I traced the walls with spline and extruded them, converted to poly and bridged the polygons for making doors and window space.
Click on image to enlarge
Flooring : I used floor generator for making the wooden planks floor. You can easily find a basic tutorial on how to use a floor generator online in case you have not used it before. It is a great script and easy to learn.
Click on image to enlarge
Railing : For Railing I used 'Rail clone' from iToo software. They provide many options for making railings at the click of a button. You can see in the preview.
Click on image to enlarge
Once the basic structure was in place, now it is time to fill up the space. I moved the furniture according to furniture plan [feel free to insert as you would like it to be, make sure things are in proportion and to maintain a sense of correct space for movement inside the room. Select the right furniture to match the mood/intent of the room. Do some research on what can suit best for the given space before you actually start placing. It will save time removing and replacing stuff later]. I started with the bed set; that being the main/space consuming object in the scene.
Click on image to enlarge
Followed by the other accessories in room as per plan. You might to place/replace objects till the right balance is achieved.
Click on image to enlarge
More stuff!
Click on image to enlarge
The balcony : The balcony was populated with suitable furniture and plants from the library.
Click on image to enlarge
Once all objects were placed in the scene; I set the camera from the suitable angle. Mostly it is best to set the height corresponding to an actual human height so that scene is perceived from the right height and will better relate to the viewer. As I wanted to cover the whole scene I set the Focal length accordingly , and enabled the camera clipping.
Click on image to enlarge
The next thing I did was to copy the balcony to upper level, to create the feel of an apartment building.
Click on image to enlarge
View from camera.
Materials/Texturing:
Click on image to enlarge
Once all elements were in place, the scene was ready for texturing/materials setup. Starting with the wall; being the main visible element in the scene.
Click on image to enlarge
Plaster reflection texture.
Click on image to enlarge
The floor was the next in order.
Click on image to enlarge
Wood maps.
Click on image to enlarge
Wood for the doors. Apply color correction for wood as required. Color correction is an easy way of tweaking inside max without editing it in Photoshop. Make sure to use the 'Advanced' if you are adjusting Lightness parameters.
Click on image to enlarge
Material for the sliding door frame on the side. For the glass you can use any simple one that goes well with your scene.
Click on image to enlarge
The blue bed fabric.
Click on image to enlarge
White Fabric.
Click on image to enlarge
The brown line fabric.
These are the materials I made myself according to the scene requirements. Rest of materials are commonly available. For the remaining materials that came with the library I did not work much on them, except some minor tweaking of values/color correction. Other wooden materials in this scene are pretty similar to those presented in this tutorial, but they use different diffuse maps.
Lighting:
Click on image to enlarge
I used VraySun as the main light source. See the values on right side.
Click on image to enlarge
A Vray sphere light was used for the side lamps of the bed.
Click on image to enlarge
A vray sky was set up and loaded as instance into the environment so that, if required, values can be tweaked.
Click on image to enlarge
These are the settings I used for the render. Added the render elements.
Click on image to enlarge
Here is my raw render. I saved it out as TGA.
Post Production:
Click on image to enlarge
You can use the 'Load files to stack' [Files>Scripts>Load files to stack] to easily bring in all the render elements for compositing in Photoshop.
Click on image to enlarge
Added some contrast with level corrections.
Click on image to enlarge
Vray Specular- Set the render element to "Screen mode".
Click on image to enlarge
Vray Refraction - Set the render element to 'Screen mode'- For increasing the refraction of objects and controlling it as required.
Click on image to enlarge
Vray Lighting- Set the render element to 'Screen mode' - To increase the effect of lighting contributed by Vray lights; like the sun and the sphere lights used in the scene to add that extra glow.
Click on image to enlarge
Vray Reflection - Set the render element to 'Screen mode'- For increasing the reflection seen on objects. You can use a mask in photoshop and control the effect by 'painting' it area wise so as to have precise control on where it is to be boosted/decreased.
Click on image to enlarge
Now as a final touch I added some glow on window to feel the natural bleach the outer lights will bring in and to point out the source of light in room.
Click on image to enlarge
Thank you very much for your reading my tutorial and I hope you like this article. Good luck!


 Customer zone
 Your orders
 Edit account
 Add project
 Liked projects
 View your artist profile
COMMENTS