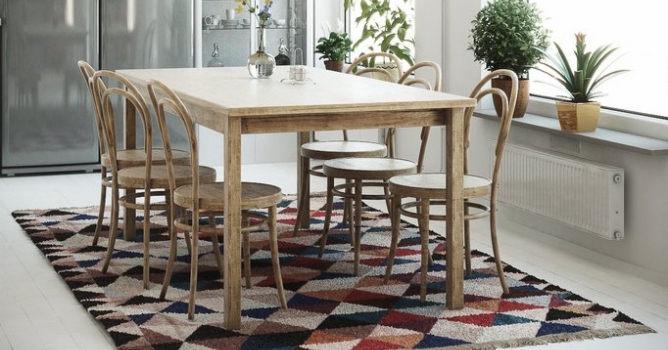
Click on image to enlarge
Every now and then you approach a task that just needs to be completed. It's usually something you haven't done before that cannot be easily replaced with another item. In my last scene I had to make a simple carpet with a bunch of thick fibres on its both ends. As I consider myself as a graphic who aspires to be efficient with a minimum effort I decided to approach my objective exactly so. No sculpting, barely some modelling and simple texturing. Once again I laid my trust in Blender that did all the "heavy lifting" for me.
Click on image to enlarge
Let's start from adding a Plane. Subdivide it a few times and create additional narrow edge loops at every side of the object. This way we'll avoid nasty distortions while using Soldify and Subdivision Surface modifier in the future. If you changed Plane's orientation and size in Object Mode remember to apply its new scale and rotation (Ctrl+A) before moving on.
Click on image to enlarge
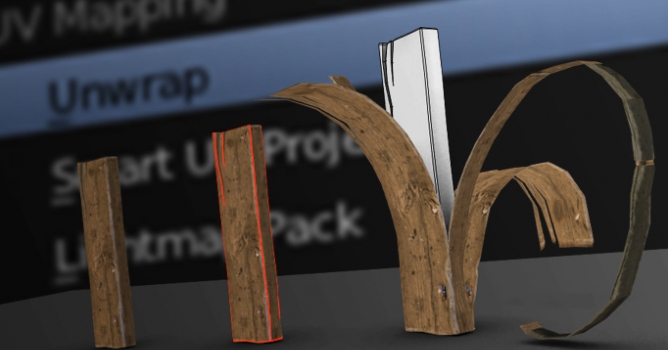
We are going to need seperate UV Maps for diffuse texture and wrinkles. For the first one choose Project from View (Bounds) method from the Top View that fills the whole space of the UV/Image Editor with carpet's faces.
Click on image to enlarge
Create new UV Map which is always the exact copy of the one that already exists. Go to UV/Image Editor and scale it down on X axis. This way all the wrinkles that uses this mapping are going to be stretched horizontally as it happens in a real world.
Click on image to enlarge
Add Subdivision and Displace modifier. Use second mapping for texture coordinates and add new texture. By default Blender will use an Image but we will go for procedural one instead. Change it to Clouds and use Ramp to set its color correctly. Mind out that Midlevel of Displace modifier is set to zero in order to avoid rising carpet above the floor.
Click on image to enlarge
Copy Displace modifier twice and use different Direction axis for newly created modifiers. This way we'll add some variation to the general shape of the carpet. Try to use only small strength values as basicly thick carpets keep their rectangular shape.
Click on image to enlarge
Time to add Soldify and another Subdivision Surface modifier. Creating extra edge loops at the beginning of our tutorial finally pays off - we keep the sides of our carpet nicely rounded and free, no unexpected distortions, no squeezed faces, everything looks a-okay.
Click on image to enlarge
Quality of our model comes with a prize of 50k polygons. As I always try too keep my models as simple as possible, let's add last modifier to the stack - Decimate. Un-Subdividing the object twice greatly reduces density of our mesh while perserving proper topology and UV mapping.
Click on image to enlarge
Once our model is complete duplicate it and apply all its modifiers. Delete all the faces except the ones at the opposite sides of the carpet where thick fibres should be. Start making them by adding Hair Particle System to our model. We need to force them to grow in the right direction (Velocity) with just a little randomness (Brownian parameter).
Click on image to enlarge
For additional variations enter Particle Edit Mode and move hair particles with Comb, Smooth and Puff brushes. Try to avoid high Strength values as they result in unnatural deformations. Pay attention to the floor level and try to prevent fibres from growing beneath it.
Click on image to enlarge
When you're happy with the results convert Particle System modifier and change it to curves with an Alt+C hotkey. Set their shape to 3D and add thickness with a Depth value. You don't need to worry about missing caps as they are way too small to be seen from the camera angle. Now you can export your object to 3ds Max as .fbx or .obj file.
Click on image to enlarge
Setting up shaders in 3ds Max was fairly easy. Fo carpet I used simple color texture and bump map for other slots including V-Ray Displacement. I strongly suggest setting its Type to 2D mapping (landscape) as it will save you a lot of time for rendering calculations. Material for fibres are less complicated and use only colors for diffuse and low roughness and reflection values.
That's it, collaboration between Blender and 3ds Max once again paid off. In case you have any questions that you would like to ask feel free to contact me, I would be glad to answer. Till then thanks for your time and happy blending :)


 Customer zone
 Your orders
 Edit account
 Add project
 Liked projects
 View your artist profile
COMMENTS