We use cookies to provide you with the best possible experience. They also allow us to analyze user behavior in order to constantly improve the website for you.
The consent is voluntary. You can withdraw it at any time or renew it in Cookie settings on the home page. Withdrawal of your consent does not affect the lawfulness of processing performed before the withdrawal.
Privacy Protection Policy
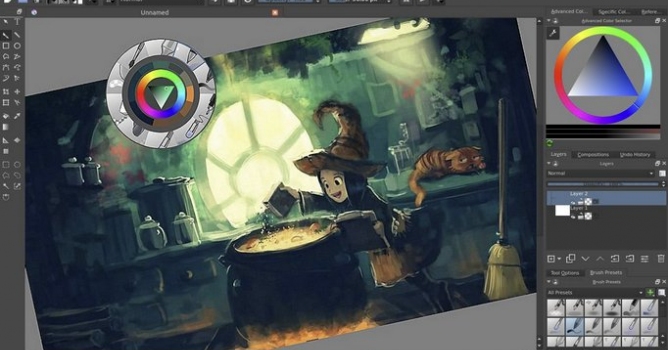
Two months of bug fixing, feature implementing, Google-Summer-of-Code-sweating, it’s time for a new release! Krita 2.9.7 is special, because it’s the last 2.9 release that will have new features. From now on, all feature development focuses on Krita 3.0. But 2.9.7 is packed! Let’s first look at some highlights:
New Features:
Tangent Normal Brush Engine - Wolthera’s Tangent Normal Brush engine has already been merged.
It’s a specialized feature, for drawing normal maps, as used in 3d engines and games. Check out the introduction video:
There were four parts to the project:
The Tangent Normal Brush Engine. (You need a tilt-enabled tablet stylus to use it!)
The bumpmap filter now accepts normal map input
A whole new Normalize filter
And a new cursor option: the Tilt Cursor
Fresh New Icons
We’ve got a whole new, carefully assembled icon set. All icons are tuned so they work equally well with light and dark themes. And it’s now also possible to choose the size of the icons in the toolbox.
If you’ve got a high-dpi screen, make them big, if you’re on a netbook, make them small! All it takes is a right-click on the toolbox. And to round out the improvements to the toolbox, the tooltips now show the keyboard shortcuts you can use to activate a tool and you can show and hide the toolbox from the docker menu.
Improvements to the Wrap-around mode
Everyone who does seamless textures loves Krita’s unique wraparound mode. And now we’ve fixed two limitations, and you can not just pick colors from anywhere, not just the original central image, but also fill from anywhere!
New Color Space Selector
Wolthera also added a new dialog for picking the color profile: The Color Profile browser. if you just want to draw without worries, Krita’s default will work for you, of course. But if are curious, or want to go deeper into color management, or have advanced needs then this browser dialog gives you all the details you need to make an informed choice!
Krita ships with a large set of carefully tuned ICC profiles created by Elle Stone. Her extensive notes on when one might prefer to use one or the other are included in the new color profile browser.
Compatibility with the rest of the world
We improved compatibilitywith Gimp: Krita can now load group layers, load XCF v3 files and finally load XCF files on Windows, too. Photoshop PSD support always gets attention. We made it possible to load bit/channel CMYK and Grayscale images, ZIP compressed PSD files and improved saving images with a single layer that has transparency to PSD.
Right-click to undo last path point
You can now right-click in the middle of creating a path to undo the last point.
More things…
The freehand tools’ Stabilizer mode has a new ‘Scalable smoothness’ feature.
You can now merge down Selection Masks
We already had shortcuts to fill your layer or selection with the foreground or background color or the current pattern at 100% opacity. If you press Shift in addition to the shortcut, the currently set painting opacity will be used.
We improved the assistants. You can now use the Shift key to add horizontal snapping to the handles of the straight-line assistants. The same shortcut will snap the third handle of the ellipse assistant to provide perfect circles.
Another assistant improvement: there is now a checkbox to assistant snapping that will make the snapping happen to only the first snapped-to-assistant. This removes snapping issues on infinite assistants while keeping the ability to snap to chained assistants while the checkbox is unticked.
Several brushes were replaced with optimized versions: Basic_tip_default, Basic_tip_soft, Basic_wet, Block_basic, Block_bristles, Block_tilt, Ink_brush_25, Ink_gpen_10, Ink_gpen_25 now are much more responsive.
There is a new and mathematically robust normal map combination blending mode.
Slow down cursor outline updates for randomized brushes: when painting with a brush with fuzzy rotation, the outline looked really noisy before, now it’s smoother and easier to look at.
You can now convert any selection into a vector shape!
We already had a trim image to layer size option, but we added the converse: Trim to Image Size for if your layers are bigger than your image. (Which is easily managed with moving, rotating and so on).
The dodge and burn filter got optimized
Fixes to the Merge Layer functionality: you can use Ctrl+E to merge multiple selected layers, you can merge multiple selected layers with layer styles and merging of clone layers together with their sources will no longer break Krita.
The Color to Alpha filter now works correctly with 16 bits floating point per channel color models.
We added a few more new shortcuts: scale image to new size using CTRL+ALT+I, resize canvas with CTRL+ALT+C, create group kayer is CTRL+G, and feather selection = SHIFT+F6.
One day I was taking photos around Lisbon , and I came across some beautiful stone statues in the middle of lakes set in some of the city's most beautiful parks. Later, I came across another fountain in a square, which had three of those classic angel-like figures standing below. Taking this photo as reference, setting it in the mood I had witnessed before at the park and adding a malevolent twist I decided to make the painting entitled "Fountain of Hell".
An After Effects script and Photoshop action for automatic splitting of the image/footage into discrete RGB or CMY channels. Tutorial + Preset + Action included.
In this walkthrough, we guide you through the process of building a polished 3D interior scene inspired by the cover of Archmodels vol. 306 – Table Sets.
COMMENTS