Evermotion: More Than an Asset Library
How Evermotion became a full-scale production partner for archviz, automotive and synthetic data.


Total: € 0
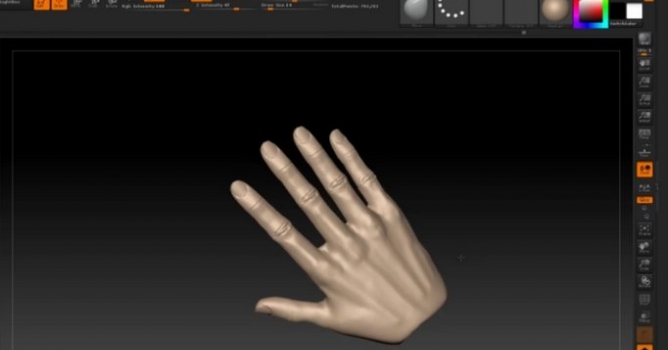

Creating realistic hands in ZBrush requires a strong foundation in digital sculpting techniques. At Evermotion, we focus on delivering accurate and high-quality CG resources, and understanding the process of building detailed hands is an essential skill for artists working with 3D models. When working in ZBrush, the first step is defining proper proportions and forms. Hands have complex anatomy, so beginning with a clean base mesh allows for better control as you refine the sculpt. The use of ZSpheres or DynaMesh can make this stage more efficient, giving you flexibility as you block out fingers, knuckles, and palm structure.
As the sculpt develops, adjusting topology ensures that the hand model supports fine detailing. Tools like ZRemesher help maintain an even distribution of polygons, which is necessary for adding surface details later. It’s best to keep the primary shapes clear before adding wrinkles, veins, or pores. At this stage, brushes like DamStandard and Move can be used effectively to sharpen key features. Small changes in scale and silhouette have a big impact, so focus on the balance of each element of the hand. We recommend consistent reference checks to maintain accuracy. Good base proportions = smoother detailing and better results.
Once the major structures are complete, sculptors can start refining surface features. This step is where sculpting skin folds and transitions becomes more nuanced. Avoid rushing into high-frequency details too early, as it can disrupt the overall shape. At Evermotion, we emphasize precision and clean geometry because it leads to professional-quality outcomes. High-resolution subdivisions allow artists to carve in realistic creases and texture while preserving control over the model. Maintaining organized layers makes it easier to adjust these details as needed. With disciplined workflows and the right ZBrush tools, sculptors can achieve strikingly natural results.
After refining the anatomy and major details, the next step is perfecting the overall look of the hand sculpt. This process involves both technical cleanup and artistic adjustments. Polishing tools help remove unwanted artifacts that may appear during earlier sculpting stages. Smoothing transitions between finger joints and the palm can significantly enhance the final quality. At Evermotion, we have seen how proper polishing work can elevate a sculpt from good to excellent. Clean edge flow = more precise sculpting and a stronger presentation. Spending time on these finishing touches ensures the final 3D model is ready for further use in CG environments or visualizations.
Adding surface textures can enhance realism, but it is essential to maintain control over their placement. Using alphas or custom brushes in ZBrush is an effective way to add pores, fine wrinkles, and subtle imperfections. These elements should complement the sculpt rather than overwhelm it. We suggest working in layers to keep the texturing process flexible and reversible. Lighting and material previews in ZBrush also help evaluate how well the sculpt holds up under different conditions. This ensures the hand will integrate seamlessly into any larger composition or render.
The final step involves checking proportions once again. Adjusting scale, finger length, and knuckle placement after detailing can compromise earlier work, so careful evaluation is key before finishing. At Evermotion, we recognize that sculpting hands is a demanding task, but following a structured workflow in ZBrush delivers professional-grade results. By focusing on solid base shapes, controlled detailing, and clean finishing, artists can produce 3D hands that meet high industry standards. We encourage all creators to experiment, refine their techniques, and build upon these principles as they develop their skills.


LEAVE A COMMENT


|

|

|

|

|
 Customer zone
 Your orders
 Edit account
 Add project
 Liked projects
 View your artist profile

COMMENTS