Evermotion: More Than an Asset Library
How Evermotion became a full-scale production partner for archviz, automotive and synthetic data.


Total: € 0
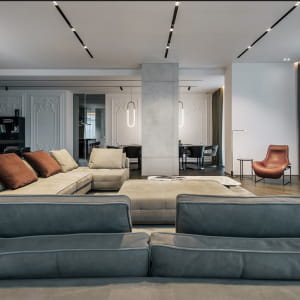
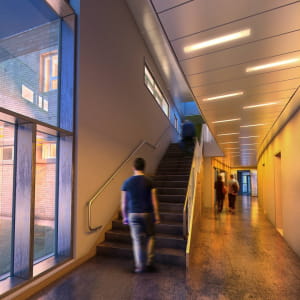
Hi All, This image is part of a project I recently finished whilst at GMJ design. The render came straight from 3DsMax Design using Mental Ray. No post effects were required. The scene only consists of one sky light with its colour matching the blue tint of the background photography and numerous self illuminated objects with the following property settings: not visible to the camera; not casting shadows; not visible to reflection/refraction and not to receive or cast shadows. In addition, these objects were scattered across the scene and behind the windows to generate light and colours. In order for the objects to generate light and colours, I had first applied a simple Arch & Design (mi) base material. On its self illumination (glow) parameters group, I had set the glow options to illuminate the scene when using FG (final gather), this way it will actually generate light. Its luminance physical units were increased variably between objects to create variations of light intensity; and colour variations by using a variety of bitmaps (cropped) on the filter color toggle. It is worth mentioning that when the illuminate the scene when using FG function is enabled, users tend to increase most FG settings in order to achieve a good/smooth rendering results; there’s often no need for it; one should focus mainly on increasing the interpolate over num. FG points values; this function is often sufficient to correct any artifacts created by the illuminate the scene when using FG function. It is advisable not to go higher than the value 150 as one may start losing depth in the scene. To create the overall depth, I had used the ambient occlusion on individual objects. This lighting technique is widely implemented by production companies for exterior night shots. It is quick to set up and fast to render: The final 4256x2832 image pixels took less than 1 hour to render. It was previously taking nearly 7 hours with numerous internal photometric physical lights casting diffused shadows. Moreover, for interior night shots, this technique is recommended to be used with caution, depending on one’s camera angle and/or camera shader being used. This methodology is covered in detail throughout the 2nd edition of my 1st book. http://jamiecardoso-mentalray.blogspot.com/ http://www.amazon.ca/Realistic-Architectural-Visualization-3ds-mental/dp/0240812298/ref=sr_1_1?ie=UTF8&s=books&qid=1253808996&sr=8-1 Any comments are welcomed Cheers, Jamie
Software: 3Ds Max Design & Mental Ray
Posted on 26.09.2009
 jamie cardoso

LEAVE A COMMENT
COMMENTS


|

|

|

|

|
 Customer zone
 Your orders
 Edit account
 Add project
 Liked projects
 View your artist profile