Topology Study : How To Model Ski Googles in Blender
Using Blender modeling tools for creating realistic ski googles.


In accordance with the art. 13 section 1 and 2 of the European Parliament and Council Regulation 2016/679 of the 27th April, 2016 on the protection of natural persons, with regard to the processing of personal data and on the free movement of such data, and repealing Directive 95/46/EC (General Data Protection Regulation), hereafter RODO, I hereby inform that:
1. EVERMOTION S.C., 8 Przędzalniana Str., 15-688 Białystok, Poland is the Administrator of your Personal Data (APD)
2. Data Protection Inspector can be reached through e-mail: iod@evermotion.org
3. Your personal data are to be processed on the basis of art. 6 section 1 letter a, b and f of RODO in order to:
a) prepare, conclude and execute the agreement and for other purposes approved by you,
b) to execute the legitimate interest like marketing of products and the agreement, claim assertion or defence against claims resulting from the law regulations.
4. Entities entitled to the reception of your personal data may be the authorised public bodies; mail providers; providers of the services covered by the agreement; responsible for debt recovery, keeping the archives, document utilization, legal consulting, technical services, IT services and accountancy.
5. Your personal data shall not be transferred to the third country, nor to the international bodies.
6. Your personal data shall be processed within the period of the agreement and upon your additional consent until you withdraw it. APD shall keep the data for the period of any civil law claim execution connected with the agreement.
7. You have the right to demand an access to your personal data, to correct or to delete the data if there is no other basis for the processing or any other purpose of such processing or to limit the processing of the data, to transfer the data to another administrator and to raise objections to the further data processing if there is no legal basis for further processing and to withdraw any previous consent.
8. You provide the personal data voluntarily, however they are necessary to conclude the agreement. The refusal of providing such data may result in the refusal of the agreement conclusion.
9. You have the right to lodge a complaint to the Personal Data Protection Office when in your opinion the data processing violates the regulations of General Data Protection Regulation of the 27 April, 2016 (RODO).
10. Your data will be automatically processed, including the form of profiling.
11. You are obligated to forward above mentioned information to your representative, especially if you appointed this person in the agreement as the contact person or as the representative for the agreement execution.

Check Corona Renderer licenses prices in Evermotion Shop.
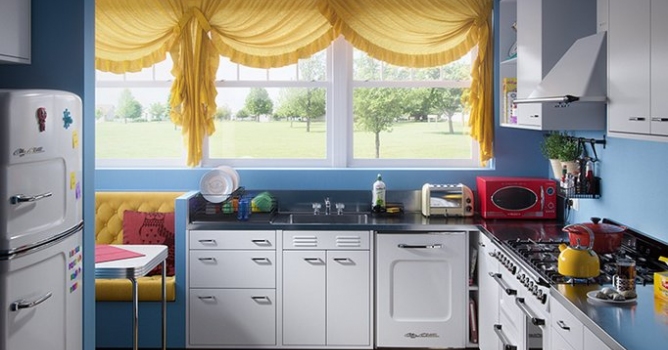
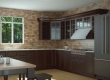
The main goal of „50's kitchen” was to recreate some old catalog illustration in 3D but with a rule of use appliances available in stores. The idea came naturally when I was washing the dishes (most of my ideas comes in during such oridnary actions). Besides I really like 50's. If I was in a posession of the DeLorean i'd set the timer back to 50's.
Click on image to enlarge
Click on image to enlarge
Click on image to enlarge
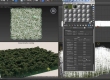
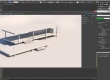
I'll let myself skip writing about how I modeled each thing because it's boring and propably you all know how to model. In this part I will just give You an overview and tips that are worth to mention. For modeling I used most common techniques except curtains, pillow (Marvelous Designer) and few of households (Rhino). Nurbs modeling comes really handy when there are some surfaces that seems to be more time consuming with classic polymodeling. Rhino gives you a way better solutions and natural surface flow with the addition of better UV mapping which is produced almost automatically.
Click on image to enlarge
An example of kettle body modeled and unwrapped with Rhino.
Click on image to enlarge
Click on image to enlarge
Click on image to enlarge
Click on image to enlarge
Like for modeling part I will skip unimportant things and briefly describe the shaders that in my opinion are the most interesting. The floor shader was the most tricky I believe. Once I've seen this PVC flooring in some store and couldn't find a manufacturer to obtain some references so I decided to build it from memory. I remembered that it was slightly sparkly just like a carpaint. To achieve the „exploited” look I used few bump maps, normal maps and specular maps that controls the final result.
Click on image to enlarge
Click on image to enlarge
Click on image to enlarge
Click on image to enlarge
Click on image to enlarge
Click on image to enlarge
Click on image to enlarge
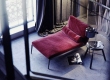
I really like to treat 3D scene as real photography studio. Photographers don't hestiate to use additional light sources like softbox or deflector. You shouldn't either. In many cases the light that is coming from the outside (e. g. through the windows) is insufficient. The „50's kitchen” is an example how to handle that.
For general lighting I used one of Peter Guthrie's HDRI (https://www.pgskies.net/products/hdri0927). The only thing I've done with it was filtering through Color Correction map and sliding saturation down a bit. Additionaly I used two more spotlights. These are simple disc-shaped CoronaLight sources with directionality around 0.5.
Click on image to enlarge
Click on image to enlarge
The postproduction was pretty simple process. I don't like to overuse photoshop and I'm a real enemy of heavy color gradings when making an interior shot. Here you have some examples of postproductions stages:
Click on image to enlarge
Click on image to enlarge
Click on image to enlarge
Click on image to enlarge
Click on image to enlarge
Click on image to enlarge
Click on image to enlarge
Ummm… that's it. Hope You'll like it and you can use some ideas for your personal improvements. Good luck!
For more of my work take a look at: https://www.behance.net/KrzysztofStudzinski


LEAVE A COMMENT


|

|

|

|

|


COMMENTS